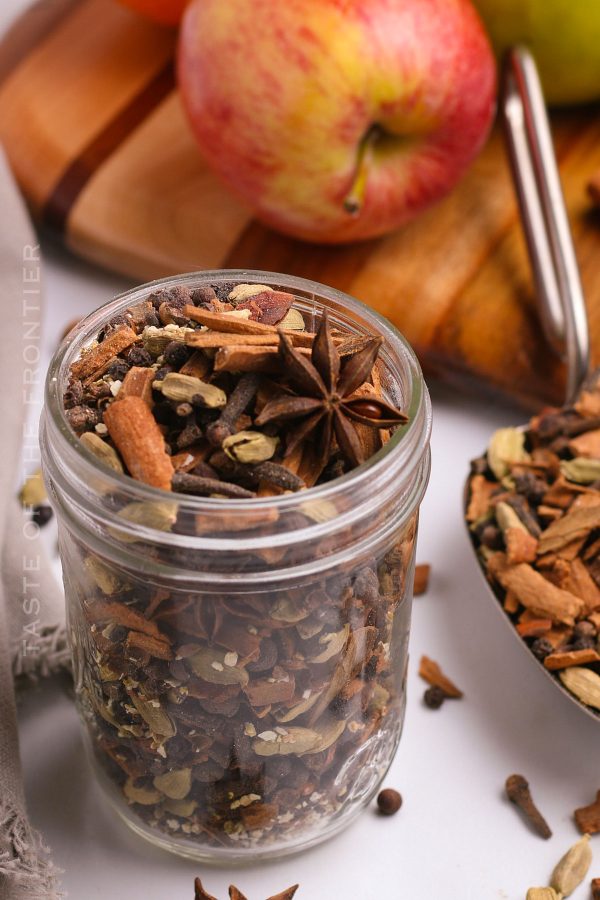
Mulled Wine Spice Mix not only makes for a warm and inviting way to get cozy on a chilly night. But it’s great for gift-giving to neighbors as well as using in a simmer pot on the woodstove too.
With the chill of winter setting in, isn’t there something absolutely magical about curling up with a warm mug filled with a spicy, aromatic beverage? The steam rising from a ruby-red liquid, hints of citrus swirling with whole spices, every sip a warm embrace.
Not only is the flavor amazing, but the aroma that will fill your home as you mull that wine is simply wonderful. That’s the magic of a mulled wine, and today, I’m sharing my super special Mulled Wine Spice Mix with you!
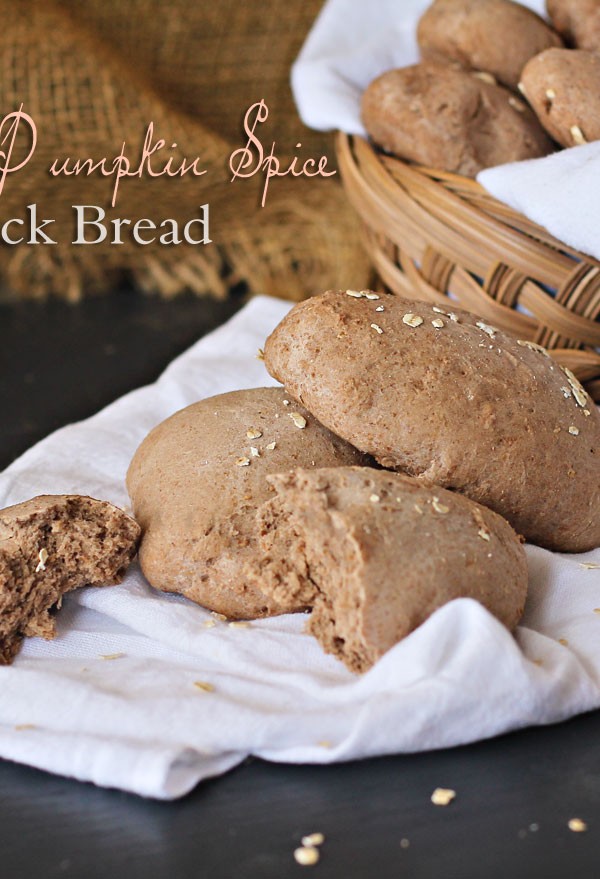
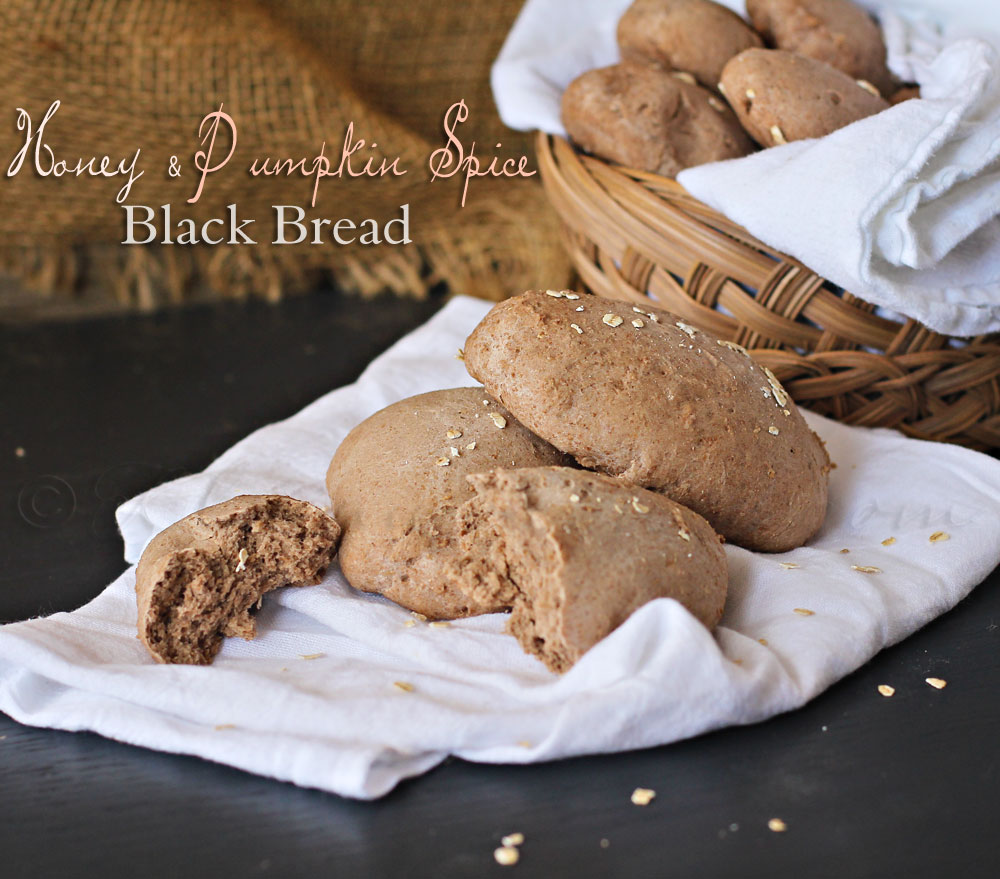
So I have this thing for bread. I love it! I can’t get enough, especially when it comes to specialty breads. I love the little loaves they bring in the nice warm basket when we dine out at the steakhouse. I literally ration out what I have to when the family starts wanting some- but for the most part, I don’t like to share. Since it’s been a while since we have been able to dine out like that- I decided I would just make my own. I really love the smell of the dough rising, I love kneading it & then there is the smell of it baking. Oh my- my stomach is growling as I’m writing this. So – you get it, I like bread- a lot. I don’t need to say it anymore. At least for now.
So I had a little fun at the store the other day. I found the Pumpkin Spice Marshmallows that are out for the season. YAY!!! I have been seeing them around & knew I wanted to try them. I have a serious marshmallow obsession. I grabbed a bag & did a little happy dance there in the isle. It was all I could do to NOT buy all the other flavors they had available there too. I knew exactly what I was going to do with these though. You guessed it…. I love Yummy Bar Recipes!
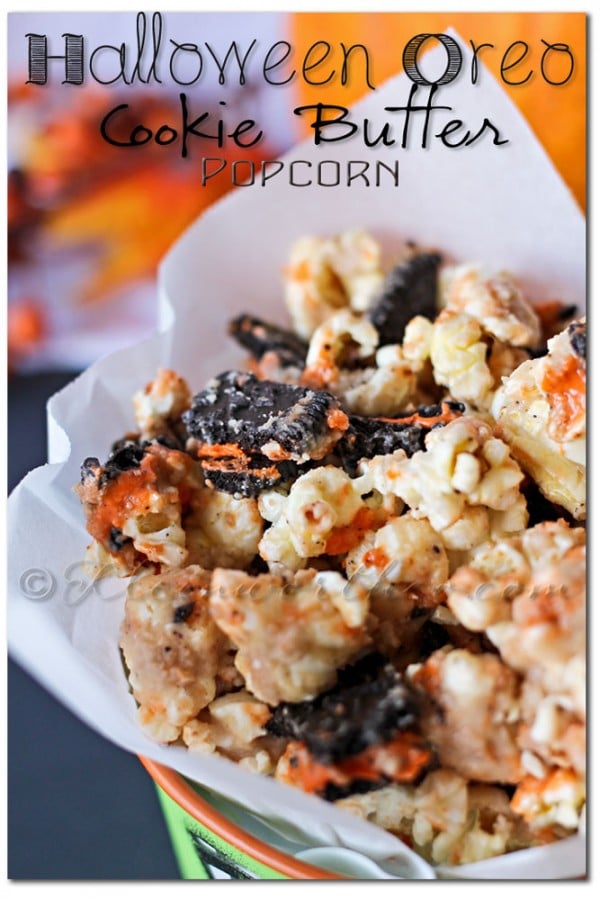
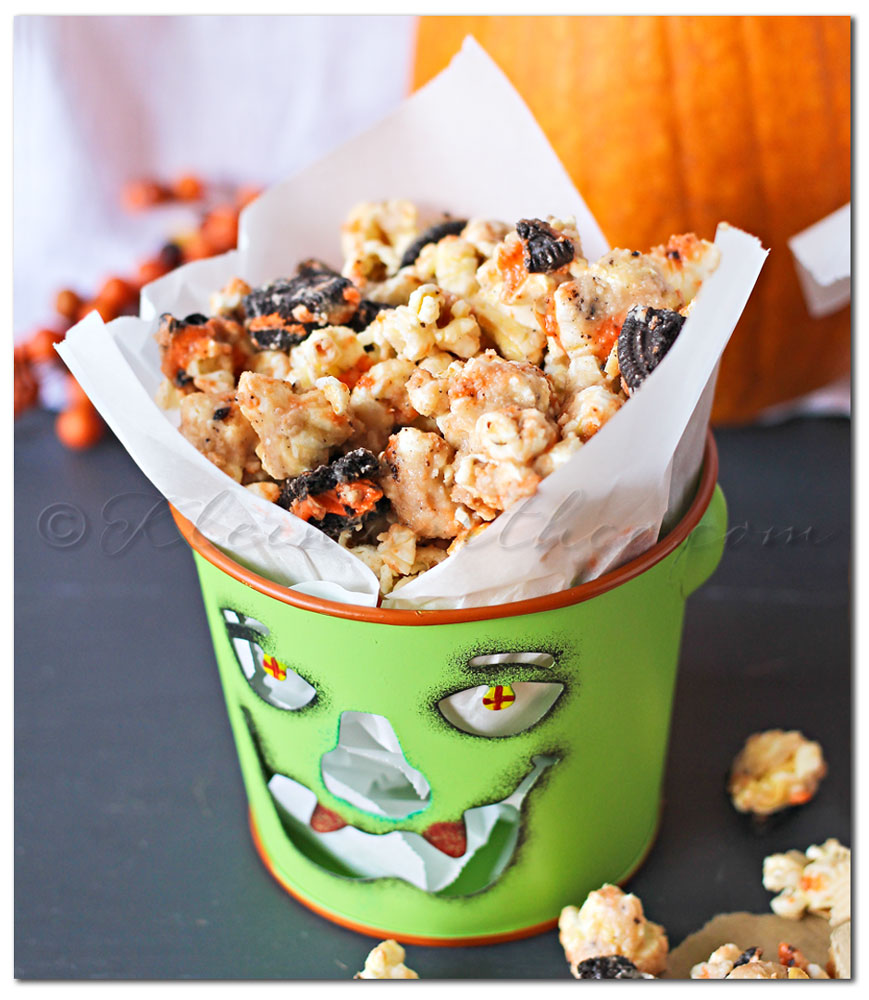
I adapted this from my White Chocolate M&M Popcorn I made back in July. The family has been begging me to make it again with the festive fall candies but I wanted something a little different. I used the super fun Halloween Oreo’s instead. I love the pop of the dark cookie against the orange filling with the popcorn. The kids love it & it’s so YUMMY!
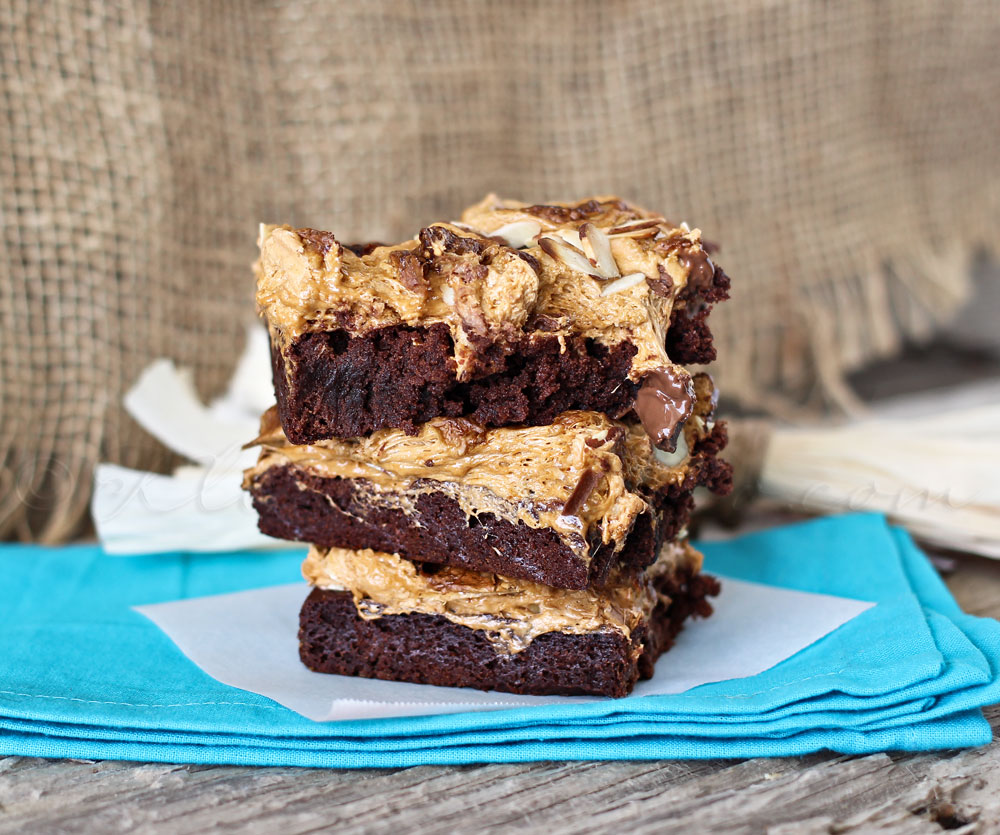
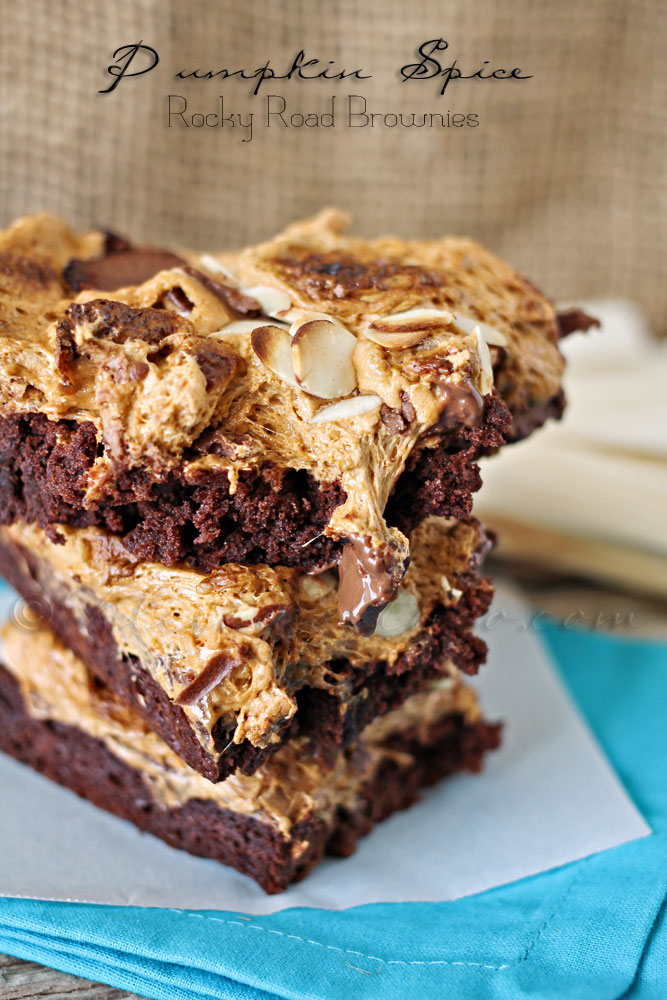
Oh my goodness- I could eat the whole batch in one sitting.
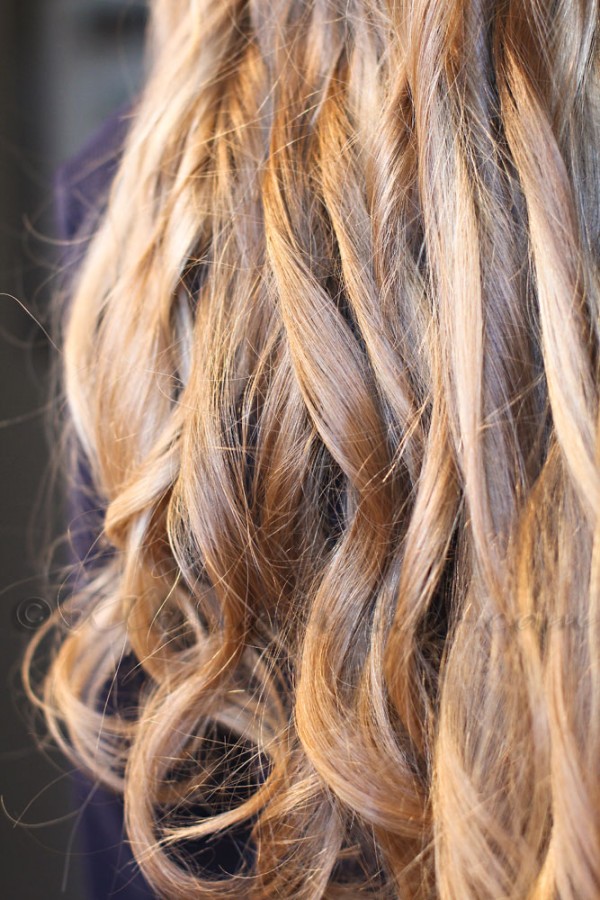
For easy beach waves , as part of a sponsored post for Collective Bias® I created this hairstyle using Conair Curl Secret for my daughters.
Do you love the messy beach wave look? Being a So Cal native- it’s my “go-to” style. But you know- it’s not easy to achieve especially for my girls who want to wear their hair the same as I do when we go places. They have waist length hair & they like it wavy/curly for anything special, when I say special- that means any time they are leaving the house. Do you know how time consuming it is for me to curl hair for both of them?? By the time I’m done with them I barely have time to style my own hair. But really- I love their hair when it has those soft messy beach waves. We tried the Conair Curl Secret on them both & found safe & easy way for them to create that beautiful style on their own.
Everything you need to know to use it is on the back of the packaging so you know what you are getting before hand.
It’s about the size of a flatiron & about the same weight as a blow dryer. So easy for the girls to use.
How to curl hair. Choose your setting- for either waves or tighter curls.
This is the munchkin. As you can see- she has naturally stick straight hair.
Curls fall out usually before we leave the house- so I was looking forward to seeing just how long this would last on her.
1 – Be sure to brush out the hair well so there are no tangles. Hair needs to be clean & dry.
2- Since her hair is so long, we pulled the top half up to work on the bottom section first.
3 – Separate out a 1/2″ – 1″ section of hair that you will be curling.
4 – Place your section of hair into the hair guide starting at the point where you want the curl to start.
For long hair like the munchkin here- I recommend you start several inches from the scalp.
5- Close the handle together – the hair will automatically be drawn into the curl chamber.
6- There will be 2 sets of slow beeps. Wait for the 3rd rapid beep that tells you it’s time to release.
7- Release the handle & allow the curl to fall out of the curl chamber.
This is what we had after the first curl.
8- Repeat through the bottom section.
9 – Release the top section of hair & repeat the steps though all of it as well.
This is what we had when we had finished all of her hair.
10 – Shake out & use a pick lightly though the hair to loosen the curl & give that wave.
11- Add a little texturizer to keep those curls separated & beachy.
It turned out so pretty & I love that it was easy enough for even this 10 year old to do on her own.
Now they can do their own waves whenever they want to.
We then tried it on my older daughter’s much thicker hair- turned out GORGEOUS.
Loved that the waves stayed in until the next day – which typically doesn’t happen for the munchkin.
Things that sold me on this…
Walmart sells this priced at $99 which is a great deal compared to $150 on and www.curlsecret.com
It creates long-lasting curls
It’s a time saver and easy to use
No chance of burning yourself – suitable for a young teen.
Not only is this great for creating beautiful hair for the upcoming holiday season….think Holiday Cards, Holiday Parties, etc. But this is a fabulous gift for those hard to buy for teens & tweens. I know you all have one on your list that would love one of these. It’s simple & my daughters had beautiful beach waves in about 10 minutes.
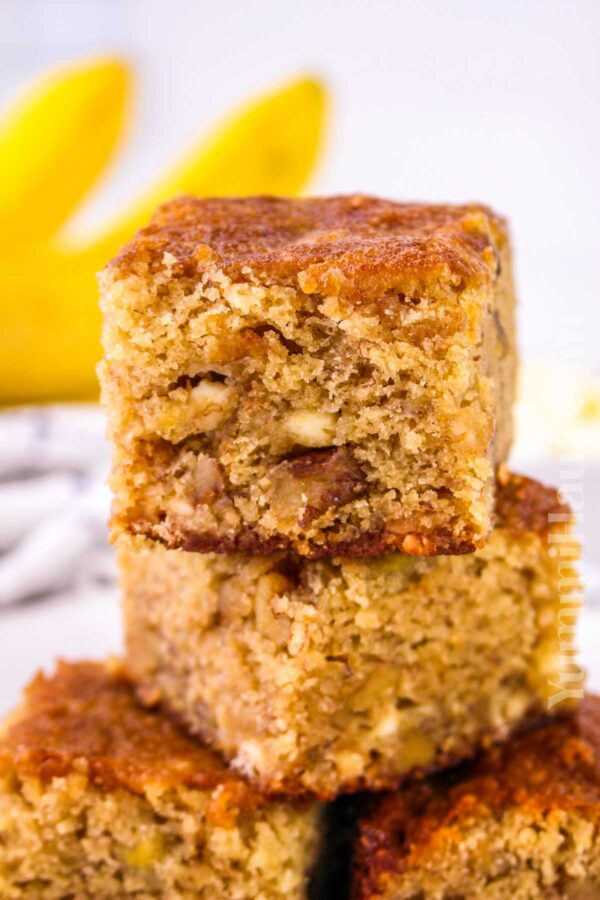
Chewy and fudgy Banana Blondies with ripe bananas, chopped walnuts, white chocolate chips, and a touch of vanilla. An easy sweet breakfast or afternoon snack.
This easy recipe makes gooey and moist banana blondies packed with mashed bananas and vanilla flavor, but I added my own twist: hazelnuts and chocolate chips.
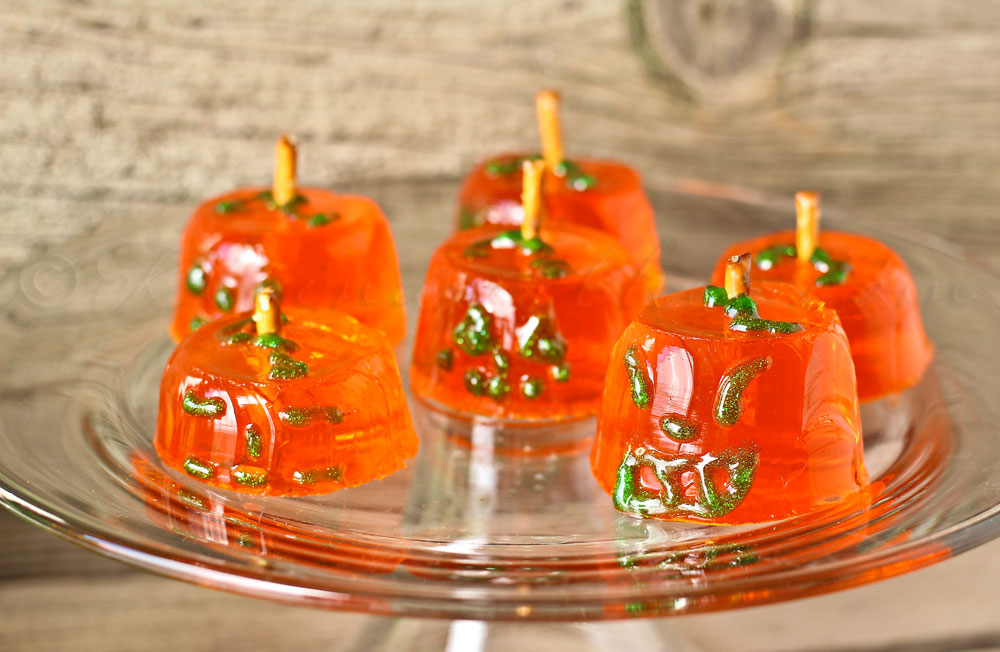
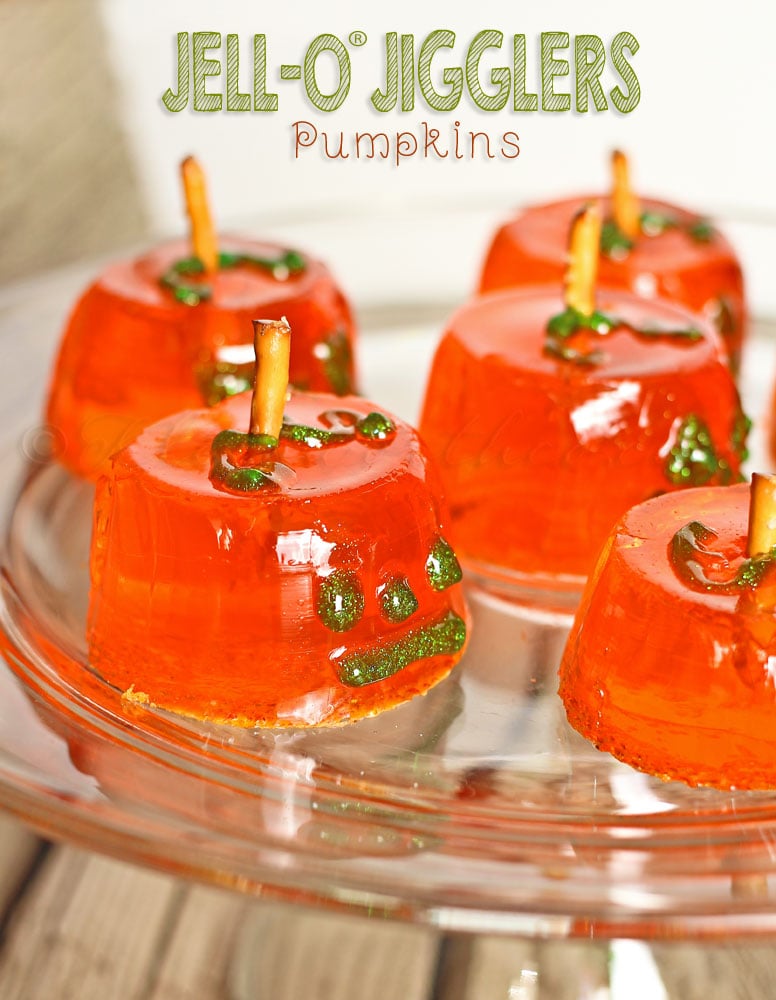
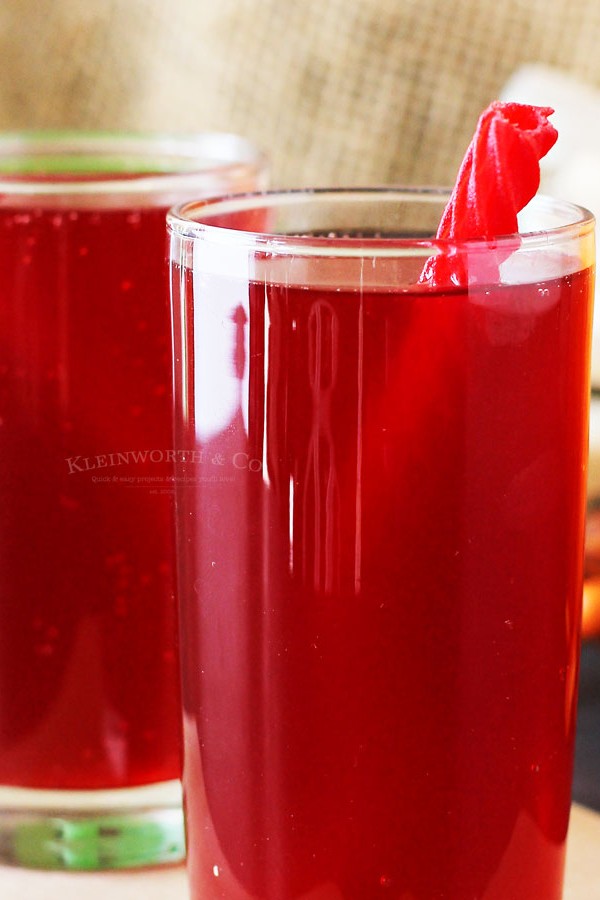
There are some things in this world that bring instant happiness in my world. One of those things is JELL-O®. I will never forget the first time my youngest tried JELL-O®. She looked at me & said “WOW mom – this sure is bouncy!” That cracked me up & made me really take notice of just how fun JELL-O® is for all ages.
As you have seen, I have been planning a little Halloween Party of sorts here for the kids & their friends before the trick-or-treating starts. I have been testing out all sorts of recipes to serve. I decided that since JELL-O® is so much fun & so versatile- I would get a little creative with the JELL-O® JIGGLERS for some really great Halloween Party Snacks.
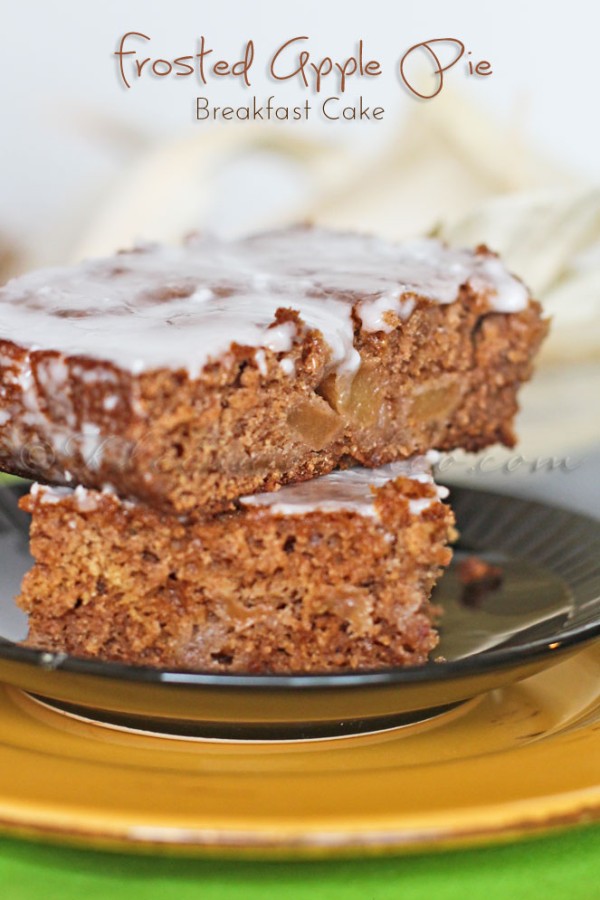
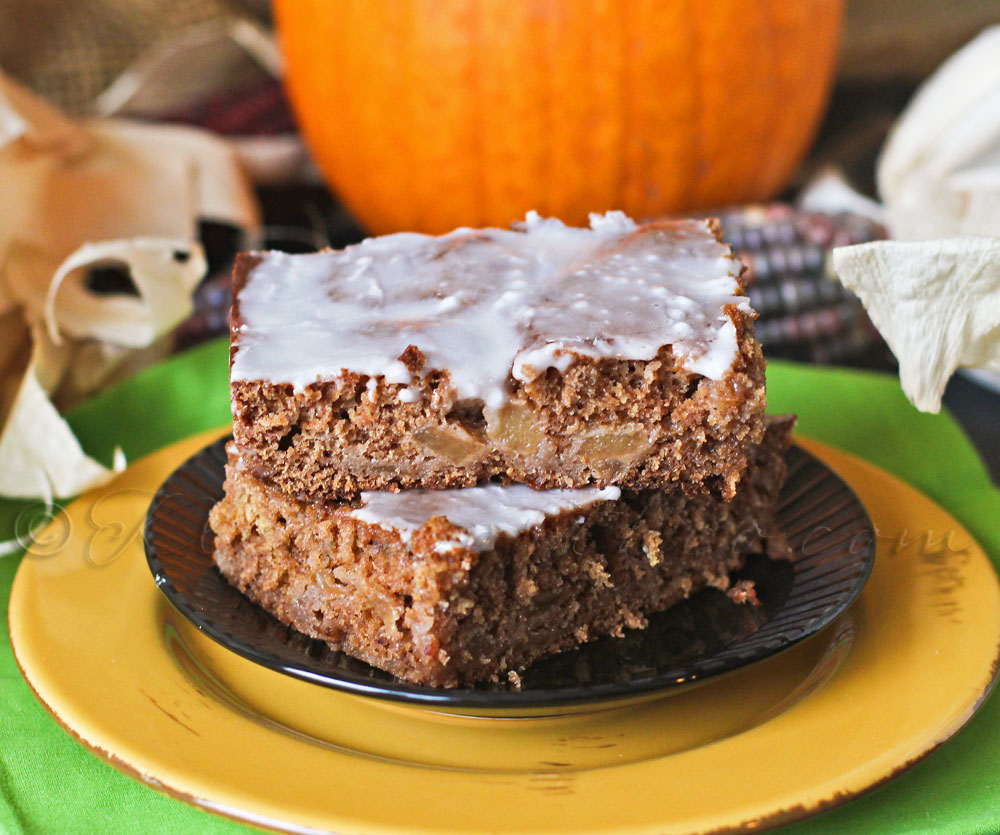
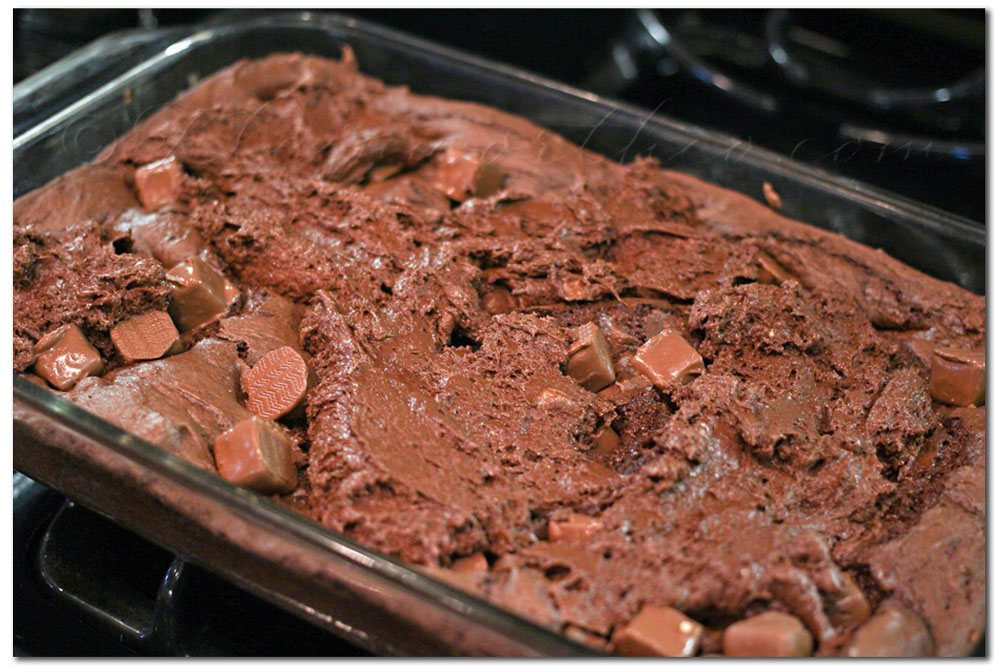
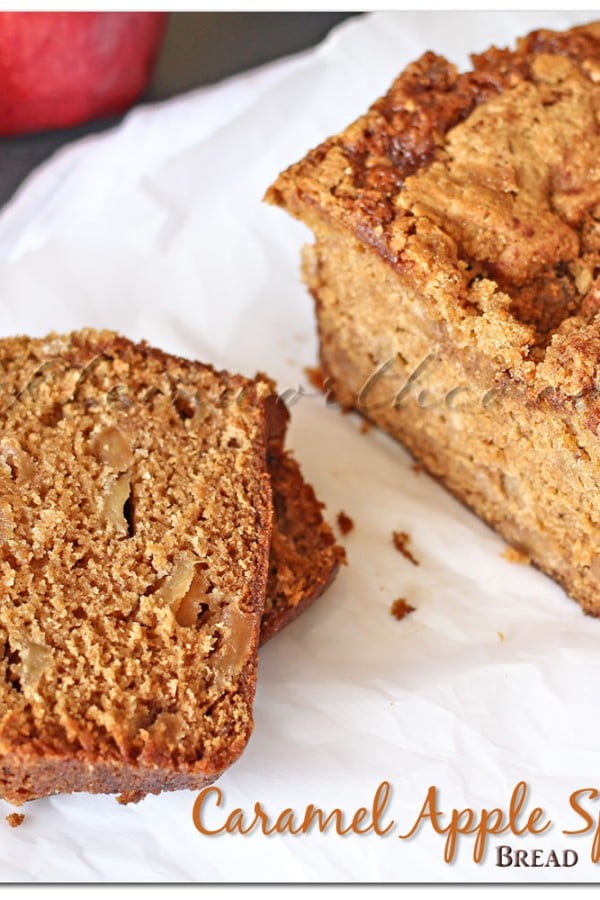
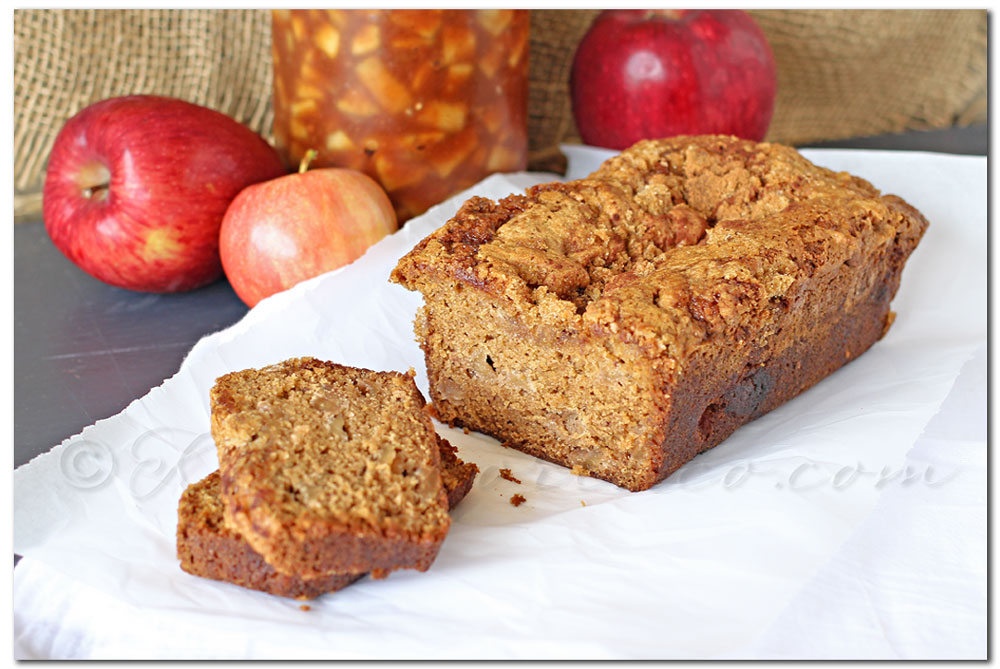
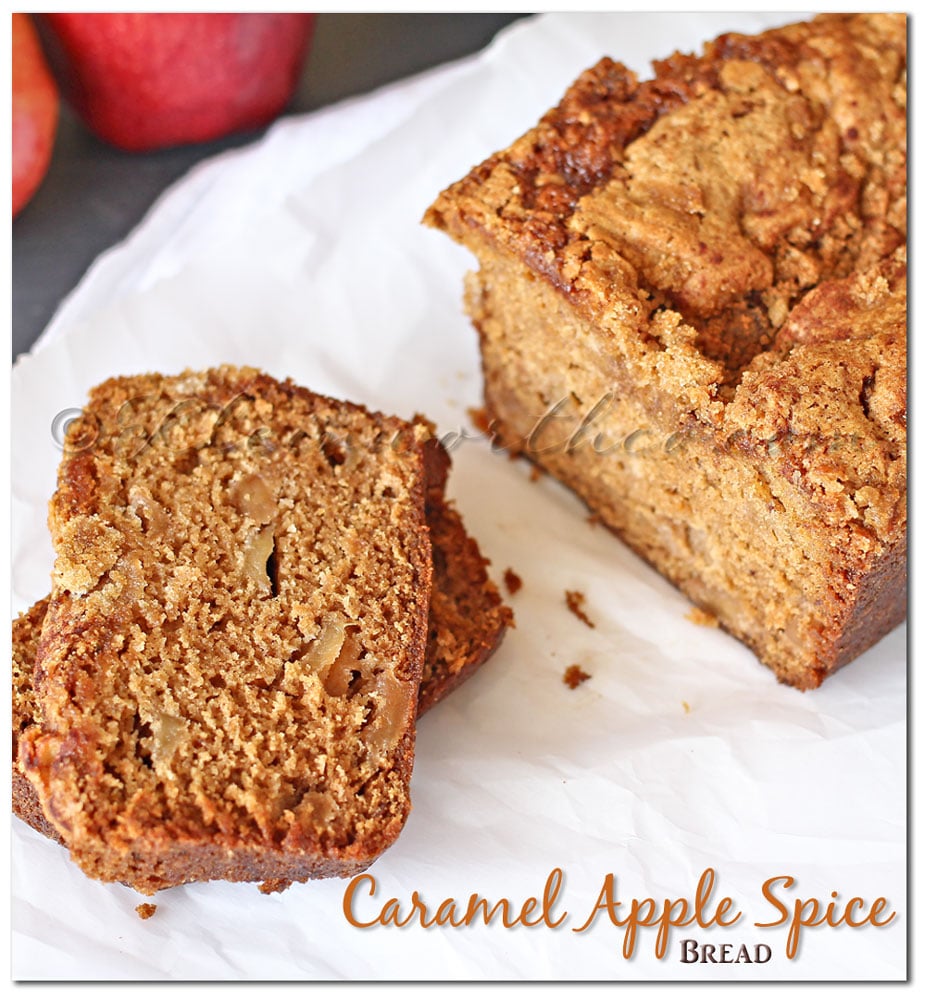
As we are coming to the end of the fresh produce season here, I am spending lots of time visiting the farm down the road picking up apples 40 pounds at a time. I’m canning as many jars of applesauce, apple pie filling & apple butter as I can to see just how long it will take me through the cold months here. At the same time I am using some of those things in my baking for the kids & their breakfast. This time I decided to use some of that apple pie filling & make them a frosted breakfast cake. Rarely do I add the frosting for them but this one just seemed like the right recipe to do just that.
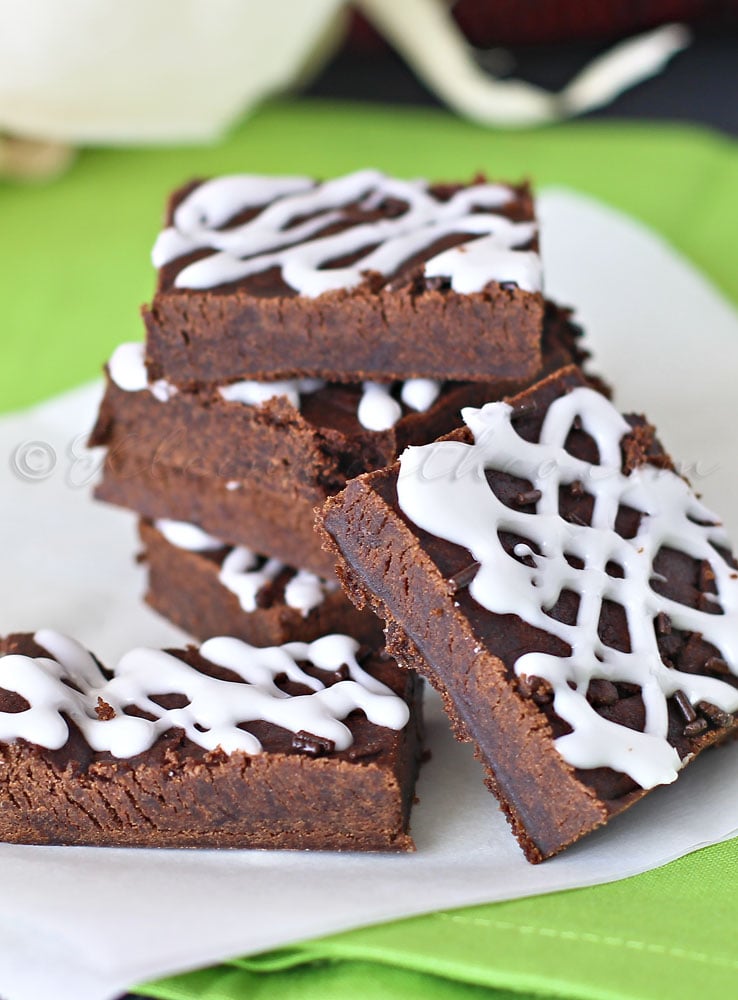
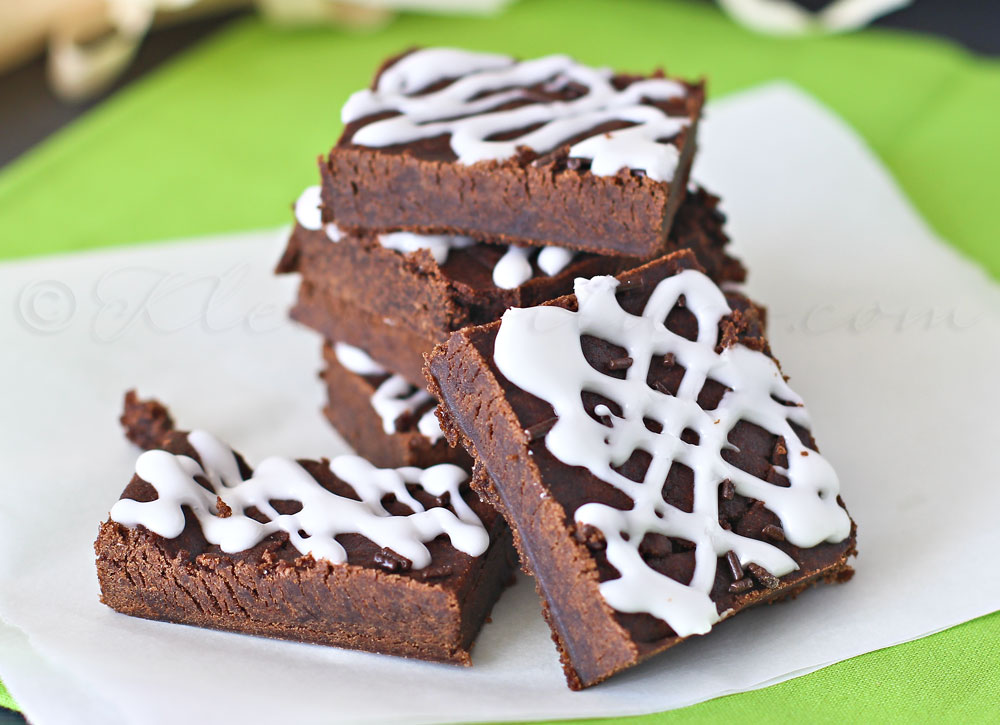
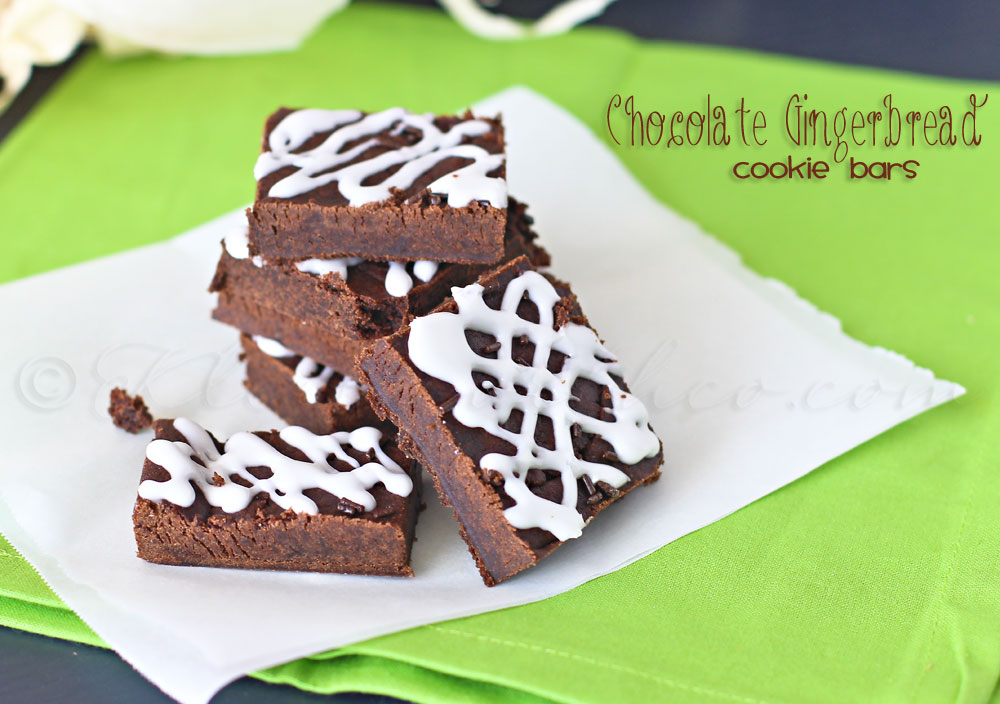
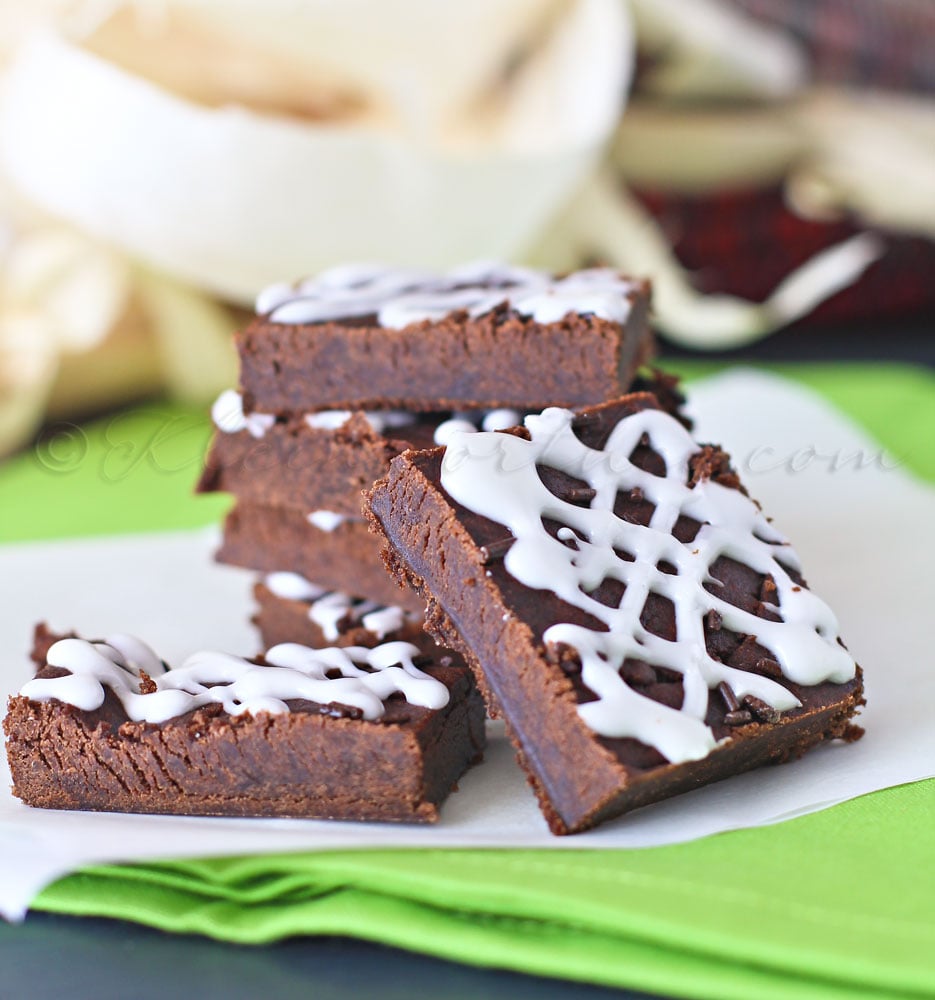
Remember last week when I shared with you my Caramel Gingerbread Ice Cream Cake? Well I used my favorite recipe for Chocolate Gingerbread cookies to make that. I wanted to share that recipe with you all here today because I love you guys & I know you will really LOVE these cookie bars. Plus- you won’t believe just how simple they are. You know how I love simple- right?!
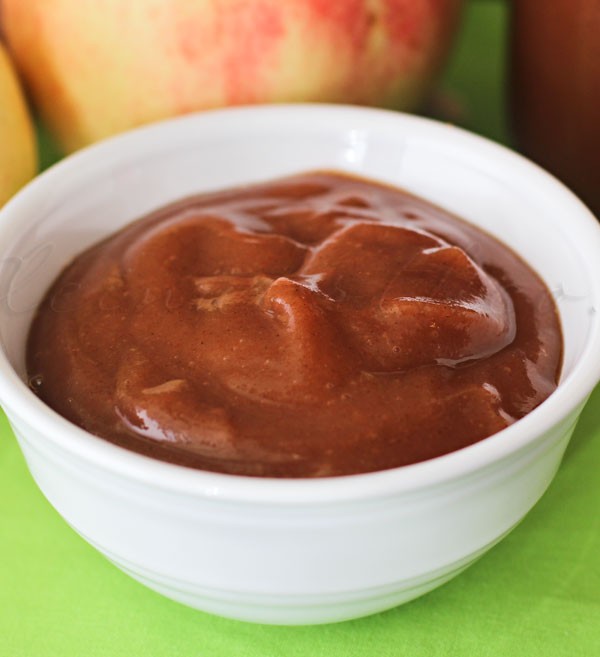
I love applesauce. Do you love applesauce? I always come across these recipes that call for it but because I never want to open a huge fresh jar of it for just a 1/2 cup or so- I end up not making the recipe at all. Sooooo- I was thrilled when we ended up with a large amount of apples & I could make my own applesauce. I decided to use the crock pot method because it’s just so simple. I also decided to store some of it in small jars for recipe use – single serve type. Then I picked up some larger jars that I used for the rest – which can be for the kids with breakfast or lunch. Problem solved & now I can make all the applesauce recipes I want 🙂 Definitely one of my best slow cooker recipes too.
Crock Pot Cinnamon & Brown Sugar Applesauce
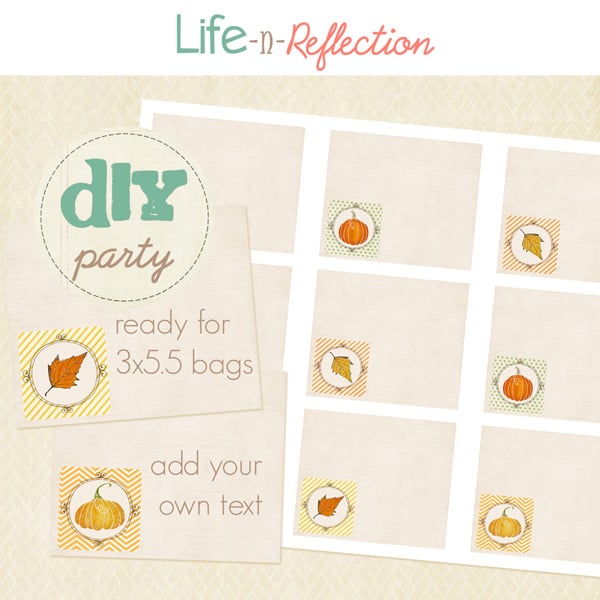
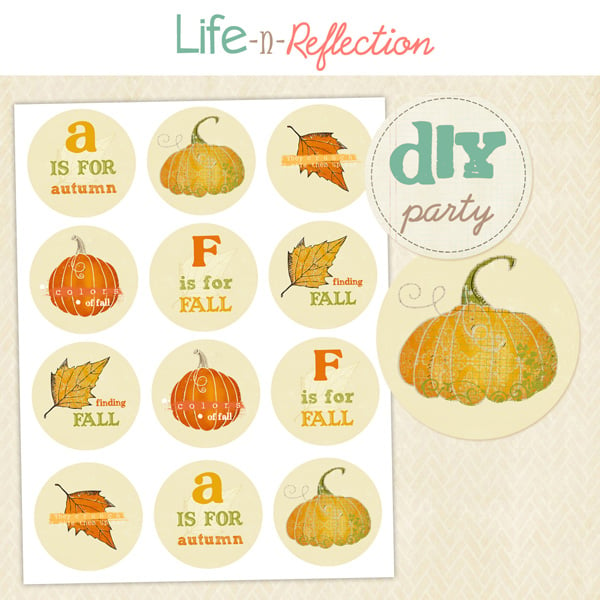
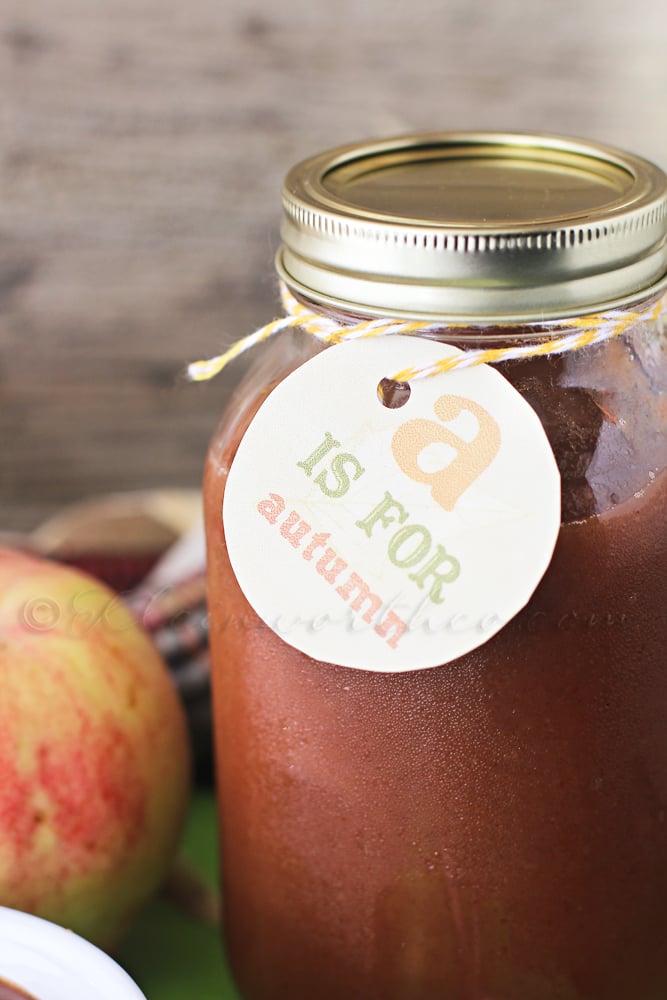
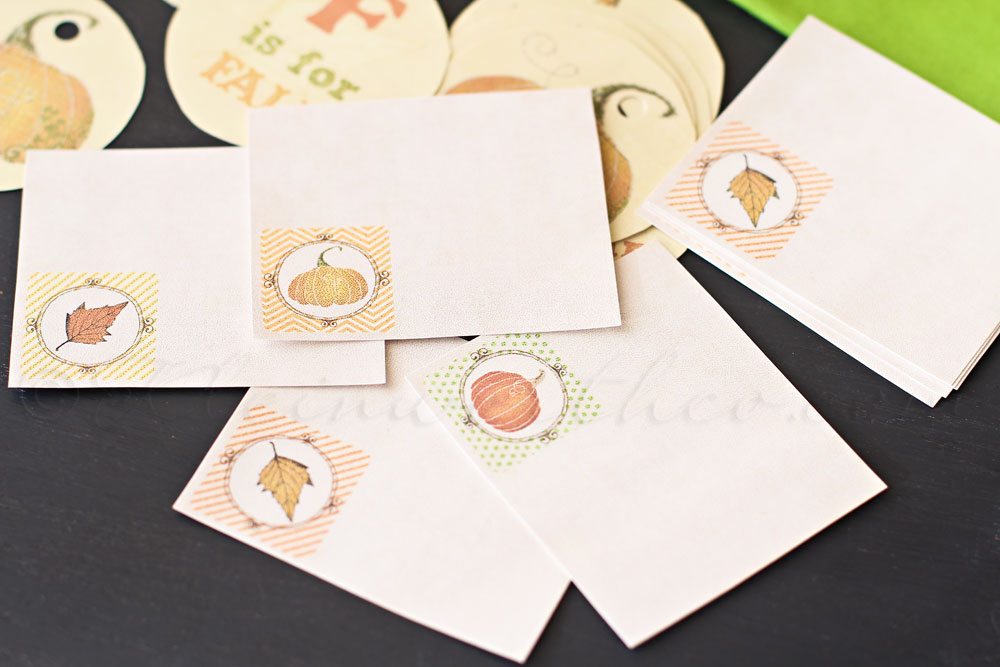
I used tags from this Fall Thyme Party Set in these images.
Look how cute they are. You will be seeing these here through the rest of fall.
I love these!!!!! Look how cute they are when printed out.
Kristy has some FREE Printablge Goodies for you all- Visit Life n’ Reflection to grab yours.
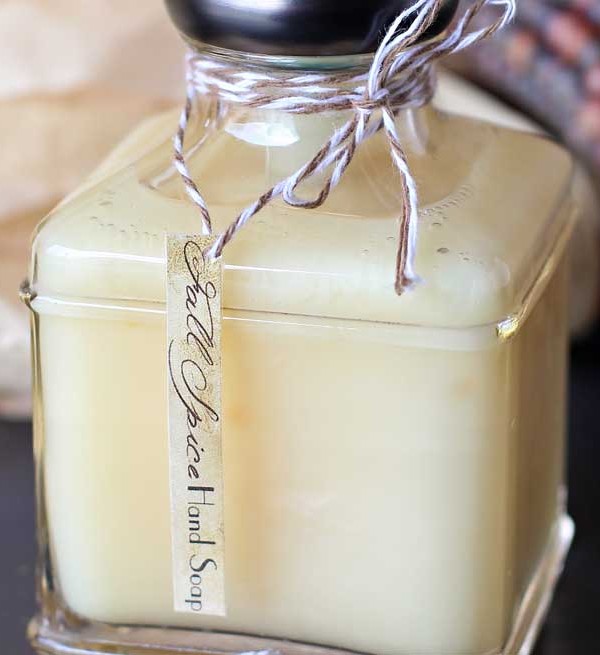
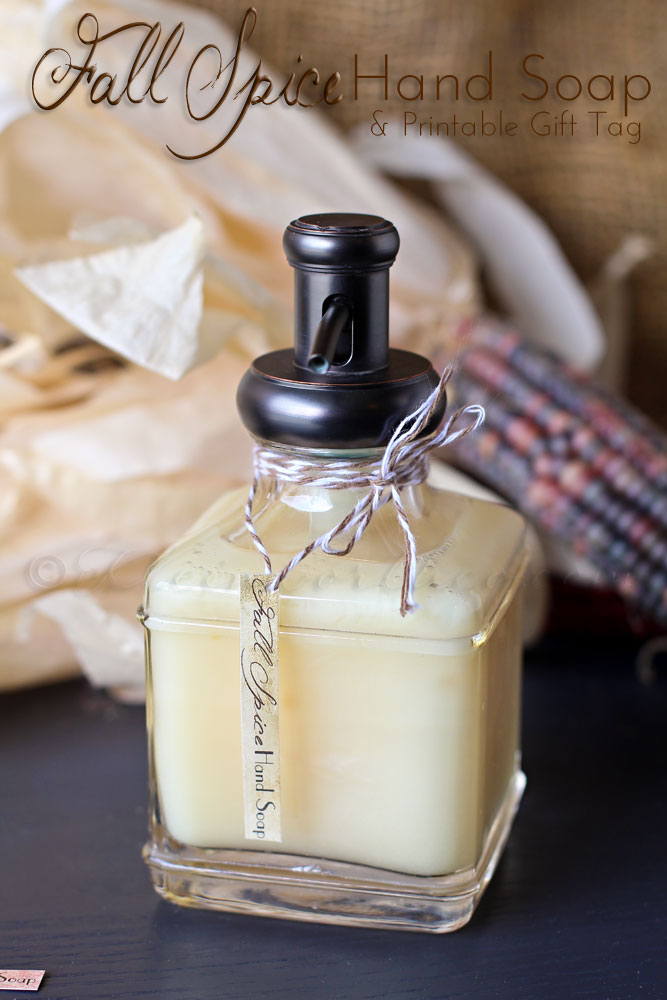
Good Morning- Hope you all had a lovely weekend. I did something that I have been wanting to do for a very long time. I finally made my own scented hand soap in a super easy way. You see for the longest time I would buy the Pumpkin/Fall Spice scented hand soap & lotion from Avon. I love the smell so much & I get so sad when it runs out. Well since we moved I have not really been buying Avon so I never picked some up for the season. In fact – I don’t even know if they still offer it. But now I don’t have to worry- I figured out how to make my own.
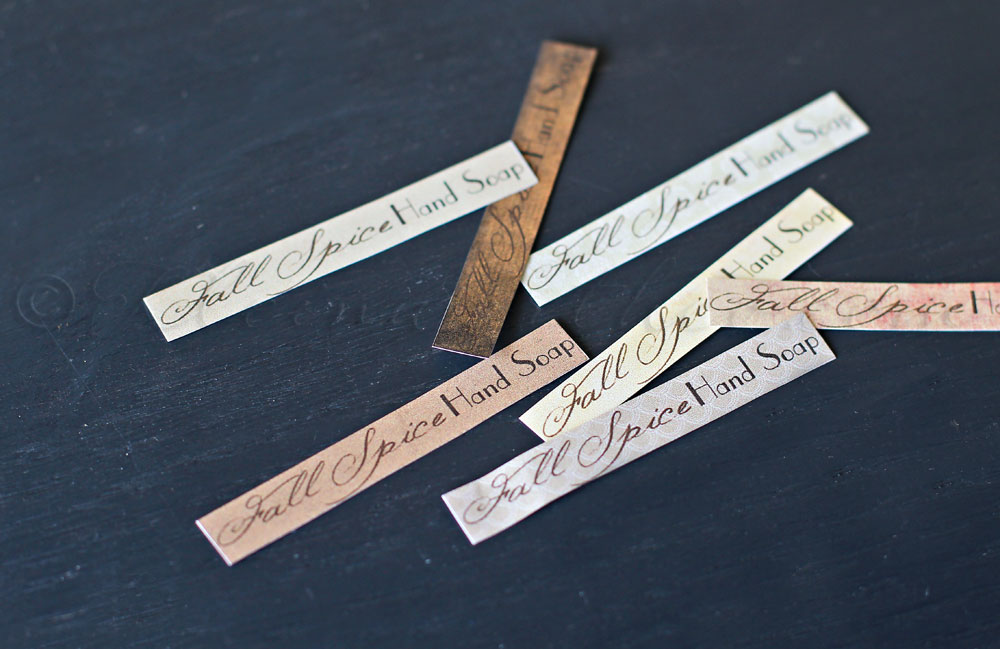
Fall Spice Hand Soap and Printable – Free Printable Checklist Template
I decided to make some printable gift tags for you all to download.
This way if you make some & then want to give it as a gift (which I recommend) you have everything you need.
Doesn’t it look pretty in this little container?? I picked it up at Target or Walmart- I can’t remember.
For the soap– fill your soap dispenser with your favorite unscented soap. I used Milk & Honey because it’s somewhat moisturizing. Then I added about 2 tsp of Pumpkin Spice Scented Fragrance Oil. I picked mine up on ebay for around $3 including shipping but I think you can get it at the craft store in the soap making isle. Swirl it around- and there you go. Yes- that simple & I’m kicking myself for not doing it sooner.
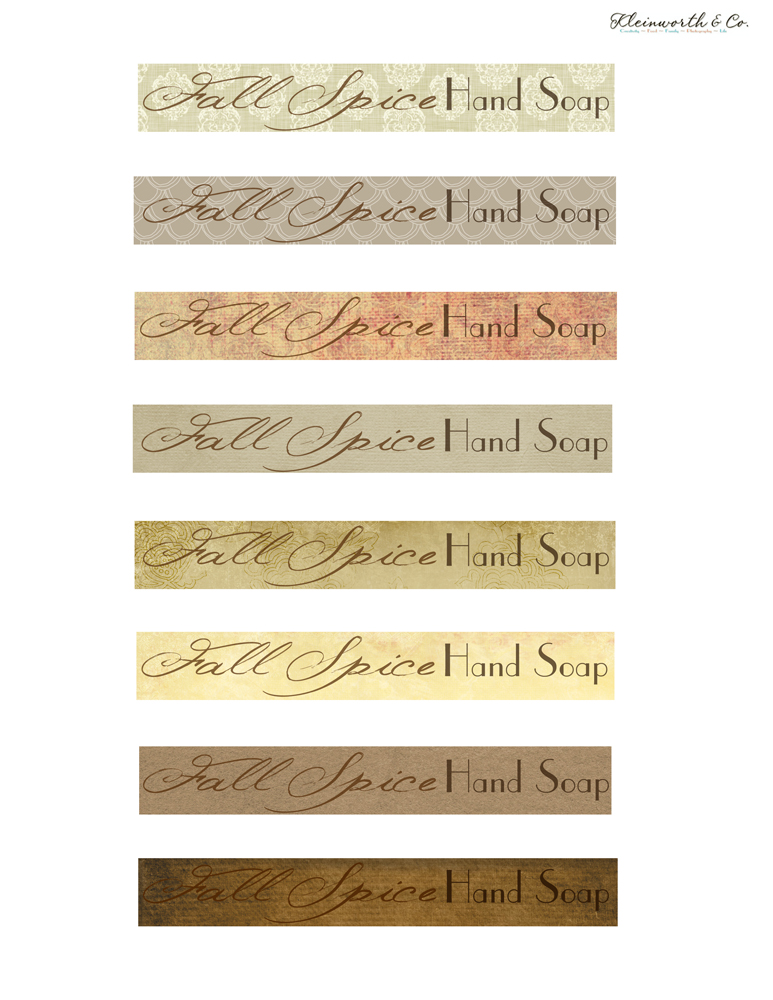
I made several different color tags so you could choose your favorite or use them all for multiple gifts.
I also made them in 2 different sizes depending on the size of your dispenser- whether it be tall or short.
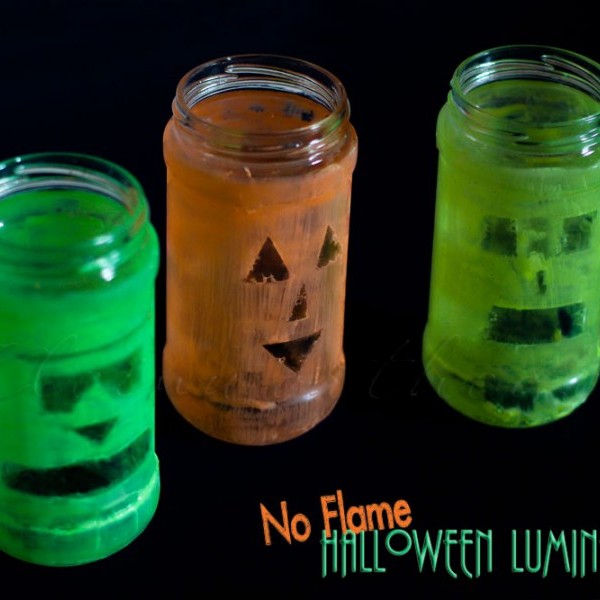
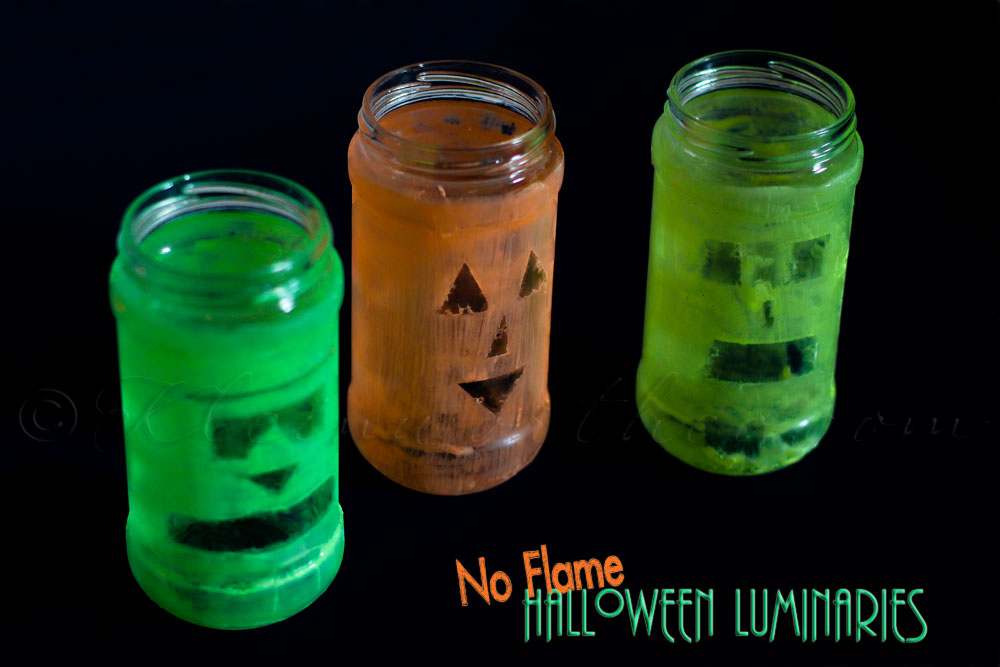
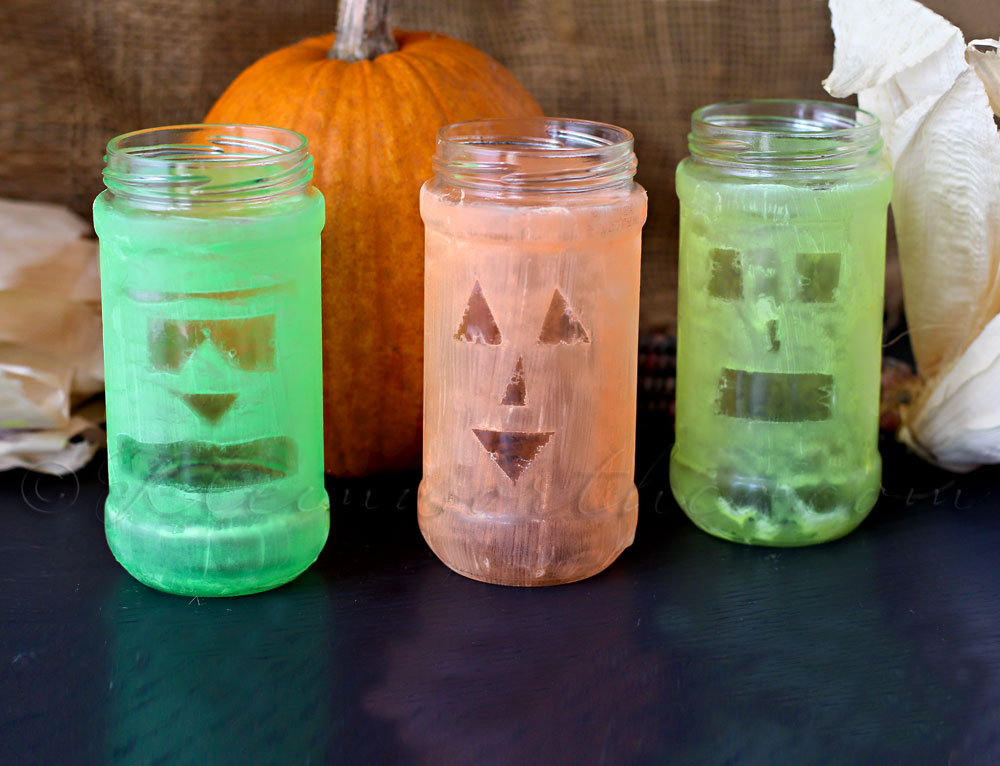
Most of you know that I’m married to a fire chief. This means that I’m a stickler for not only safety (especially on holidays) but super cautious when it comes to fire. I love luminaries & the fun feel they give when decorating. But I get really nervous when it comes to sticking that tea light in there & lighting it. I worry about it getting kicked over, or a costume brushing against it & catching fire or the wind blowing it over. Sooooooo- I decided to use some of the fun paints & products I have been given through some past campaigns & create some safer luminaries for Halloween decorating.
These were really easy. I just re-purposed some spaghetti jars I had saved & first painted them with some Plaid Glow in the Dark Acrylic Paints. I used #20485 Yellow, #20484 Orange & #20486 Green. Dabbed on several coats & waited for it to dry. Then I added Plaid Glo-Away Glow-in-the-Dark Gel in a thick layer & let dry. I decided to let them look a little weathered & rubbed for a spookier vibe – instead of completely coating them. Then I just left them sitting on the counter under the under-cabinet lights all day. When we went to bed- there they were- glowing like they should. So if you are leaving these on your porch- the sun should charge them with more than enough light to keep them going all Halloween long.
This was a simple project that the kids loved helping me with.
This post is not sponsored- I just wanted to use some of these fun products I was given in the past for more seasonal projects.
Don’t forget to come back & join me on Mondays for Project 52
Do you feel that sense of togetherness this time of year? When you think about family moments, do they center around food? I know a lot of my family memories are jogged by certain triggers, many of them food. Whether it be a smell, a flavor, a moment shared with my kids that is similar to one I had as a child- they are all so great & they all come flooding back & give me smiles.
I love creating memories like that with my kids. I want them to remember the times we spend in the kitchen. I want them to taste something when they are adults & remember something we did together & smile about it. One thing I am trying to do is bring back old family recipes & combine them with things I love to make new family favorites & great memories for the kids.
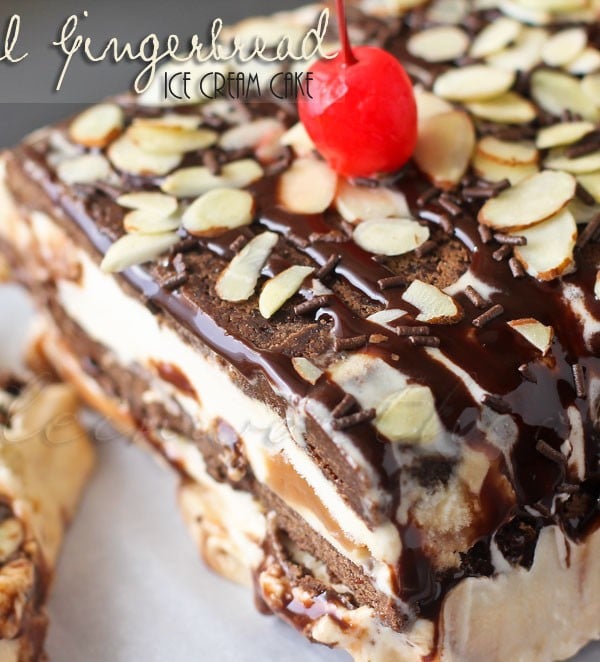
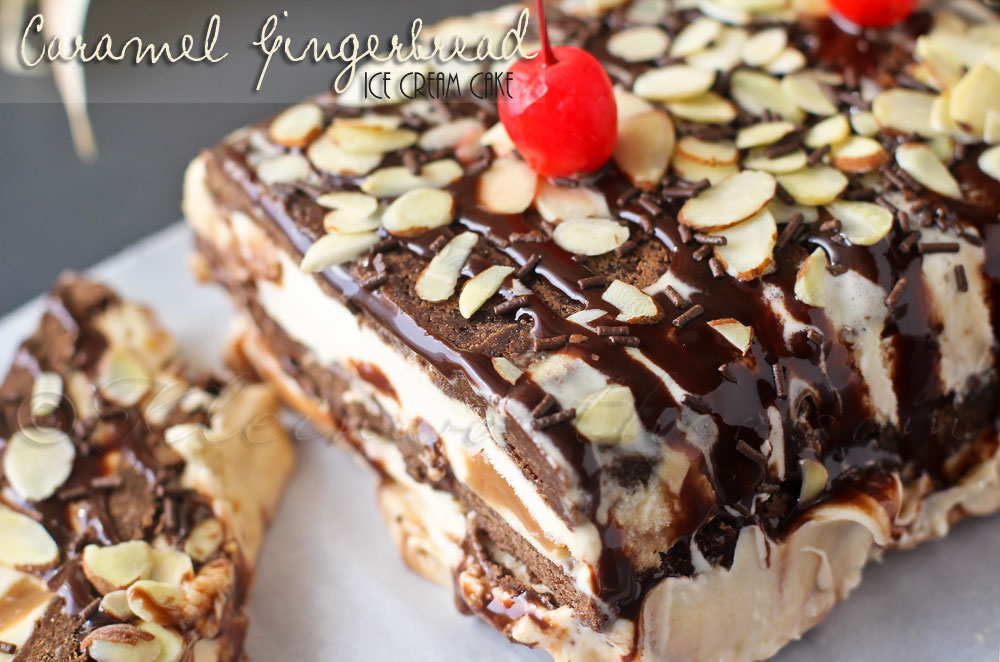
If you ask my kids what foods I love- they would definitely say Ice Cream. Not just any Ice Cream though. When I am looking for Ice Cream I want something that tastes amazing, wholesome ingredients, variety of flavors, creamy texture & makes me feel special. I think that’s part of the experience. So I decided to take one of my favorite cookie recipes & combine it with one of my favorite Dreyer’s Slow Churned flavors – Caramel Delight & make a treat that we will be making for years to come.
Start by letting your Dreyer's Slow Churned Ice Cream soften on counter about 5-10 minutes
Using a loaf pan, start laying your cookies in the bottom of your pan for your first layer
Put several scoops of Ice Cream on your cookies & smooth out to a flat layer
Add another layer of cookies over your smoothed Ice Cream
Add another layer of Ice Cream
Cover & place in freezer several hours to firm up.
Remove from freezer & run sides of your dish under water to warm up enough to release
Run a knife along the sides to help release the Ice Cream & invert on to serving plate
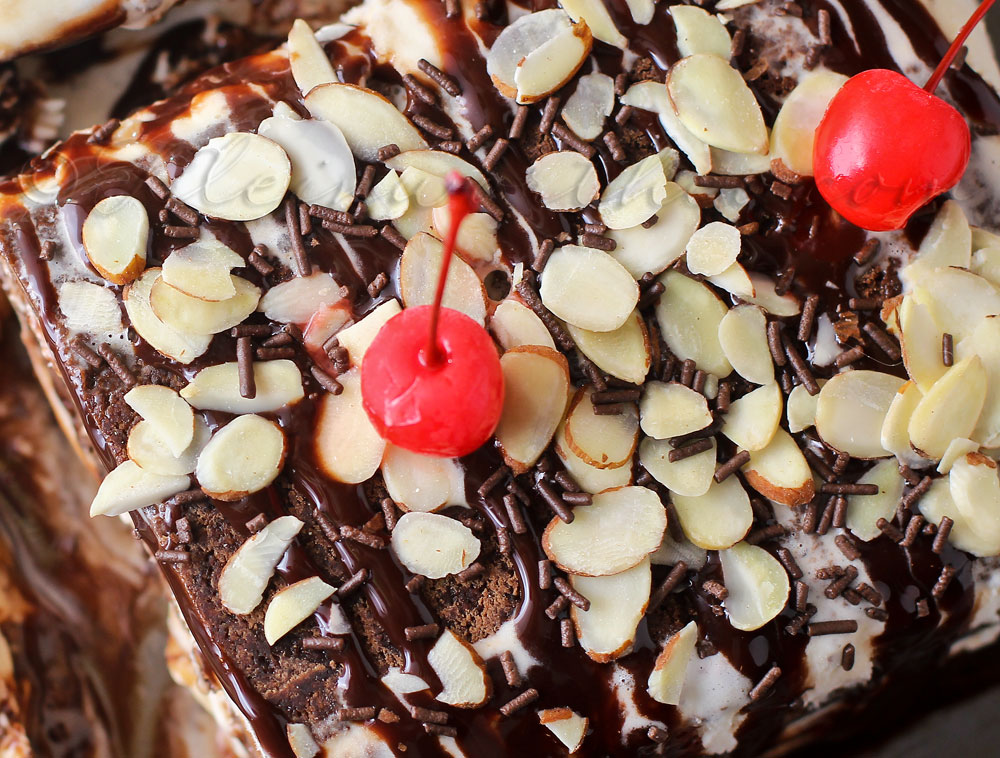
Drizzle chocolate syrup over the top
Sprinkle with chocolate jimmies & slivered almonds
Add cherries
Return to freezer about 30 minutes to firm again after decorating to firm any Ice Cream that may have melted during this process.
Enjoy
This was a HUGE HIT! We will be making this for many holidays here in the near future. I prefer the Dreyer’s Slow Churned for this not only because of it’s creamy texture but because it’s Slow Churned it makes it HALF THE FAT and 1/3 FEWER CALORIES than regular ice cream.
Don’t miss the seasonal flavors Pumpkin & Peppermint this time of year.
Good Morning!! Hope you all are having a fabulous week.
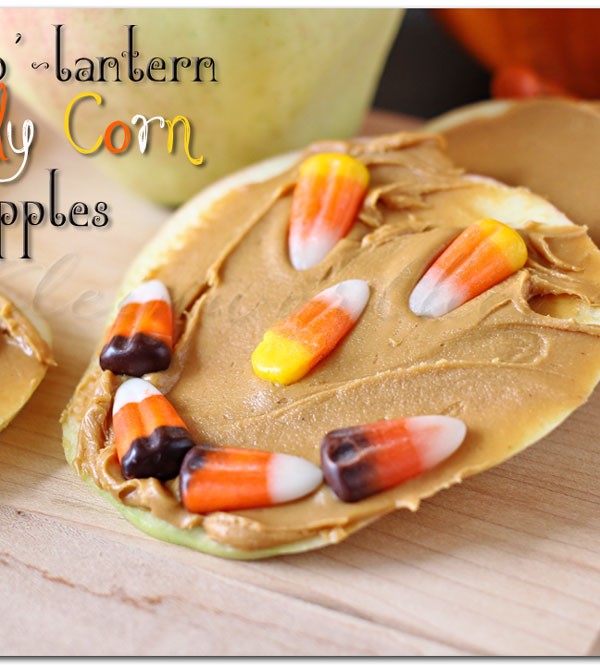
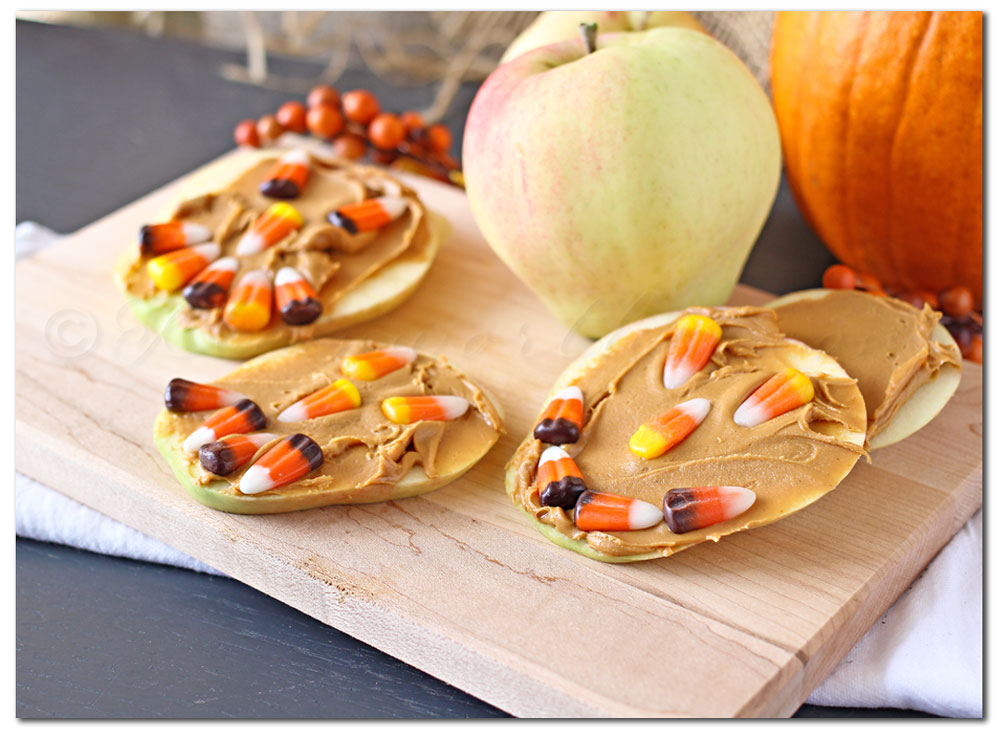
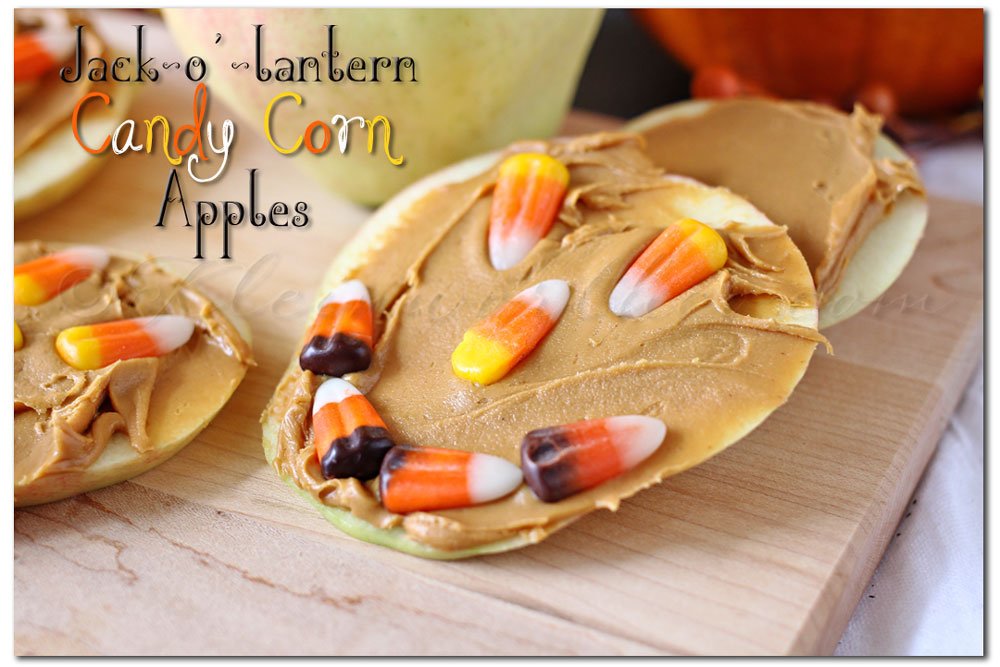
This past week I was trying to think of ways to use up all these apples I have around here. I wanted to do something different for the kids & yet keep it relatively healthy. Sooooo- I started by taking some of my largest apples & cutting them into slices to get the shape of the apple. Then I added the peanut butter but I still wanted it to be more fun. Then I had an idea to use the candy corn & make these…
The kids loved them- even if they are a bit old for playing with their food. I know they like apples & peanut butter.
But adding candy corn- what’s not to like?
No need for a recipe here- just apples, peanut butter & candy corn in the shape of a Jack-O’-Lantern.
Simple, quick & so much fun for the kids.
Don’t forget to come back & join me on Mondays for Project 52
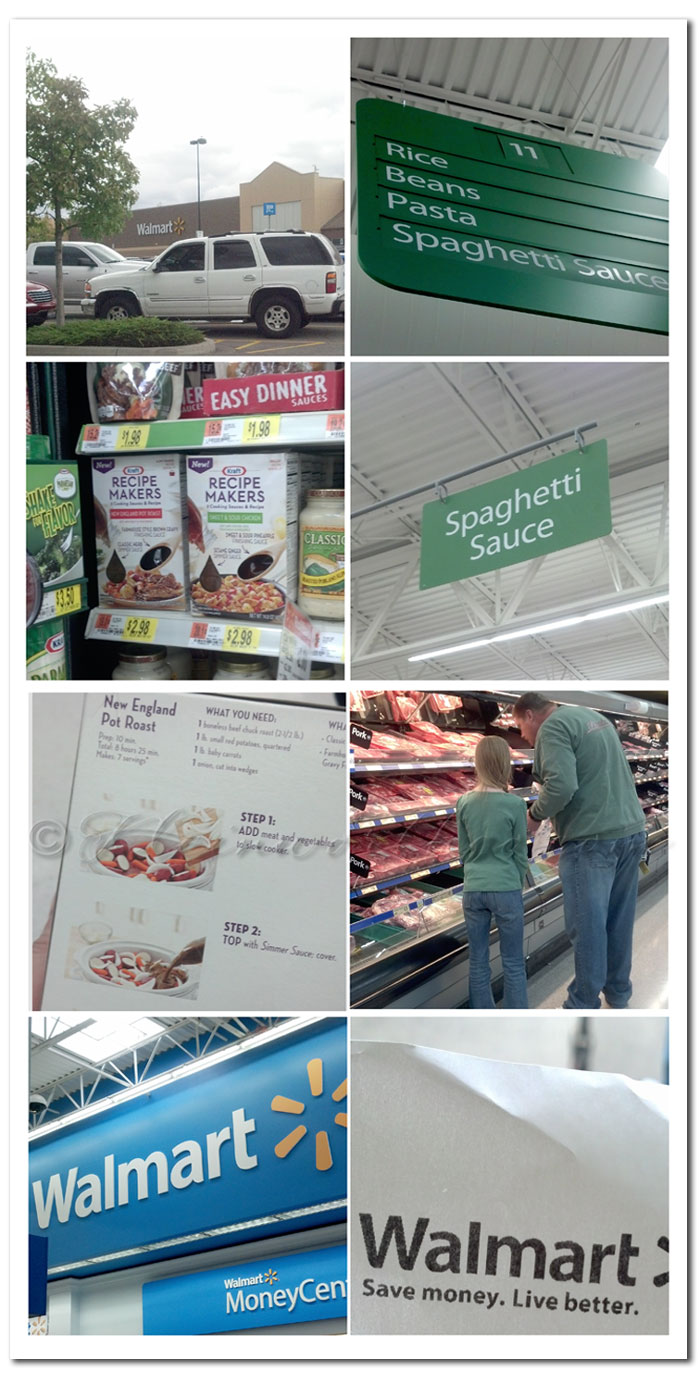
For an easy slow cooker dinner, as part of a sponsored post for Collective Bias® I made this New England Dip Sandwich using Kraft Recipe Makers for my family.
As most of you know- things here have been absolutely nutty. Between having company this past week, working on product photography sets for a client & some really special family portraits for a friend, the projects I am trying to get put together for the holidays & then pumping 60-70 hours a week into the blog- I need the days to be longer. But since I can’t make that happen, I have to do what I can to make everything else around here happen quickly & efficiently. So finding things to make dinner tonight simple & easy is a top priority. The hubs works 60+ hours a week himself- so asking him to come home & cook too would be just plain mean. We reserve a lot of our time consuming meals to our days off & have found some quick family meals that work for us on the super busy days. When I was asked to try the new Kraft Recipe Makers– I was all for it. But we always like to do things differently. Even if we are using a semi-ready made meals recipe we like to make it our own. So we came up with…
2boxes Kraft Recipe Makers - New England Pot Roast Flavor
1bag small red potatoes - sliced into rounds
1small bag mini carrots
2lbschuck roast
3tbspminced onions
2tbspseason salt
1-2tbspminced garlic
Salt & Pepper to taste
6stadium style buns
1stick salted butter
1/4cupParmesan cheese
2tbspgarlic powder
Instructions
Place chuck roast in the bottom of slow cooker
Place sliced potatoes on top of meat
add in bottle of Kraft Recipe Makers seasoning sauce
Add minced onions, season salt, minced garlic & salt & pepper.
Cover & cook 6-8 hours on high
During the last 20 minutes- add contents of Kraft Recipe Makers flavor pouch - stir in.
Continue to cook on high remaining 20 min.
While you are waiting- pre-heat broiler to high & place your stadium buns open on baking sheet
Melt butter in microwave 30 seconds
Brush butter on to the insides of the stadium buns to coat
Sprinkle on garlic powder & then Parmesan cheese
Broil until golden & toasty. Set aside.
Turn off slow cooker & remove lid
Using 2 forks- start pulling the meat apart into bite sized pieces
Using a slotted spoon- add meat & potatoes to bun
Add mini carrots on the side
Ladle out a little bit of the juice from the slow cooker into a small bowl for dipping your sandwich
Enjoy
This worked out great for me. I was able to get it prepped in just a few minutes & then it was ready by the time the hubs came home. The prep for the buns was simple & so the whole meal came together quick & easy. Very little clean up too- which always makes me happy. So nice to be able to have a hearty, hot meal- even if we are short on time.
Connect with Kraft via Facebook:
Don’t forget to come back & join me on Mondays for Project 52
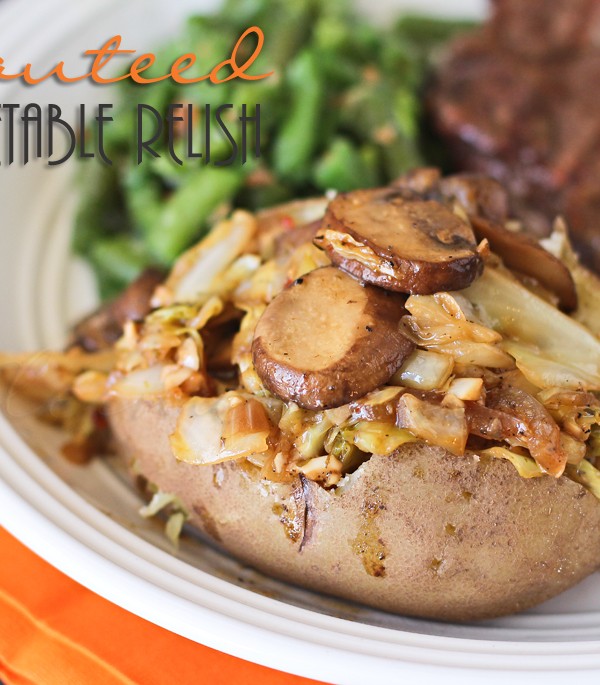
For quick dinner recipes as part of a sponsored post for Collective Bias®
I made this Sauteed Vegetable Relish using Land O’Lakes Sauté Express® Sauté Starter for my family.
Looking for Easy Family Dinner Ideas?Do you like to jazz up your dinner ideas even when you don’t have quite the time you wish you had?? We certainly do. Seems like life is so busy these days & it can be so easy to just make some quick meals that just get you by & aren’t necessarily satisfying or enjoyable. We try so hard to come up with new ways to make our quick dinners still feel exciting & “guest worthy” if you will. Even though neither of us have the energy for making an elaborate dinner each evening we definitely don’t think we should be sacrificing taste.
One thing we love making is a side of vegetables for whatever we are having- whether it be steak, chicken or pasta for the night. We love to saute them. But these can be prep extensive & when that happens, we tend to not make it during the week. So when I had the opportunity to try the Land O’Lakes Sauté Express® Sauté Starter I was excited to see how it would cut my time & make our recipe taste great.
Start with your vegetables & your Land O’Lakes Sauté Express® Sauté Starter
We use 1 half purple onion, 3/4 of 1 head of cabbage, 1 head of garlic, 1 container mushrooms, 2 cubes Land O’Lakes Sauté Express® Sauté Starter
Prep your veggies – roughly cut your cabbage & onion. Mince your entire head of garlic.
Add in 1/2 cup teriyaki sauce, salt & pepper to taste.
Transfer it all to a large non-stick skillet
Toss & saute until well combined & reduced – about 20 minutes. Stirring & tossing every 1-2 minutes.
Add to the top of your baked potato – enjoy
I loved that this Land O’Lakes Sauté Express® Sauté Starter in the Italian Herb flavor already has the butter, olive oil, red bell pepper, garlic powder, onion powder, marjoram, thyme, rosemary, savory, sage, oregano, & basil all in these tidy little cubes. I didn’t have to have all these ingredients on hand nor did I have to prep them ahead of time. I basically cut my prep time in half. Definitely good in my book.
Hope you all have had a great weekend & this week is kicking off to a fabulous start.
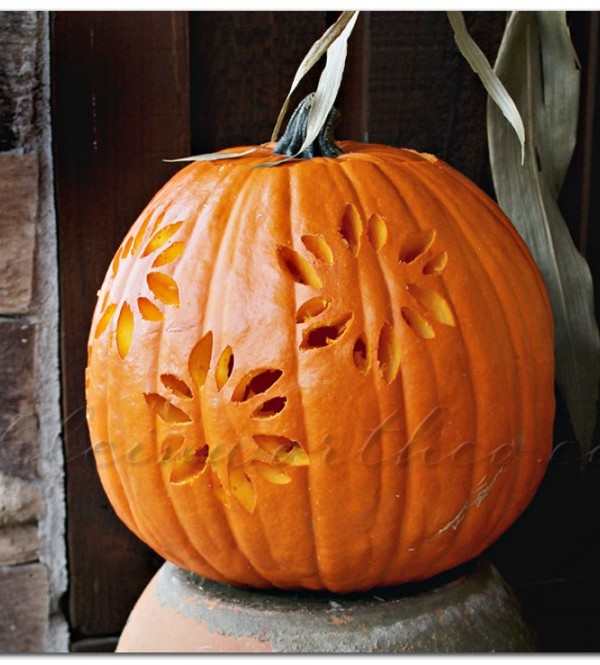
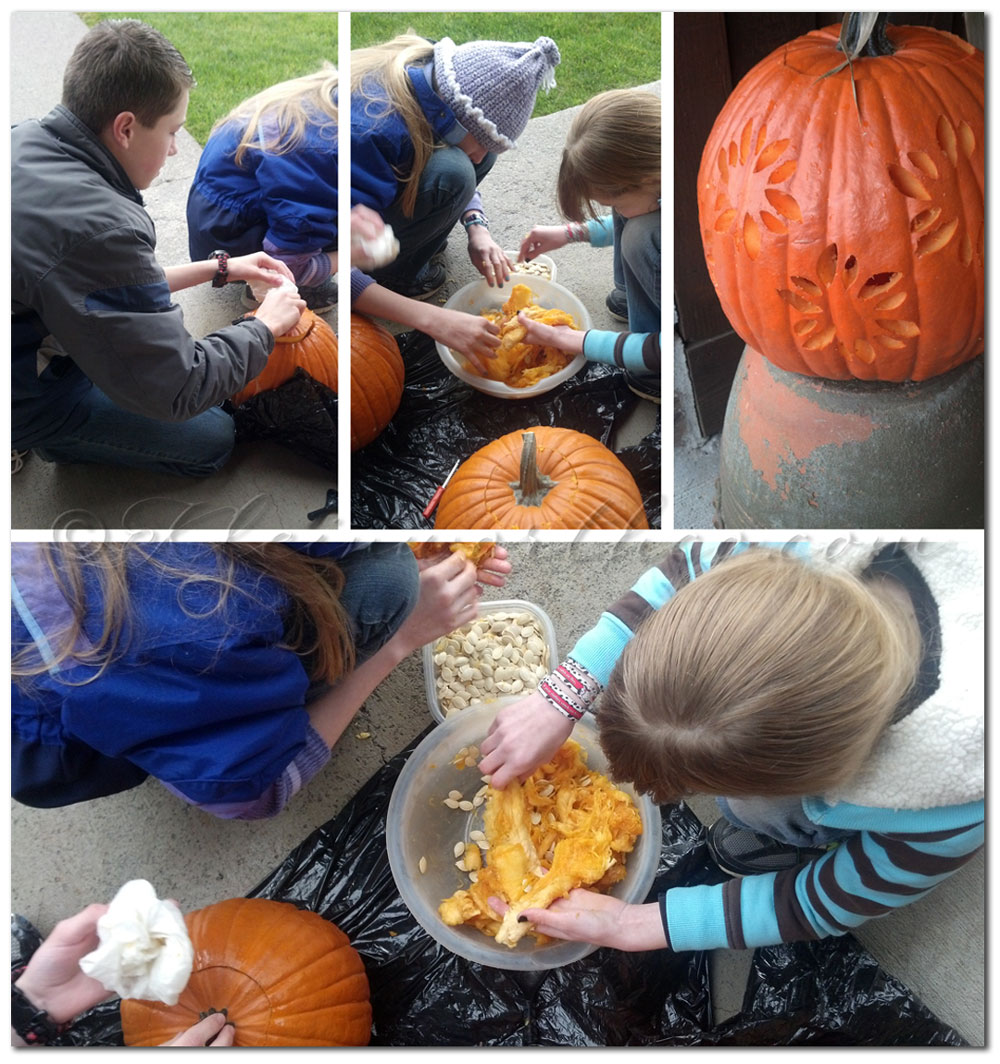
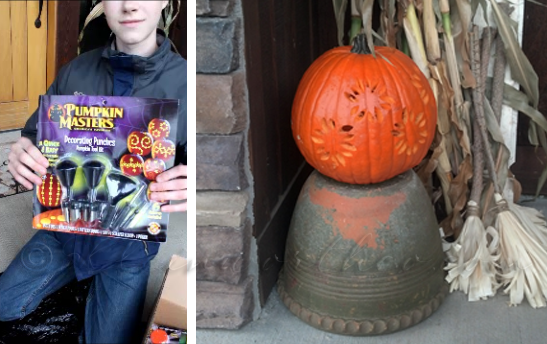
We had the chance this past week to try out the Pumpkin Masters Pumpkin Carving Kits. It was really fun. I had always wanted to give them a try but we never end up getting around to the pumpkins. So this year when I was asked to try them I knew it was my chance to actually do it & have some fun with the kids. The hubs is always worried that the time that goes in to the blog can pull me away from the family. But in this case- it gave us a full day of family fun. The kids had a blast- especially because with the use of the kit- they were able to do most of the work. YAY for me. I had the pleasure of taking the video & doing a little carving with them- while they got the messy part of cleaning out the pumpkins. 🙂
Pumpkin Masters Creative Carving
Since I was using the dslr for the video so I could have it in HD I had to take pics with my phone during the process.
We had to break up the shooting of the video into parts due to the rain- but you only see that on the full length version.
I realized when watching back the full length version that I say “really cool” a lot. Guess growing up in So Cal has not worn off yet. 🙂
Please excuse the camera angles- I was bending, stooping, crouching & hovering over the kids in all sorts of strange ways to get the right angle to show what we were doing. I’m sure the neighbors thought I had lost my mind. In fact, I’m pretty sure at this point that with all the things I do on the porch for the blog- they have given up TV & we have become their main source of entertainment.
**Want to win a kit of your own – ($35 value – US residents only)
watch the full length version of this video & leave me a comment telling me what your favorite part is?
Pumpkin Masters Carving Contest: Pumpkin Masters is searching for carving talent as part of its annual Pumpkin Masters Carving Contest. Share a pic of your carving via Instagram or Twitter with #PumpkinMasters2013, submit via the Facebook app or send via email to: social@pumpkinmasters.com to enter for the chance to win one of six prizes, including $5,000 for the Best Pumpkin.
Contest runs from October 1 – 31, 2013.
Contest details and official rules:
I was selected for this opportunity as a member of Clever Girls Collective and the content and opinions expressed here are all my own.
The P52 Details
* Post 1 photo or as many as you like each week on Mondays.
* The button or text link should be present in your post- but not absolutely necessary.
* Please visit some other blogs & leave some love & encouragement.
* Submit the URL of your blog post – not your home page.
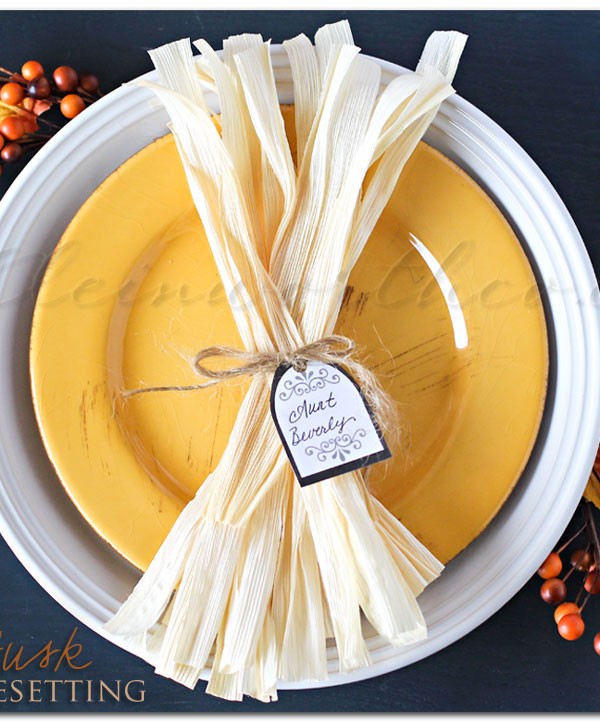
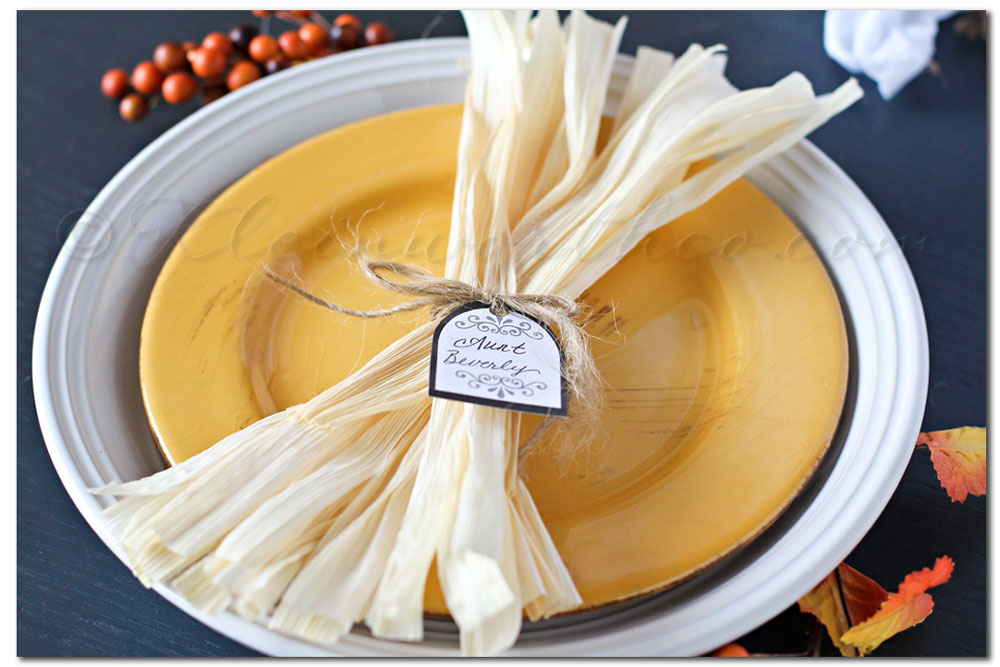
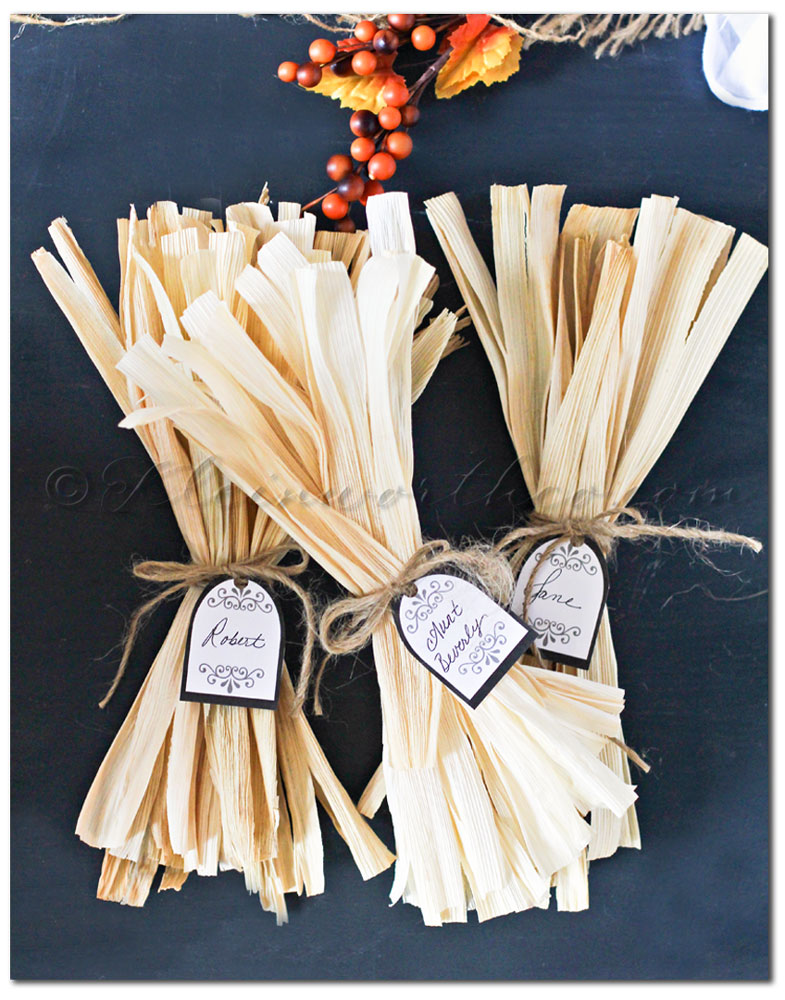
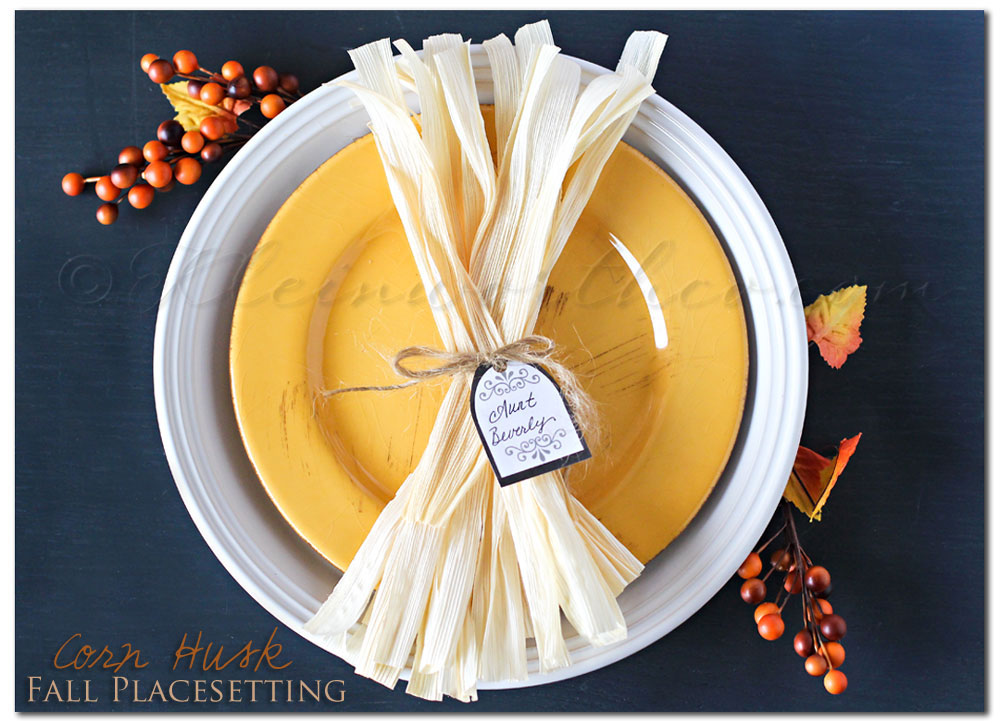
A couple weeks ago I shared my Corn Husk Fall Tablesettings when I guest posted for Taryn at Design, Dining & Diapers. I wanted to not only share those with you here- but I wanted to give you the free printable tags to go along with it. That way you can make the whole project for your upcoming holiday gatherings.
Corn Husk Fall Tablesetting & Free Printable Checklist Template
This adds such a warm & inviting feel to your table.
I printed mine at the 4×6 setting because I wanted them small.
I could have printed them at full size & used them for a larger placesetting- or on individual flower pieces in front of each plate.
These are really so simple yet add just the right amount of rustic warmth for your table this time of year.
To Make:
-Take 3-4 husks & soak them in a bowl of water for several minutes to soften.
– Pull out of the water & shake & pat off excess water with a paper towel.
– Lay the husk one on top of the other in a stack- alternating the wide ends with the narrow ends.
– Take your twine & wrap around the center & tie.
-On each end, start pulling 2-3 inch tears into the wide ends of each husk to give a frayed look.
-Pull & fan out each end to give fullness.
-Repeat for each one you want to make.
-Allow to dry flat. Ends will curl & twist on their own as they dry.
(Note- I put mine in the warm garage to speed up the process)
So that’s it. I told you it was easy & oh so festive!!
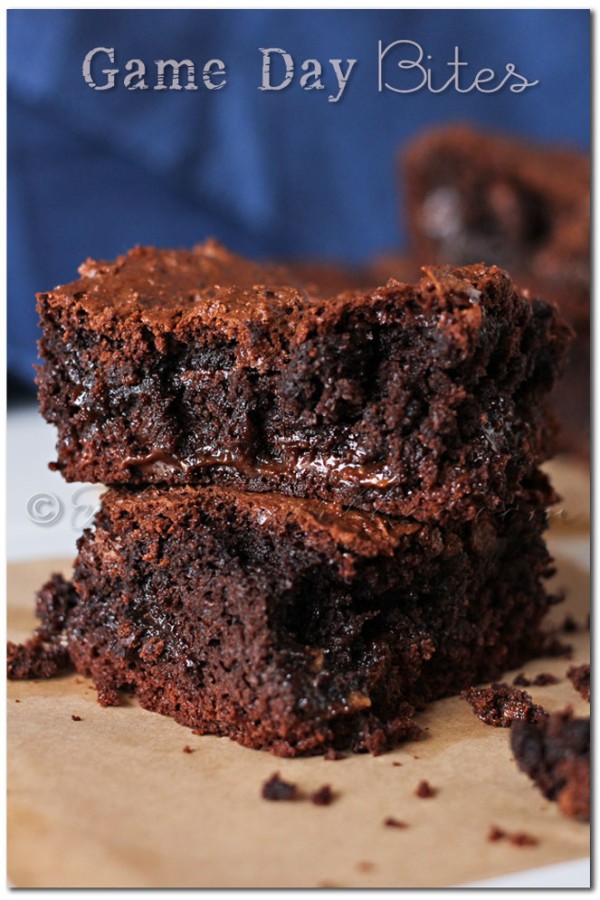
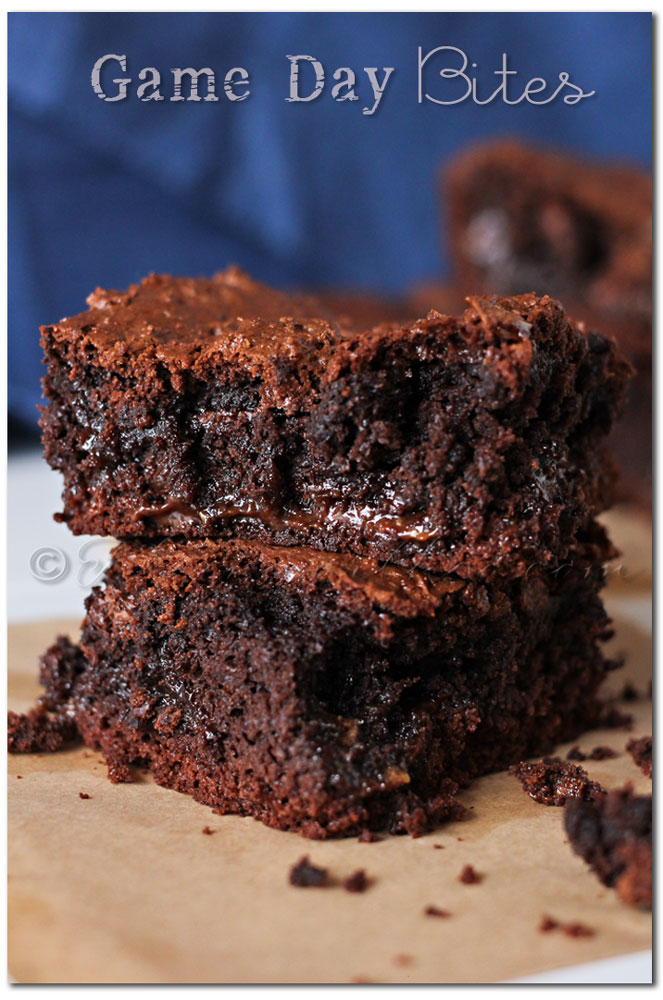
For an easy game day tailgating snack as part of a sponsored post for Collective Bias®
I made these Game Day Bites using MARS Snickers & Milky Way Bites for my family.
Do you love tailgating? Do you love sporting events? Do you love going to your favorite event with some great snacks to make the experience just that much more fun? I totally do. I love Yummy Bar Recipes! I am a HUGE College & Pro football fan & I LOVE NASCAR. We have not had the opportunity to go to a football game in a while but when we would head to the NASCAR track in Vegas we loved enhancing the party atmosphere with great snacks. Being a HUGE Kyle Busch fan – I regularly purchase & use MARS products in support of my favorite driver. So you can imagine how excited I was when I had the opportunity to work with MARS & Collective Bias® Social Fabric® Community to make a new tailgating recipe using MARS Snickers & Milky Way Bites.
I new I wanted something quick, simple & easy to transport to the track. I also wanted something that people could grab & walk around with that didn’t require a plate. Knowing that we typically get up before the sun to get to the track- I knew whatever I made had to still taste great if made the night before. So I decided on these Game Day Bites. I took my cake bar recipe, twisted it a little & then doubled the whole thing for extra yumminess.
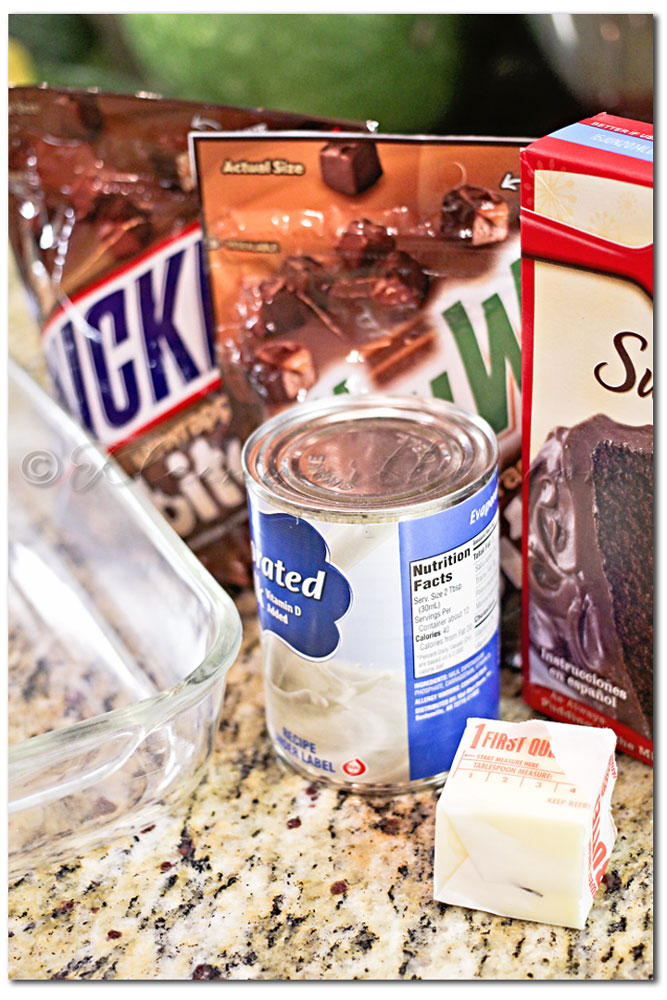
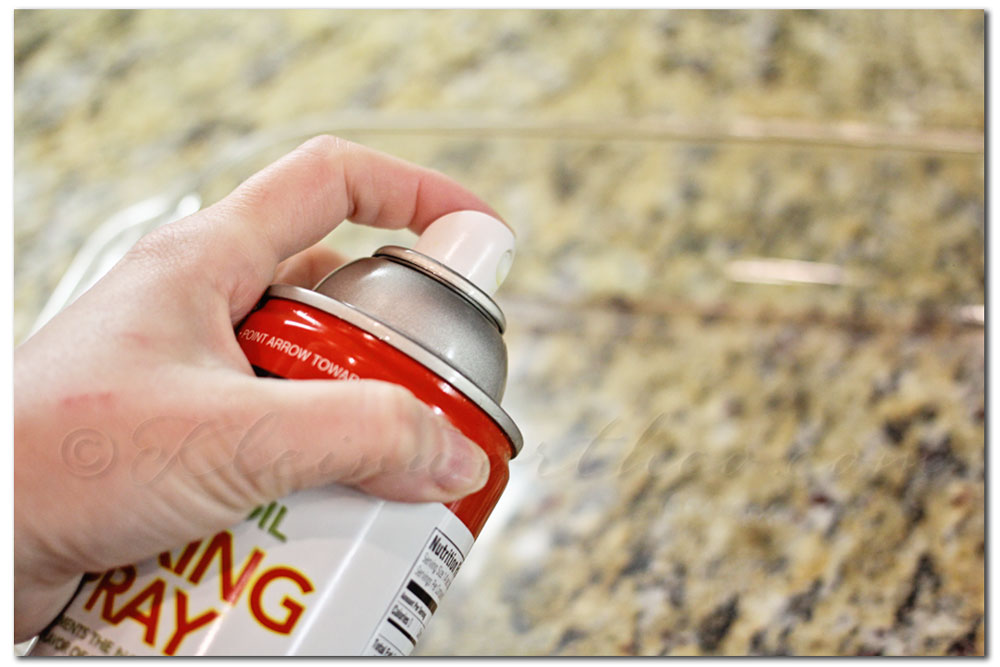
You need cake mix, butter, evaporated milk & 1 cup Snickers Bites & 1 (8 oz) bag Milky Way bites. Preheat your oven to 350 degrees & coat your 9×13 glass pan with cooking spray. Put your cake mix, butter & evaporated milk in your mixer & beat well until it is thoroughly combined.Add in 1 cup of the Milky Ways bites & beat in on high.
Spread out 3/4 of batter in prepared pan. Bake 10 minutes.
Pull out of oven & sprinkle on 1 cup Snickers Bites & remaining Milky Way Bites.
Drop remaining batter on top – do not spread out. Return to oven.
This is what it looks like up to this point.
Bake 40-45 minutes – until toothpick test is mostly clean. Cool completely before cutting.
These are so tasty. A cross between cake & brownies with the nougat & caramel of the bites melted throughout. OH MY!
You can download this coupon to pick up your own MARS Snickers & Milky Way Bites
So what do you do when you have 40 pounds of apples on hand?? Well you start by making lots & lots of Apple Pie Filling. Then you start using that filling in all sorts of recipes. Or at least that’s what I have been doing since we picked up our apples from the orchard down the street. I couldn’t be happier with the smell of cinnamon & spice filling my house each day. Apples & cinnamon are a top favorite of the hubs & my son- so they are in absolute heaven here at the moment.
I needed to whip up something quick for the kids for breakfast the other day so I decided to make this…
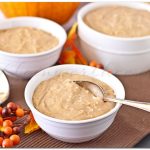
Good Morning! I’m still visiting with my family who is in town. Life is crazy full at the moment & I’m certainly ready for some comfort food. I don’t know about you- but flavors like salted caramel top my list for comfort. Add in there a little pumpkin spice & it just screams fall for me. I have about a million different things I was going to make but I kept coming back to the idea of salted caramel pudding. But I really wanted to make it more fall like- especially since I don’t do a lot of recipes with actual pumpkin in them. But I do love pumpkin spice- so I came up with…
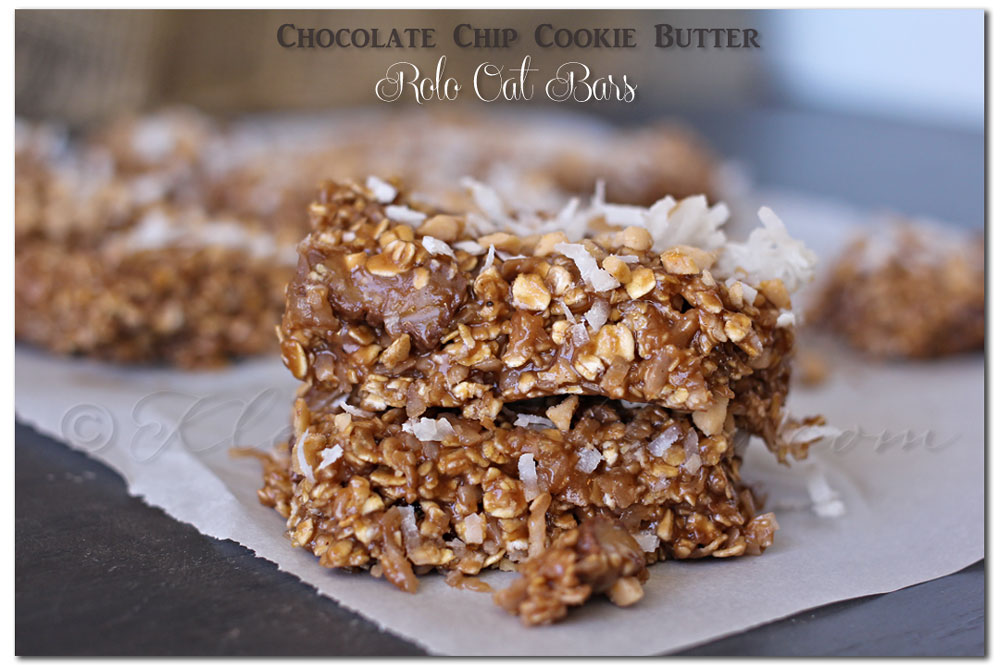
Remember when I made the Chocolate Chip Cookie Cookie Butter?? I mentioned that I would probably make it in bulk & store it in the fridge for future recipes. Well- I did do that & so today I bring you the first of probably many more recipes using that cookie butter. Oh heavens- it’s so amazing. Taking chocolate chip cookie flavored buttery spread & using it to make other treats- really… it doesn’t get any better. So this time I made…
Such an easy little treat to whip up- no one will ever know that it took you less than 30 minutes (including the 20 minutes in the fridge)
It’s a great use for that Chocolate Chip Cookie Butterthat I know you made after I posted it 🙂
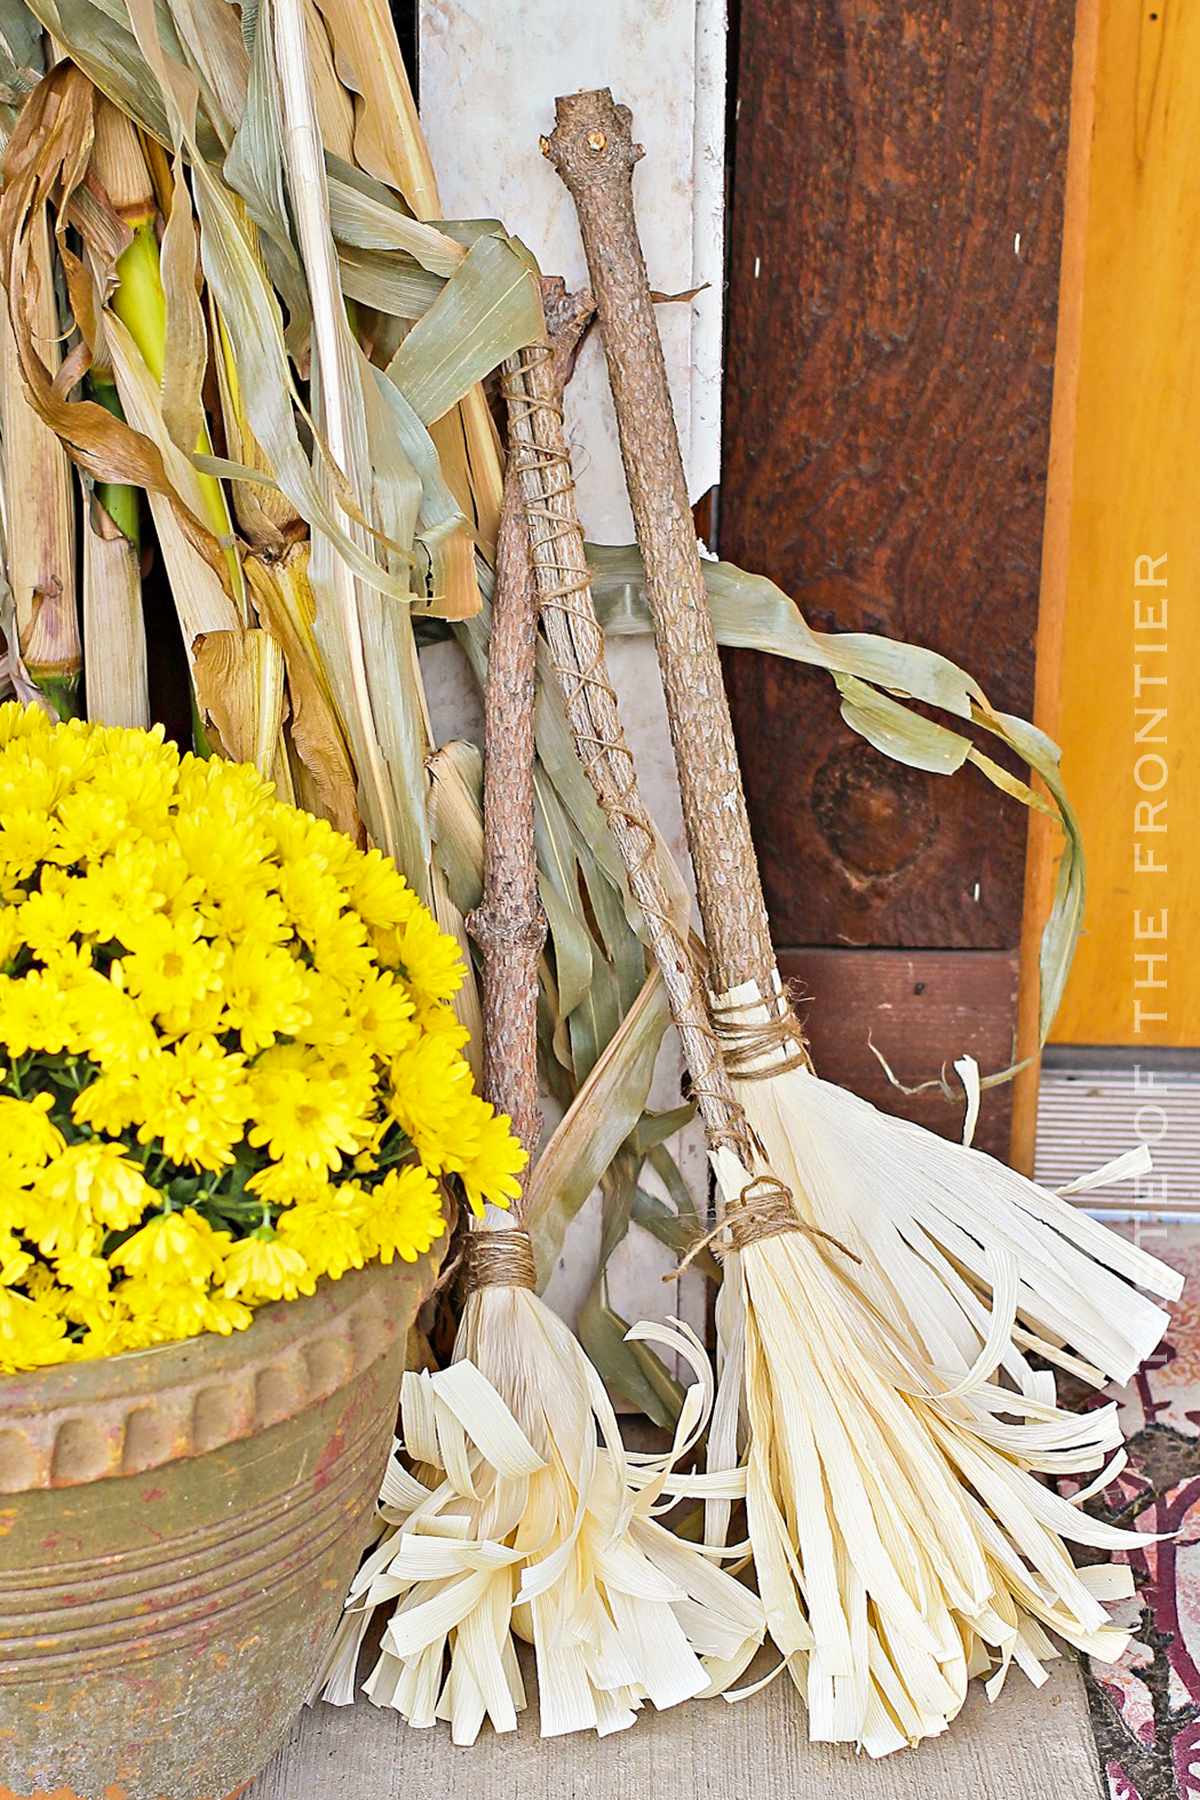
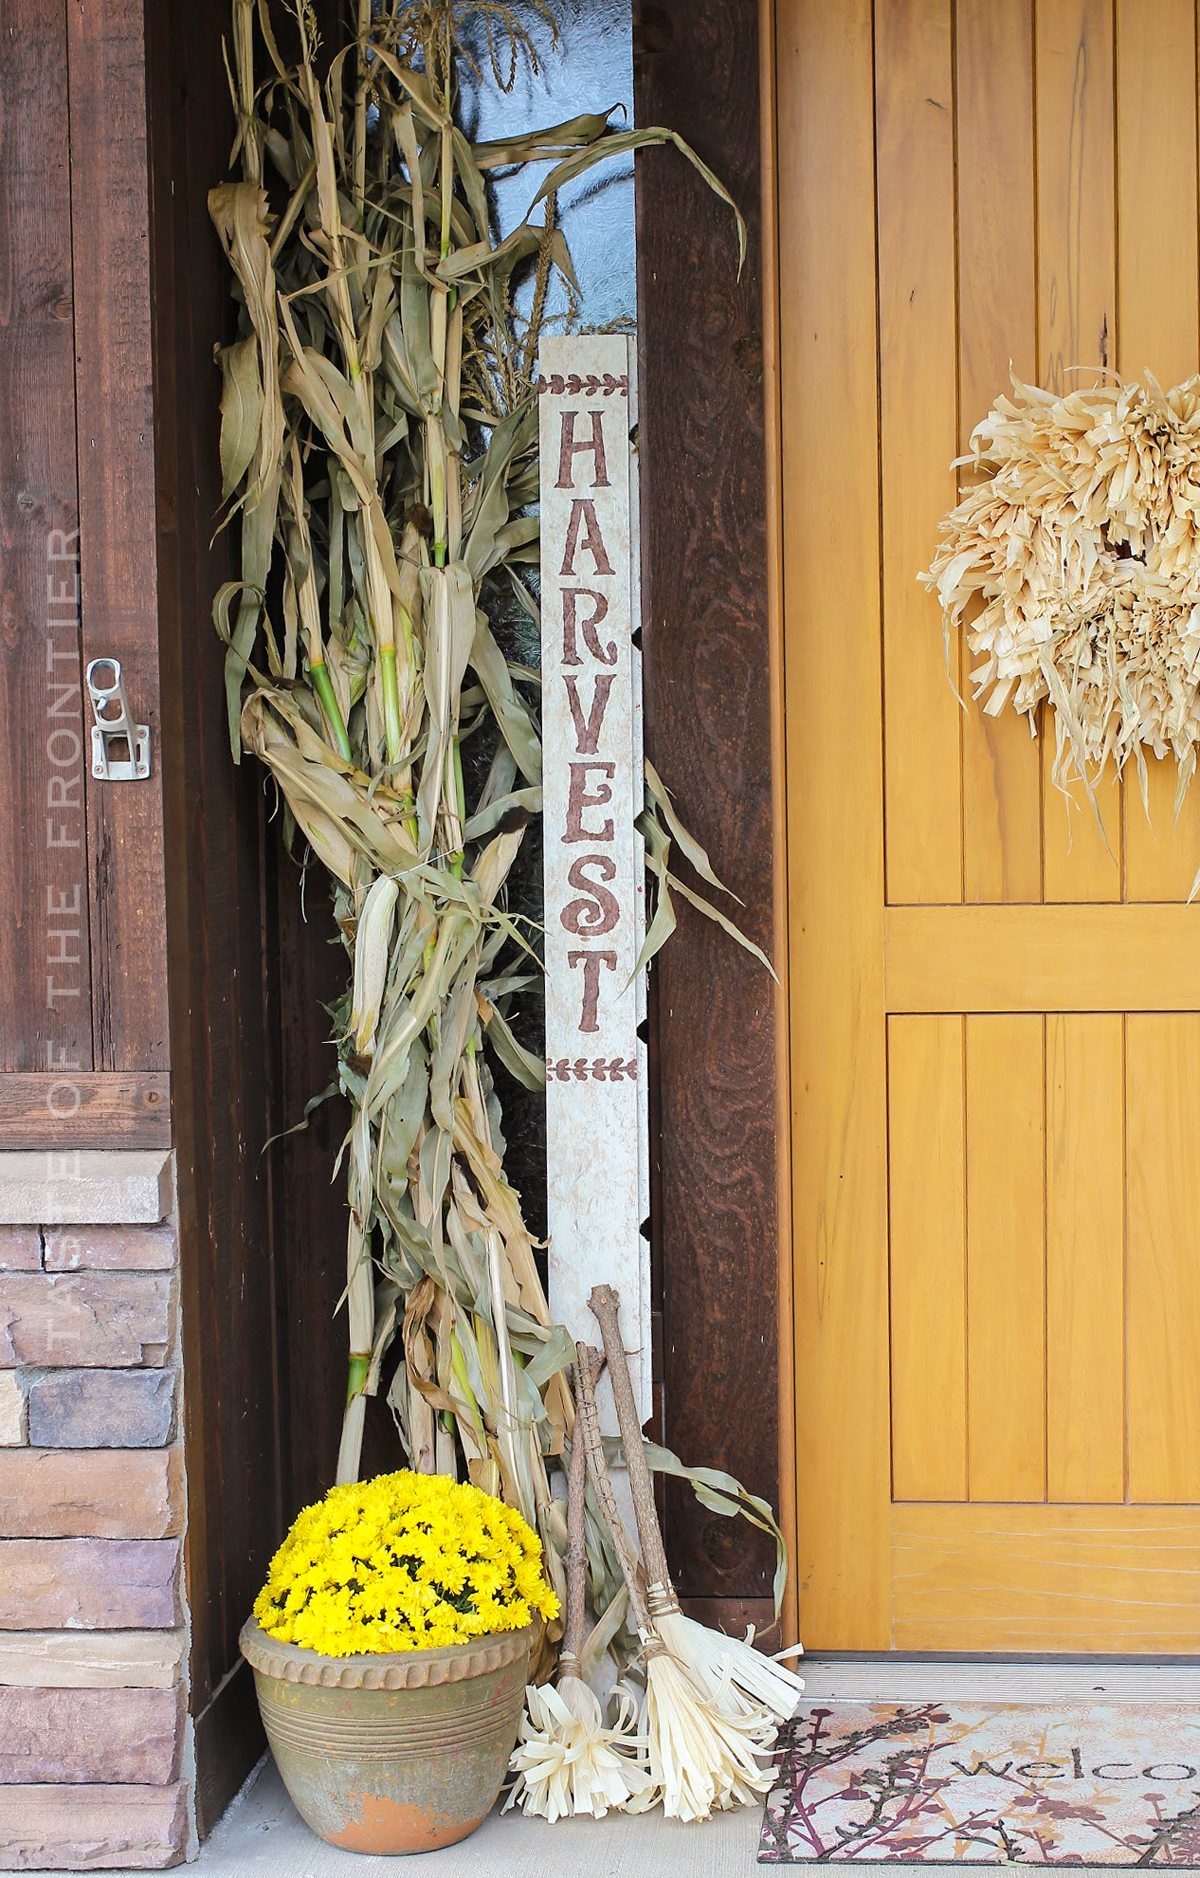
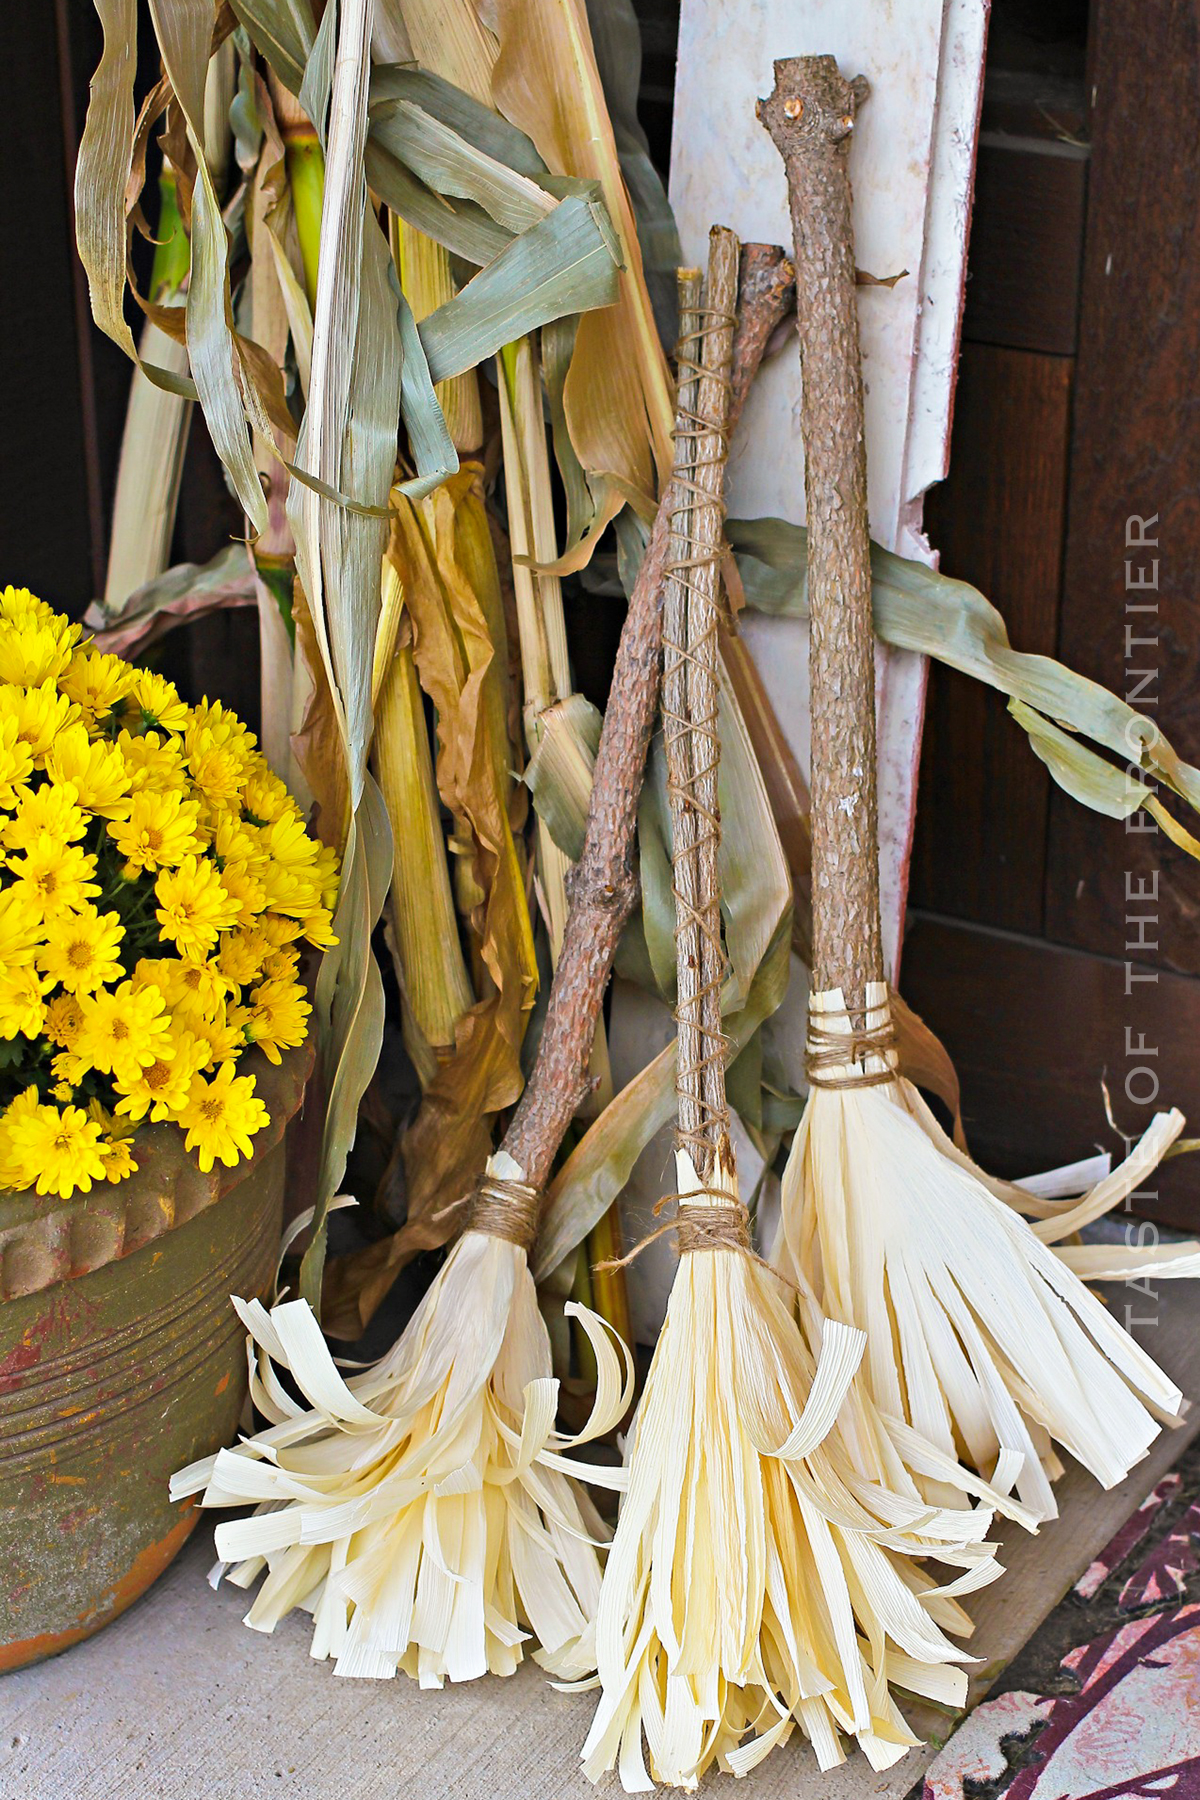
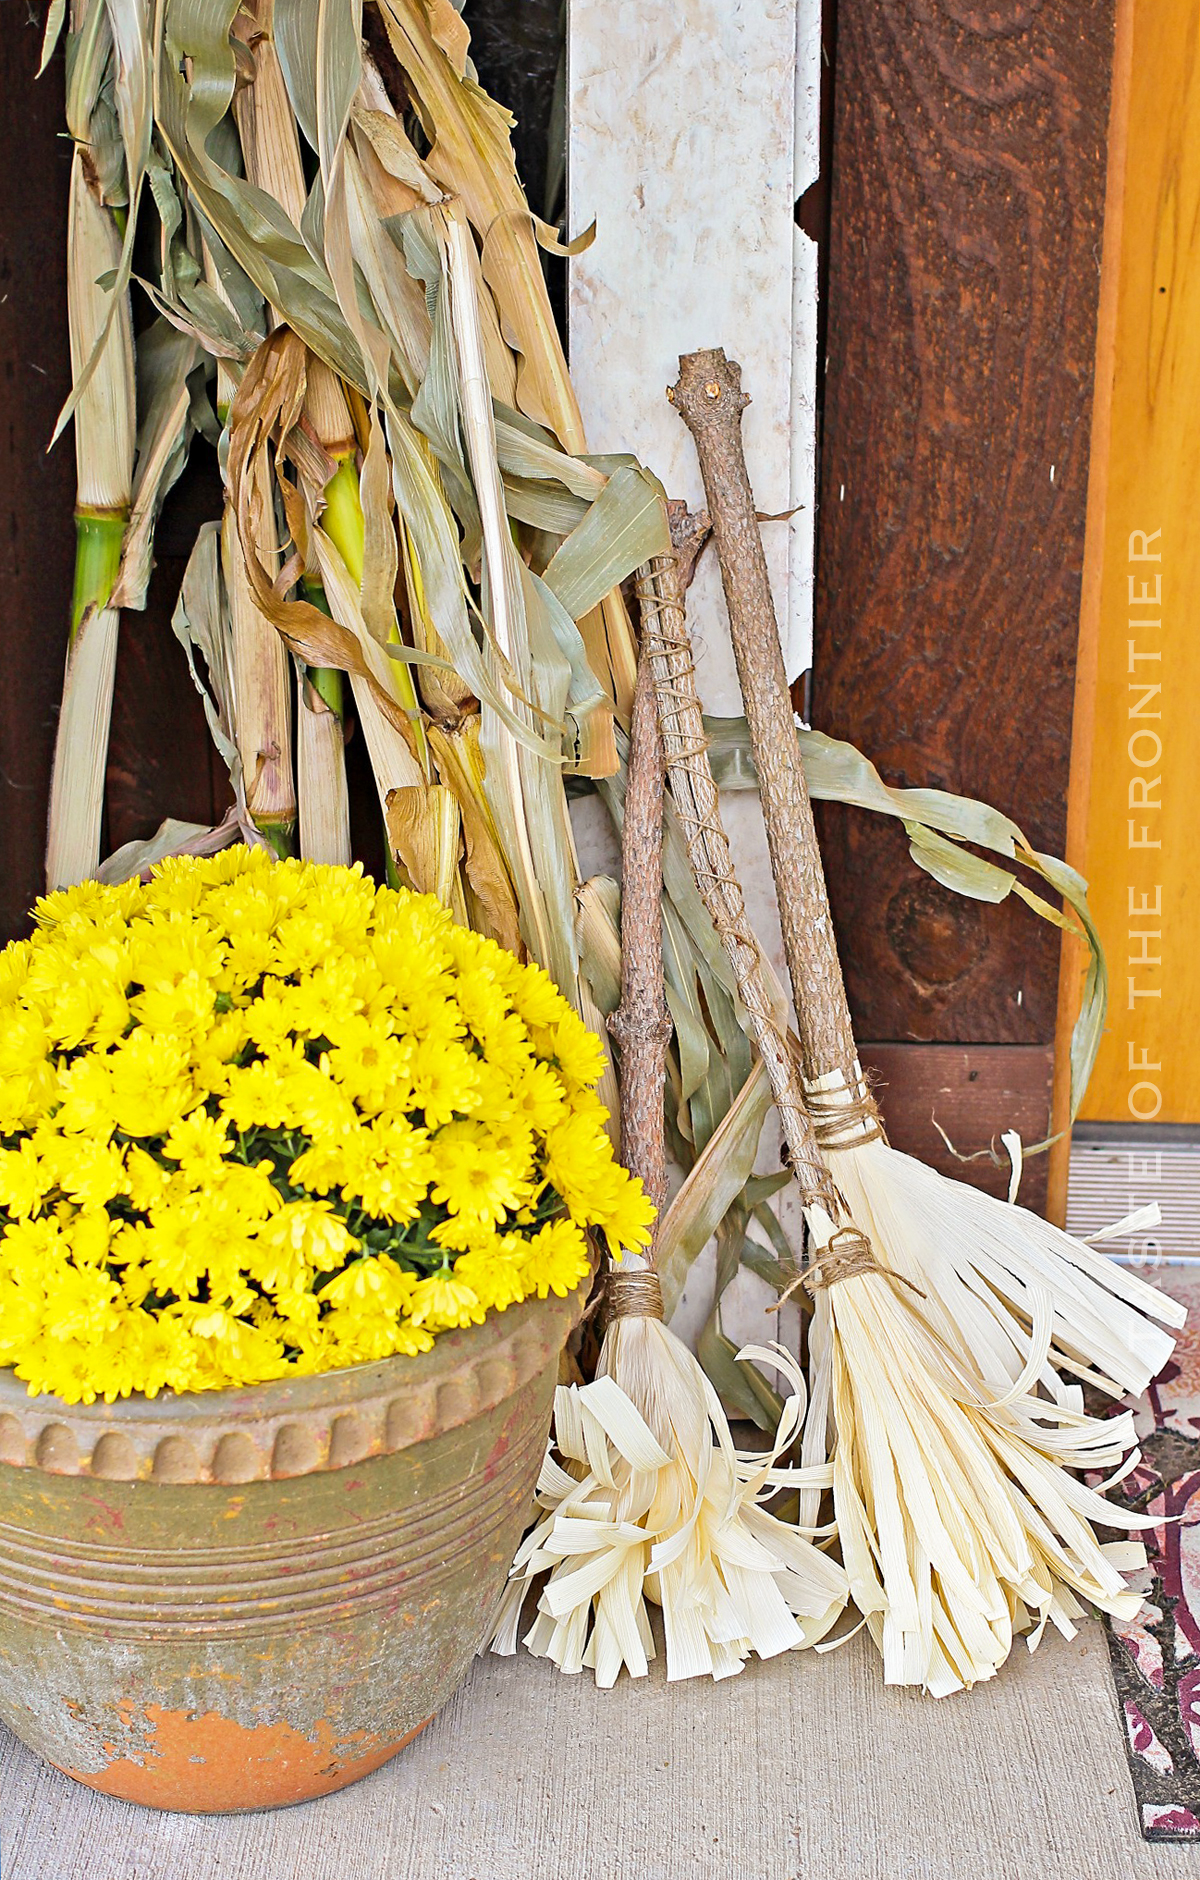
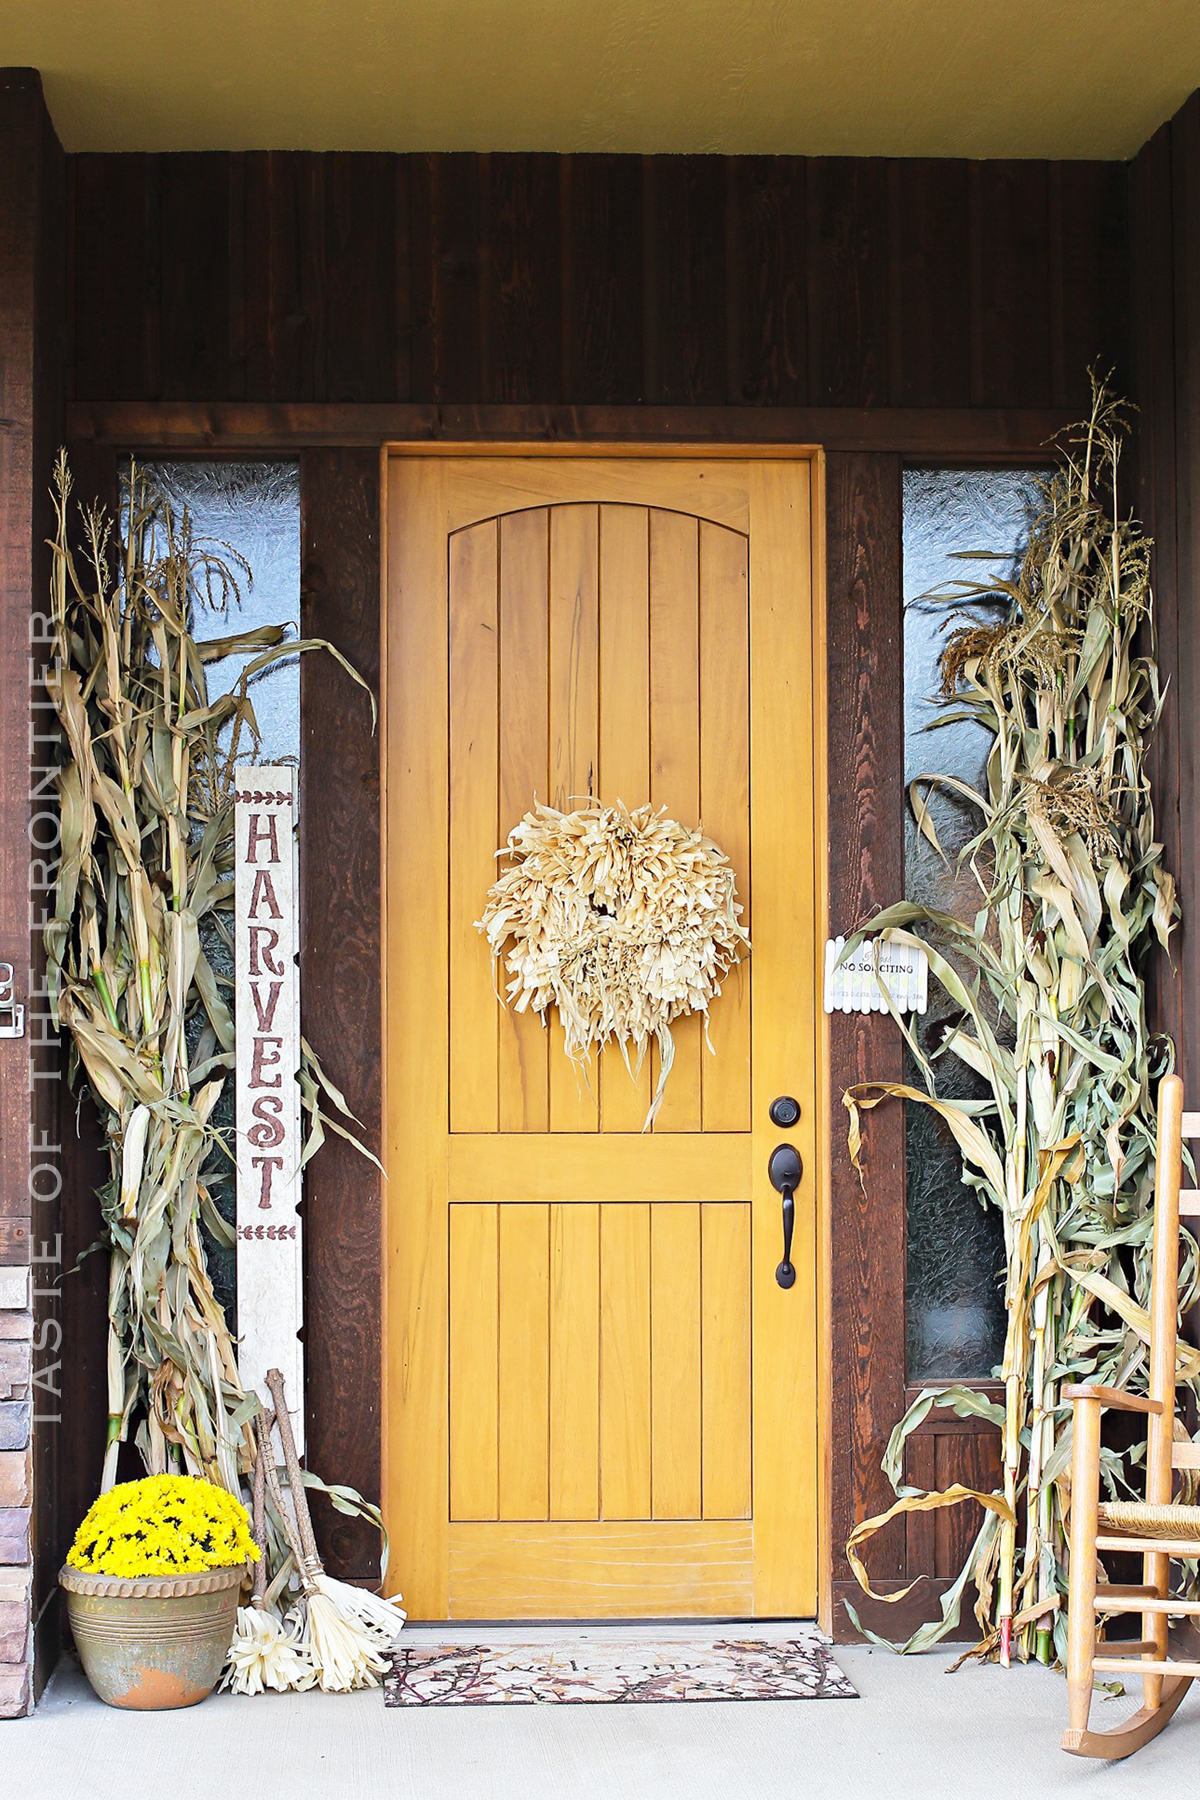
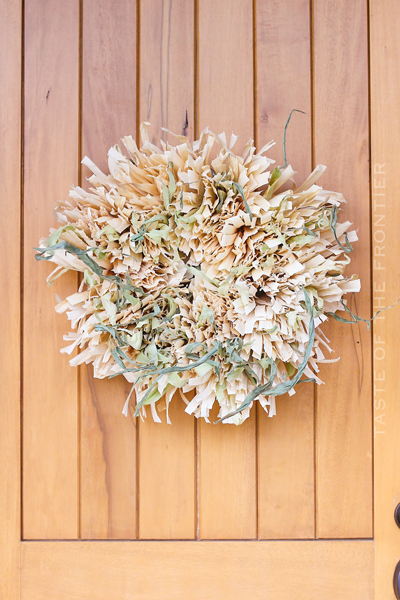
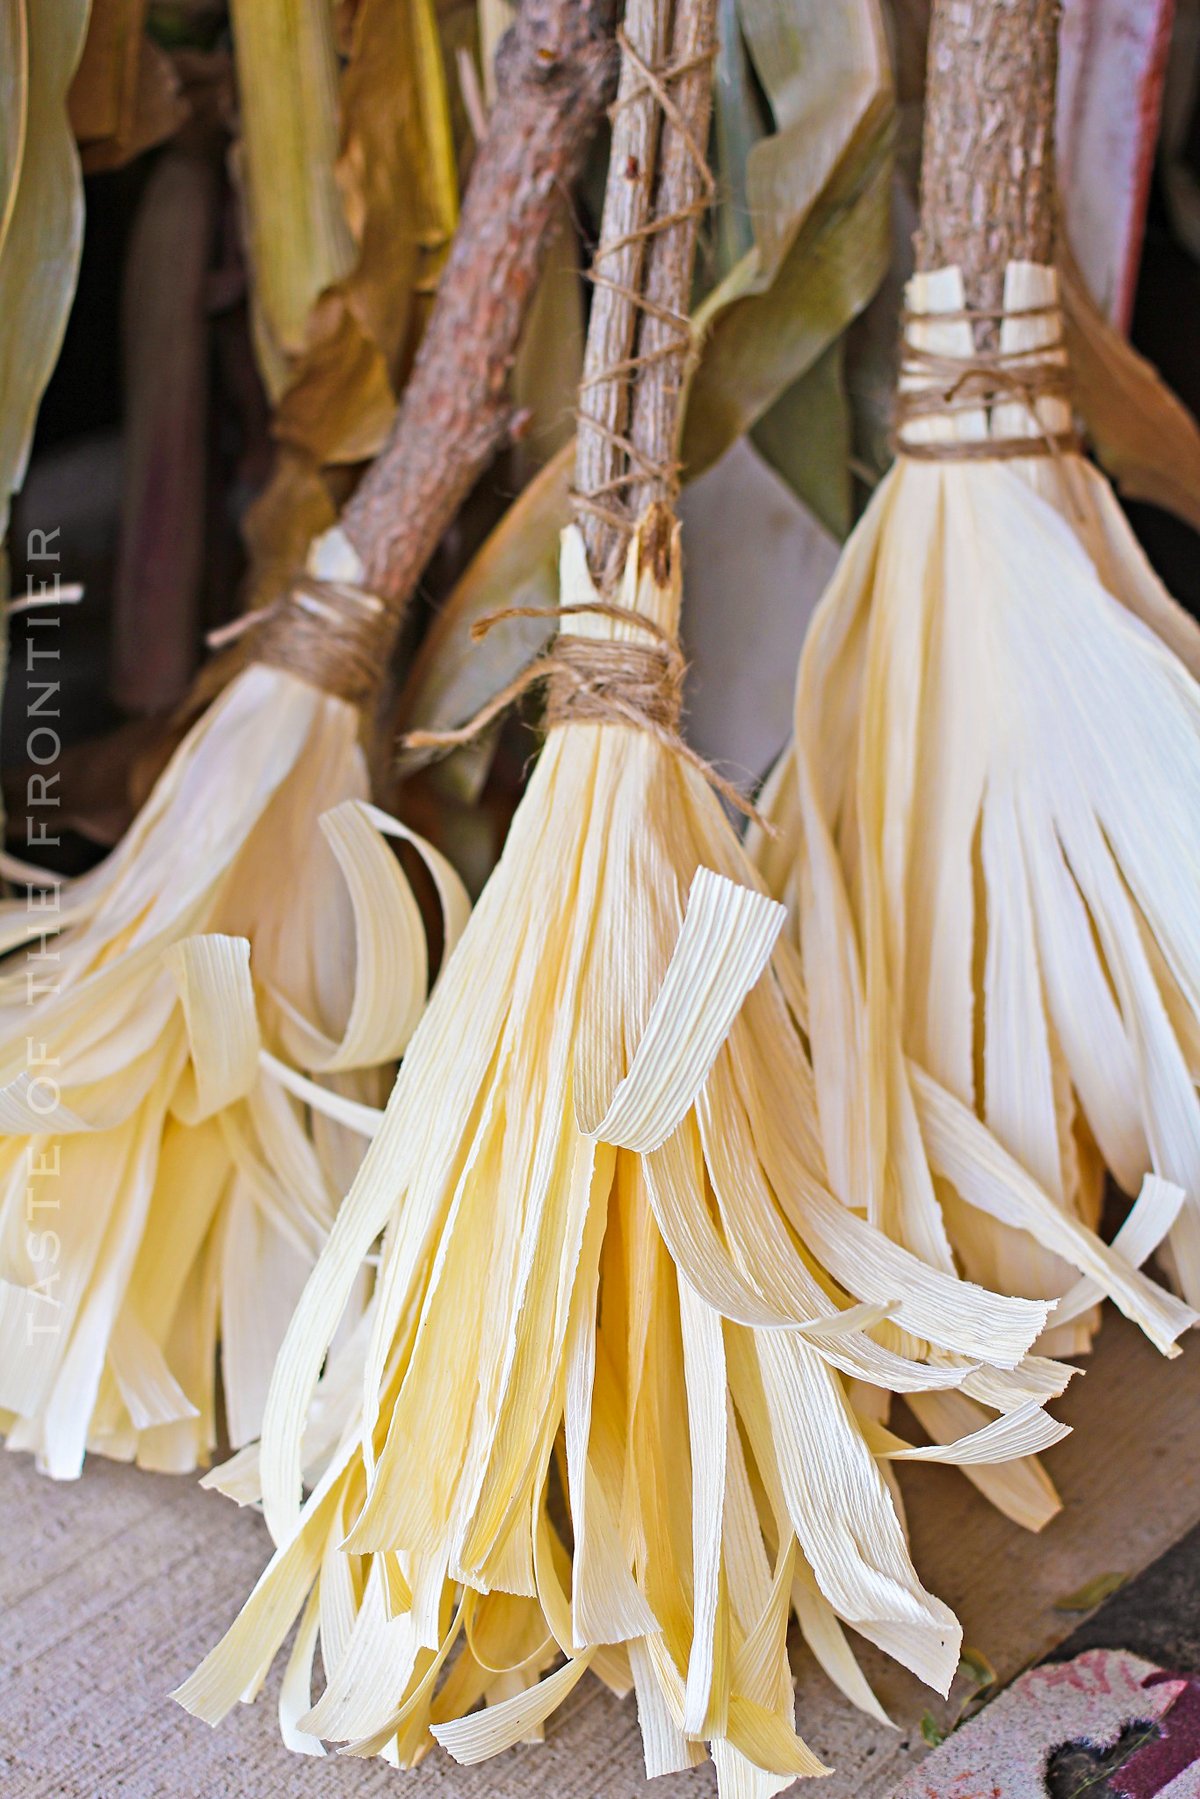
These corn husk brooms are a fun way to decorate your home for the fall season. It’s a fun fall craft for all ages.
Looking for a fun, easy way to decorate your porch for fall? Why not try creating a corn husk broom? This craft is simple and can be completed in just a few short steps.
Plus, it’s a great way to use up any extra corn husks you may have lying around. So, what are you waiting for? Get started on your very own corn husk broom today!
Can you believe it’s October 1st? WOW how the days just fly on by. Guess I better get into Halloween mode around here.
I have been so focused on getting ready for fall & prepping the house for my family to arrive today- that I have completely spaced on Halloween. My head has been going from fall to Christmas & skipping everything in between.
fall crafts
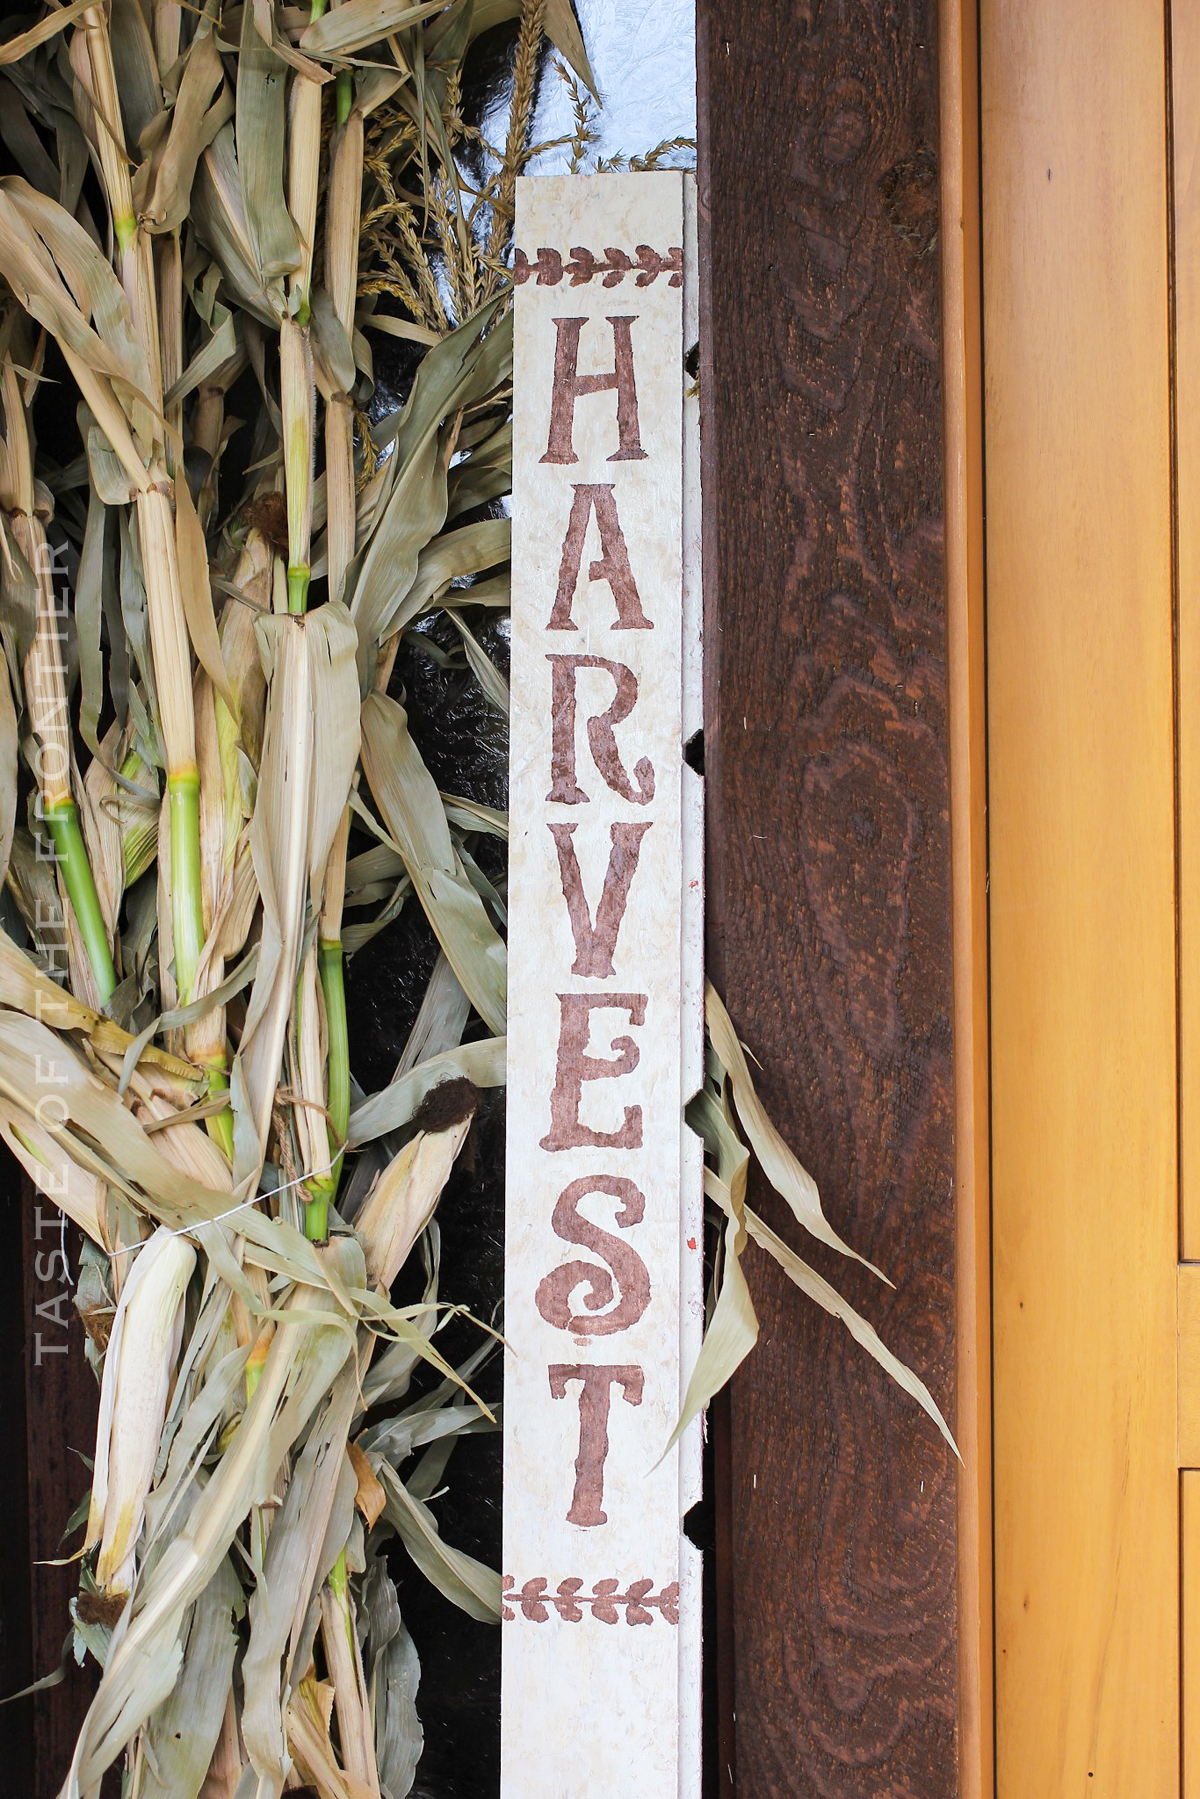
In keeping with my love for decorating with corn husks, I made these little corn husk brooms for the front porch. I suppose they could also be used as witch’s brooms for Halloween if you wanted them to be.
I may go that route- closer to Halloween. But for now, it looks like a corn field was dumped on my porch & I’m perfectly happy about that. I will share the rest of the porch soon.
Here are some commonly asked questions
Where can I find corn husks?
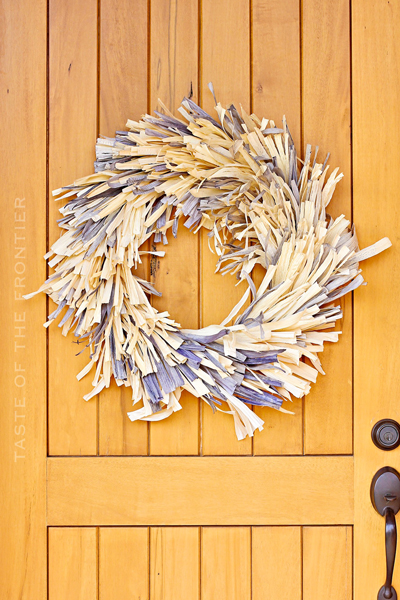
Corn husks can be found in the international food section of the grocery store. I haven’t bought any in a while, but I used to be able to get a decently large bag for around $2-5. Now they run about $8 a bag – but you might be able to find them at the dollar store for so much less. You will need at least 2-3 bags to make this wreath, depending on how full you want the end result to be.
NOTE: TIE THE HUSKS AS TIGHT AS YOU CAN – THEY WILL SHRINK AS THEY DRY. They will eventually fall out of the twine if they are not tight enough.
Cleaning Corn Husk Brooms
As with most things that sit outside, these brooms can collect dust and pollen that is in the air. To clean them you can take some canned air or even just an air compressor or leaf blower and gently blow the dust and dirt off of the brooms.
Do not wash them with the hose or bring them inside and rinse them off with water. Re-wetting the husks will make the brooms fall apart.
SUPPLY LIST
sticks or branches – we used ones we had from pruning our trees
NOTE – KEEP THE BROOMS OUT OF DIRECT WEATHER – YOU DON’T WANT THEM TO GET WET FROM RAIN OR SNOW.
How to Prepare the Corn Husks for Crafting
Soak the natural husks from the bags in a fresh bowl of clean water.
Place another bowl or jar on top of them to hold them down in the water as they will want to float. Leave them in the water for several hours to really soften them up. The water will soften the husks and make them pliable and easier to work with.
Once soft, remove from the water and pat any excess moisture off with paper towels.
How to Make a Corn Husk Broom
Working with several husks at a time, start wrapping the small end of the damp husks around the base of the stick you are working with.
Take a piece of twine & tie the husks to the stick – wrapping around several times to secure well.
Continue adding more husks onto the stick, making sure to overlap the husks to make the broom nice and full.
Tear the ends of the husks to make the frayed look so that they look like a broom. They will curl as they dry.
Once you have assembled the entire broom, hang the stick somewhere where it is warm for them to dry. This allows the husks to all dry without the weight of them squishing them down. I attached mine to a wire hanger with paper clips & hung it in the warm garage for a couple of days.
If you love this easy-to-make fall craft, you’re going to love these other crafts too. Check out the other fun ideas below!
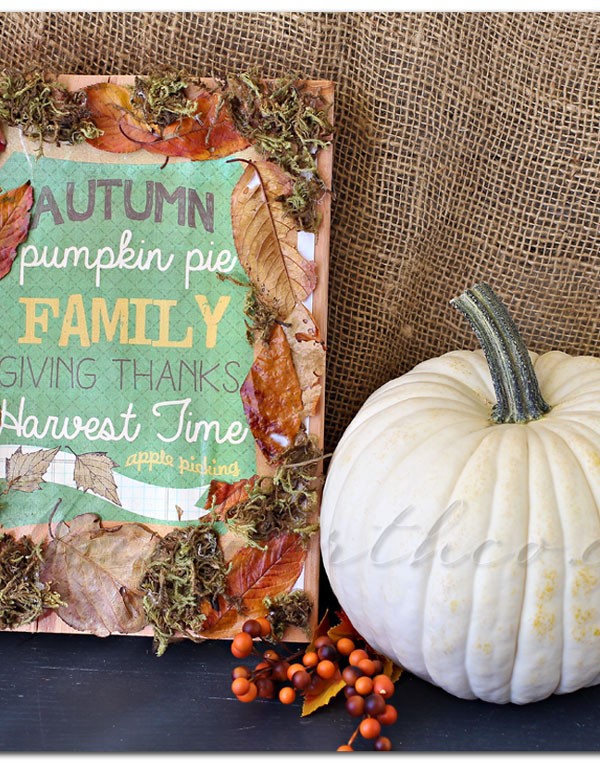
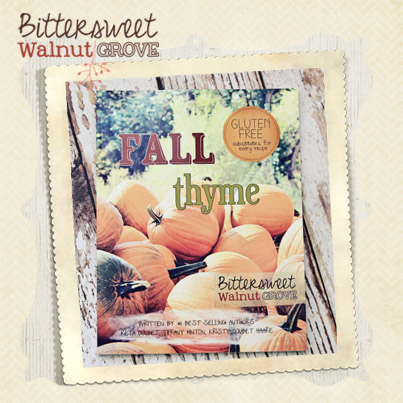
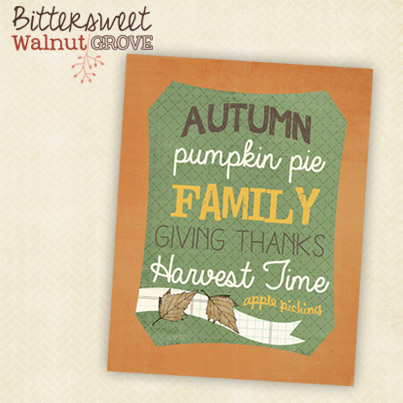
This past week I had an opportunity to review the latest book from Bittersweet Walnut Grove – Fall Thyme. I have reviewed each book from the Bittersweet Collection & I have to tell you – this one is my favorite so far. I don’t know if it’s just because fall is my favorite season or what- but every single page had something I was just itching to make. Kristy & Tiffany have really put a great book together.
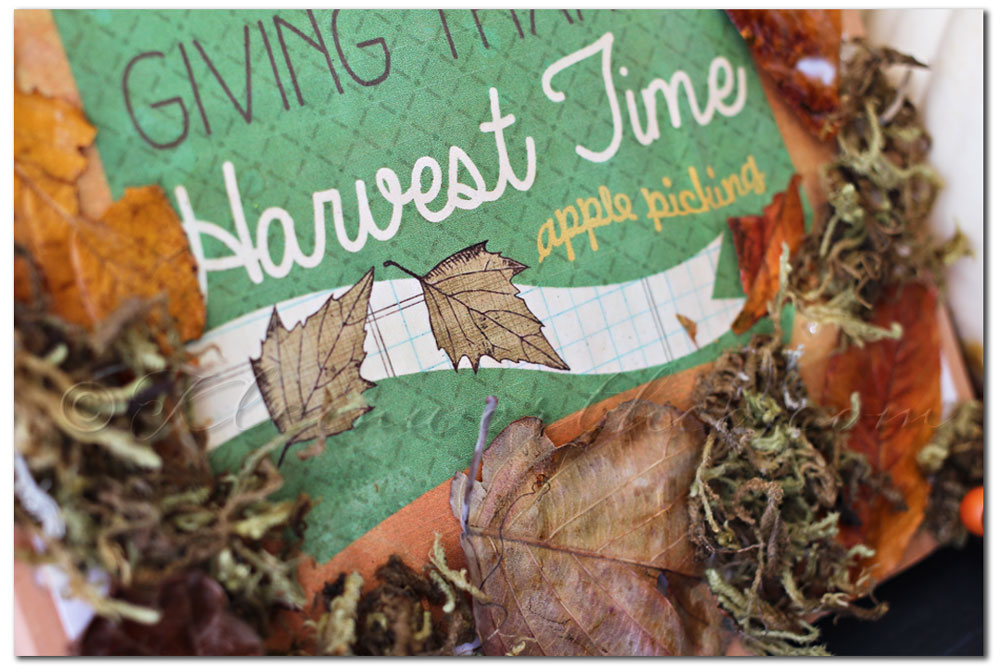
It’s packed full of fabulous fall recipes like ginger snaps, stuffed apples & applesauce cookies.
It has lots of crafts like autumn placemats & banners.
Then there are the printables. I love printables. They make it so easy to decorate for any occasion.
I printed mine & then I decided that insead of framing it like I usually would- I wanted to decoupage it on to one of the larger pieces of wood I picked up at the scrap salvage down the road. It then turned into this…
I used some Mod Podge Matte & sealed the printable to the board. I then added some of the leaves that my dear co-host Tamar sent me last year when I had nothing “fall” around me. I coated them with Mod Podge too to help preserve them & hopefully keep them from breaking so easily.
Then a little bit of moss to fill in the gaps. I have this propped on the hearth- looks so cozy & brings in the feel of the season.
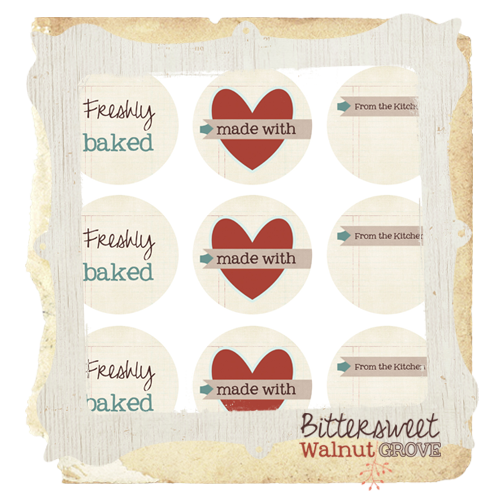
Kristy was so nice to give this printable free to you- my wonderful readers
She is also giving you these free printable jar toppers
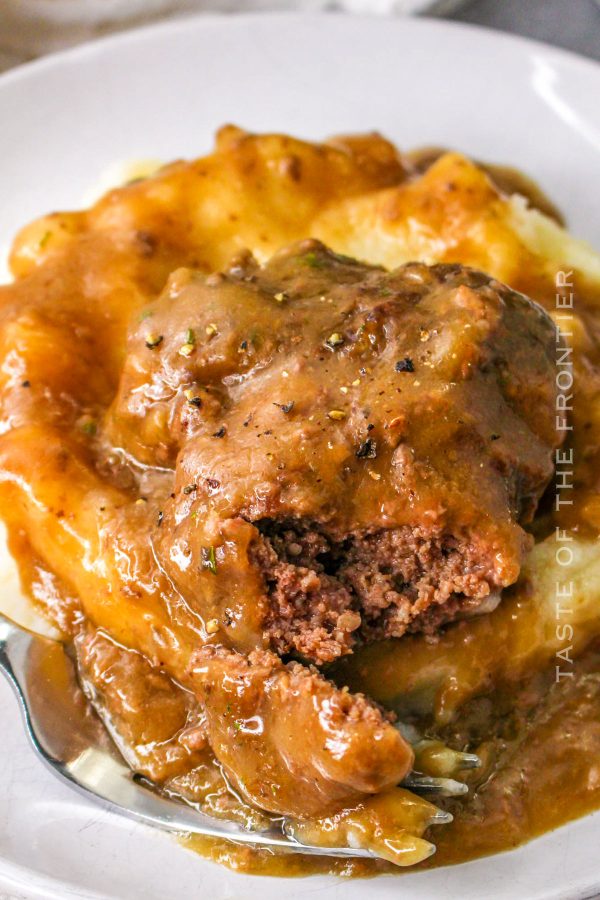
Crock Pot Cubed Steak is an easy weeknight dinner recipe that is so juicy and flavorful. Definitely a meal to put in the weekly rotation.
Just imagine coming home after a long day and being greeted by the mouth-watering aroma of slow-cooked cubed steak. I’m talking meat that practically melts in your mouth and is drenched in rich and savory gravy.
That’s the beauty of Crock Pot Cubed Steak! It combines simple ingredients with slow cooking magic (seriously, I love my crock pot), turning an easy recipe into a flavorful meal that’s just perfect for busy weeknights.
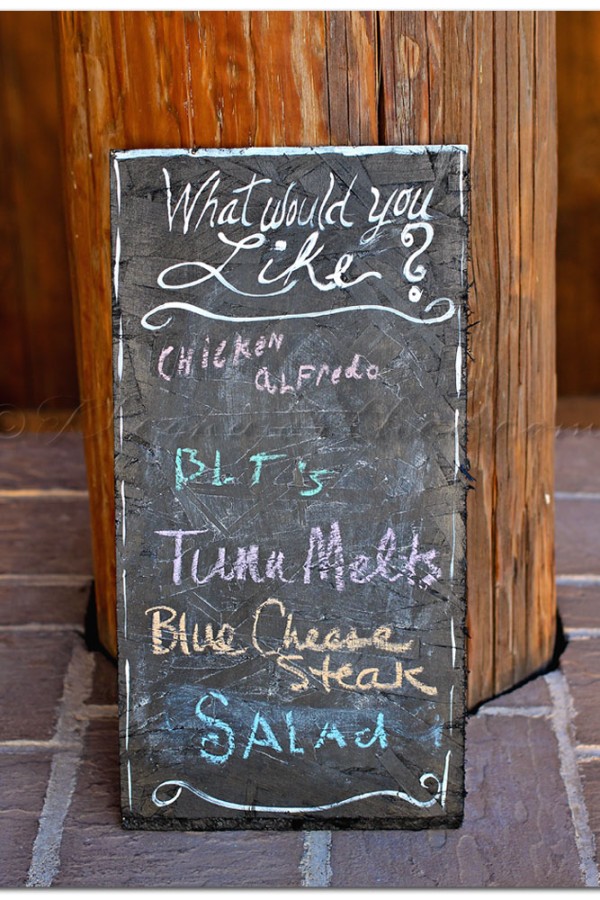
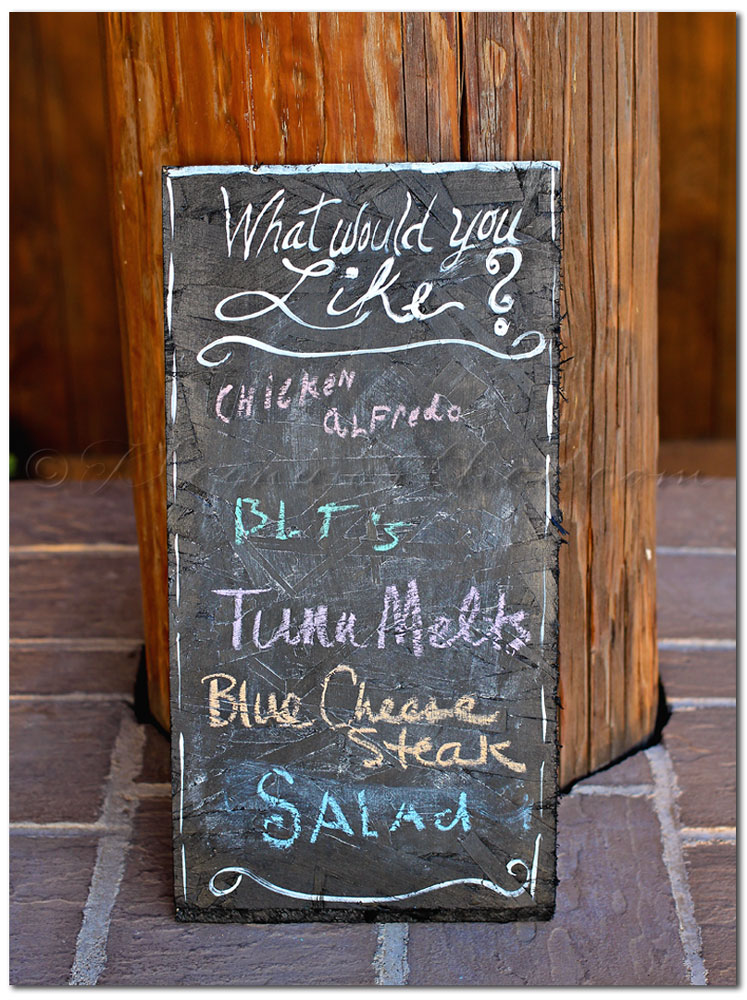
How many times have you been asked to make certain dishes by your family? My kids are always asking me to make this or that – for dinner or for breakfast. The hubs always has a dessert request of some sort. I can never remember all of these & then when it comes to putting the grocery list together I always forget the key ingredients & just buy the weekly staples. Then everyone is asking me when we can have whatever it is that they requested. Soooooo- I decided to make a …
Just a board from the scrap salvage down the street & some chalkboard paint. That’s all it took.
As you can see- everyone in the house couldn’t wait to add their requests to the board. They are already telling me that there isn’t enough room for everything they want to add- so I have been told that I need to dedicate a wall in the house for a larger board in the future. This will have to do for now in this tiny little cabin. But at least I now have some reminders when I am planning my list for the store.
Don’t forget to come back & join me on Mondays for Project 52
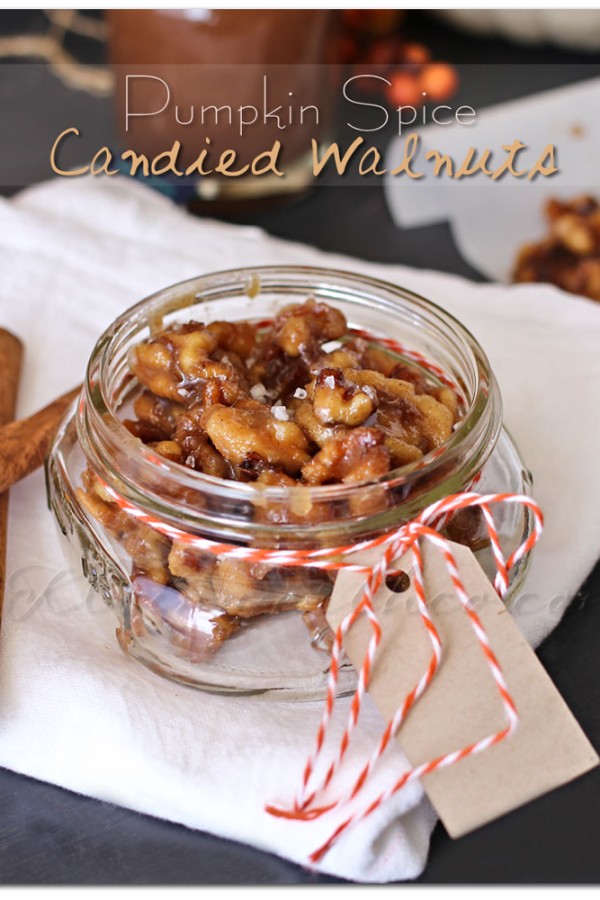
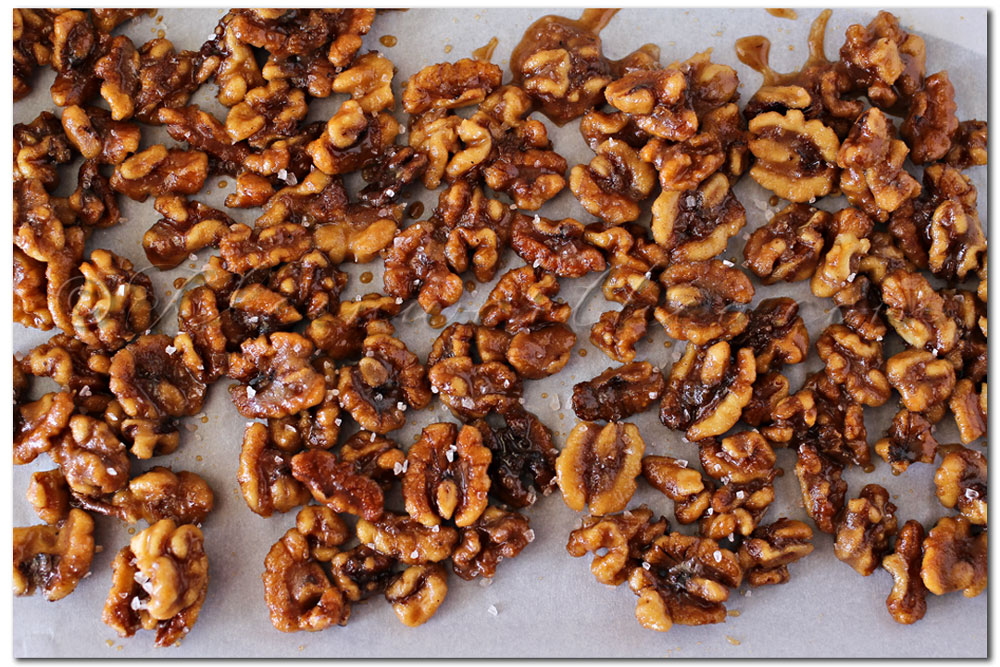
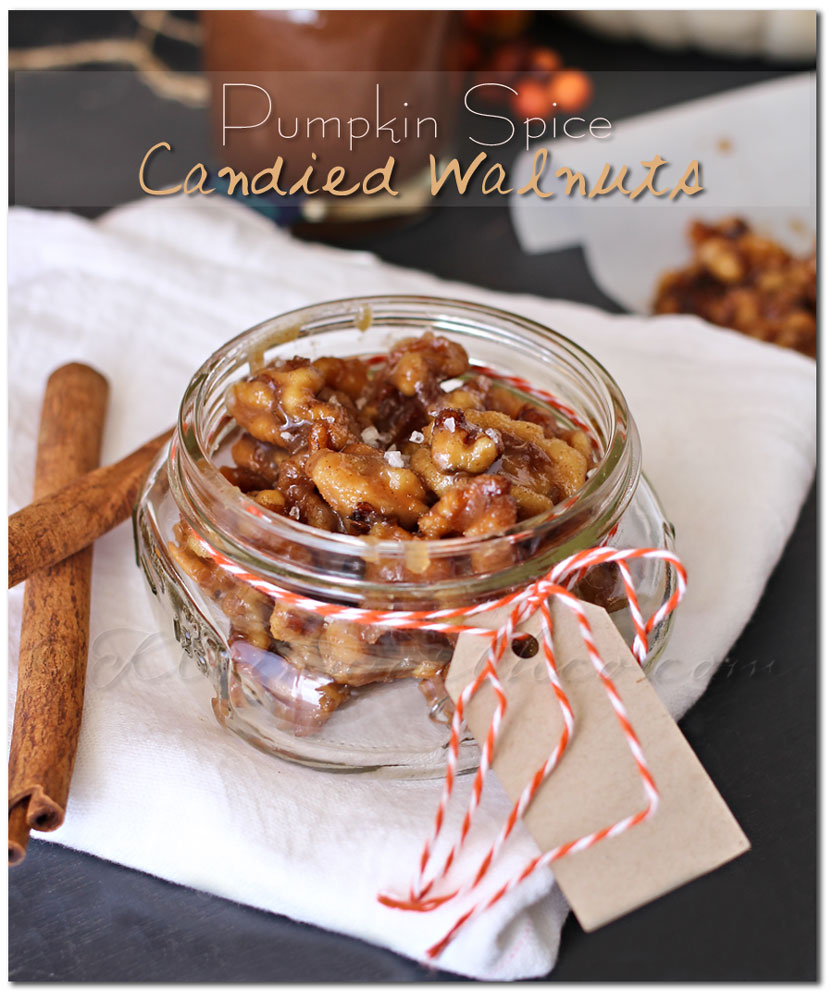
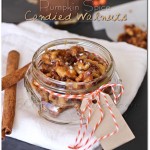
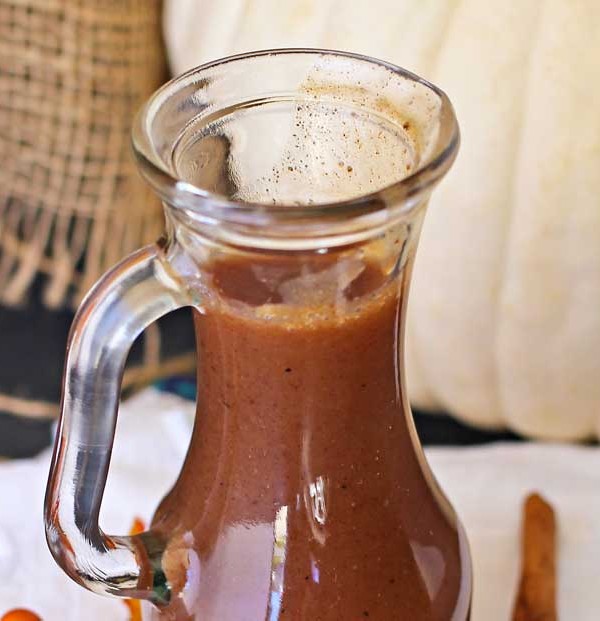
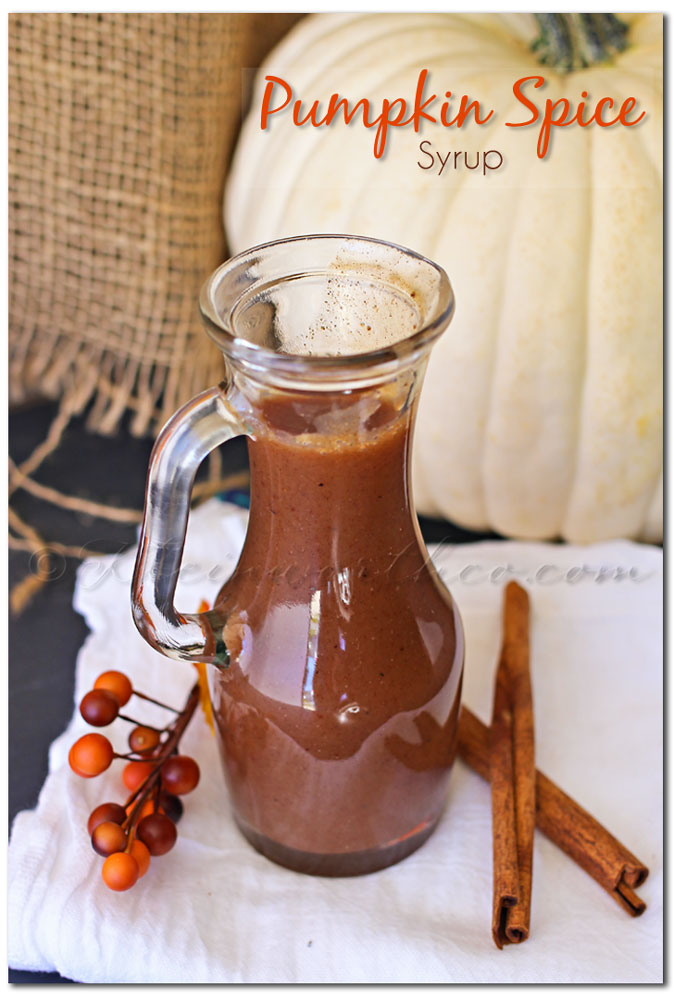
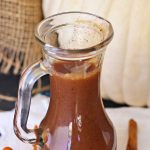
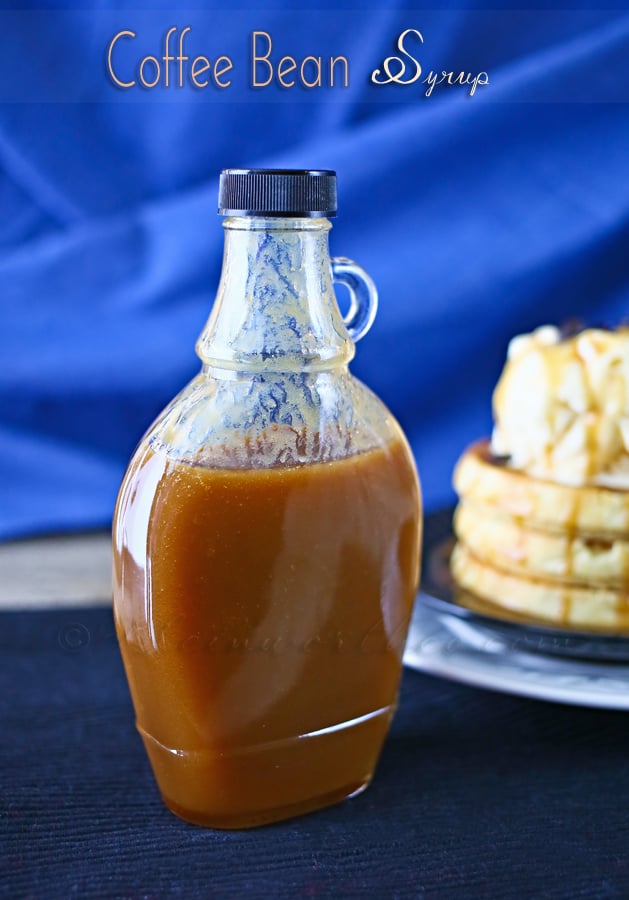
Do I have a treat for you today! A couple days ago when I made the Pumpkin Spice Syrupthat I shared on Wednesday – I knew I wanted to do more with it than just put it on my pancakes. So I came up with the idea to use it to experiment with making candied nuts. I had just picked up a huge bag of walnuts at Costco for some banana bread & so I figured it would be tasty to give it a try with them. I was so thrilled with the result & the whole family LOVES them. They will definitely make the perfect little gift for the neighbors as the season progresses.
Pumpkin Spice Syrup takes your favorite pumpkin spice flavor & puts in in a pancake syrup. It’s easy pumpkin recipes like this that really make your morning!
Pumpkin Spice Syrup
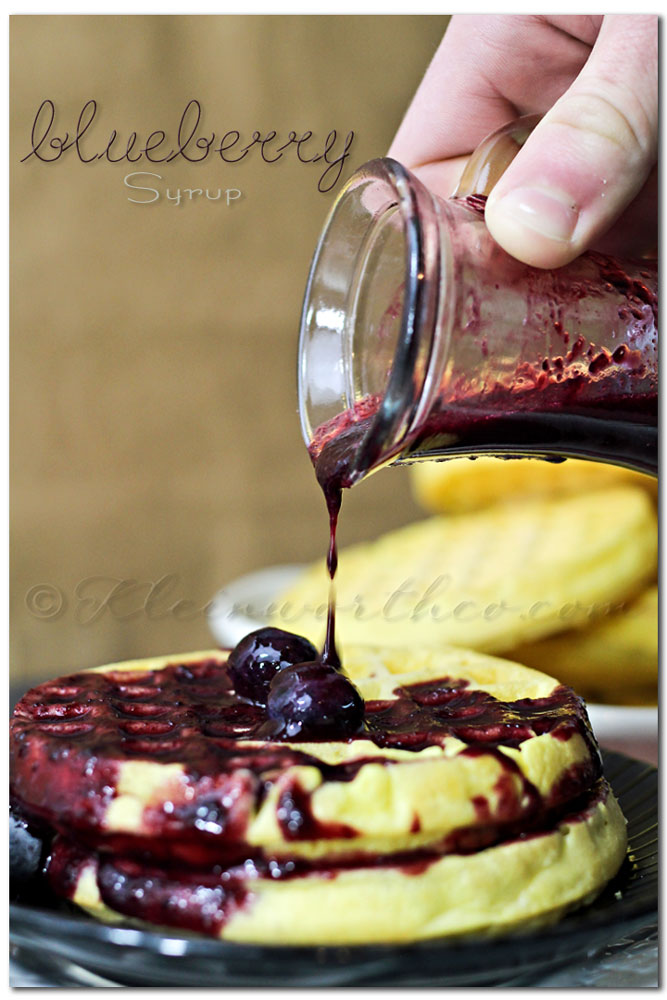
I know I mentioned that I am not a huge fan of pumpkin flavored things- but the rest of my family is. I spent an entire day in the kitchen playing with recipes & ideas to come up with some new family favorites for the season. We happened to be planning on a big batch of pancakes for the weekend & normally I would whip up some blueberry syrup for that. But I really wanted something that didn’t feel like summer- I wanted something warm & cozy feeling. So I came up with this
Pour corn syrup, sugar, water, cinnamon, pumpkin pie spice & nutmeg in 2 qt saucepan.
Whisk to combine & heat over med-high heat until it comes to a boil
Whisk constantly - let boil & cook 3-5 minutes
Remove from heat & slowly pour in evaporated milk- whisking the entire time.
Whisk in vanilla
Transfer to airtight container - store in refrigerator
Heat in microwave before serving
It’s absolutley FABULOUS! All the smells & flavors of fall – drizzed on my breakfast. Plus- it’s so simple- you have to make it. I know this is something I make often & always have on hand this time of year. It’s not only great on pancakes, waffles or french toast, but I love adding it to my ice cream & my morning coffee. No wonder we go through it so quickly- right?!
*Disclosure: Sponsored Post- I have been compensated for this post either monetarily or with product.
All opinions are truthful & my own.
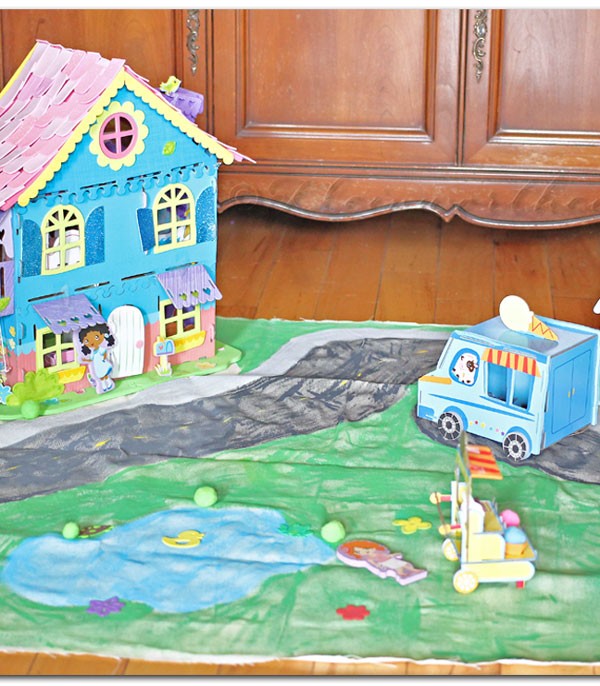
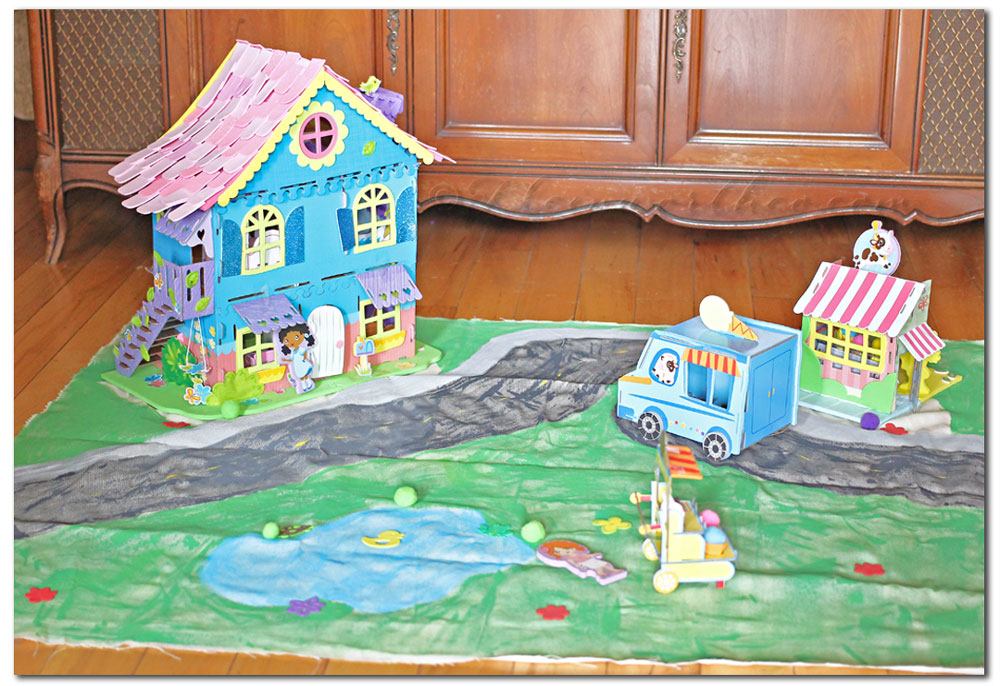
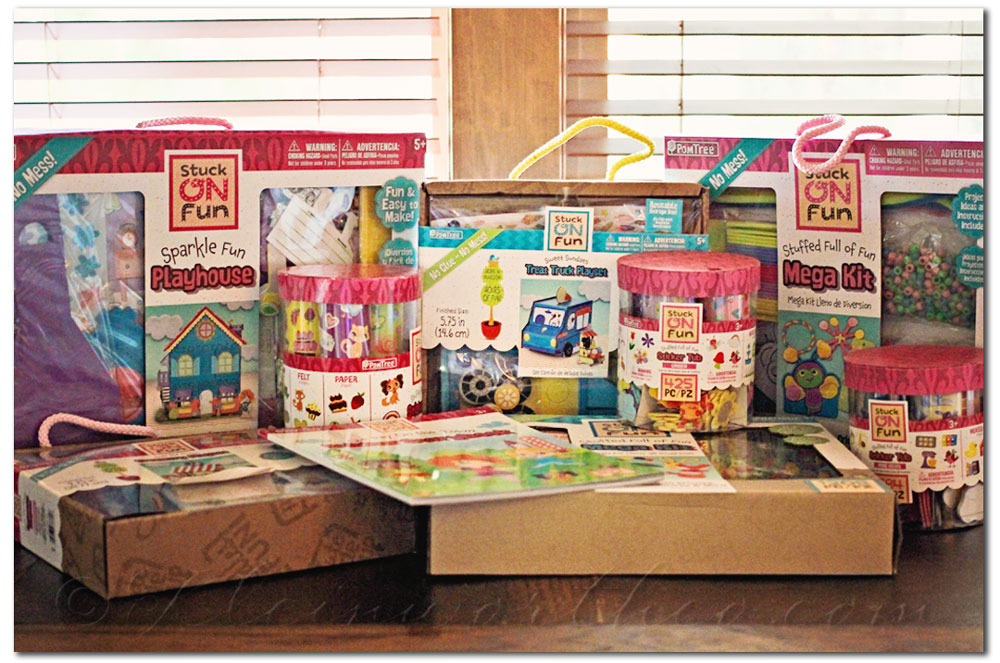
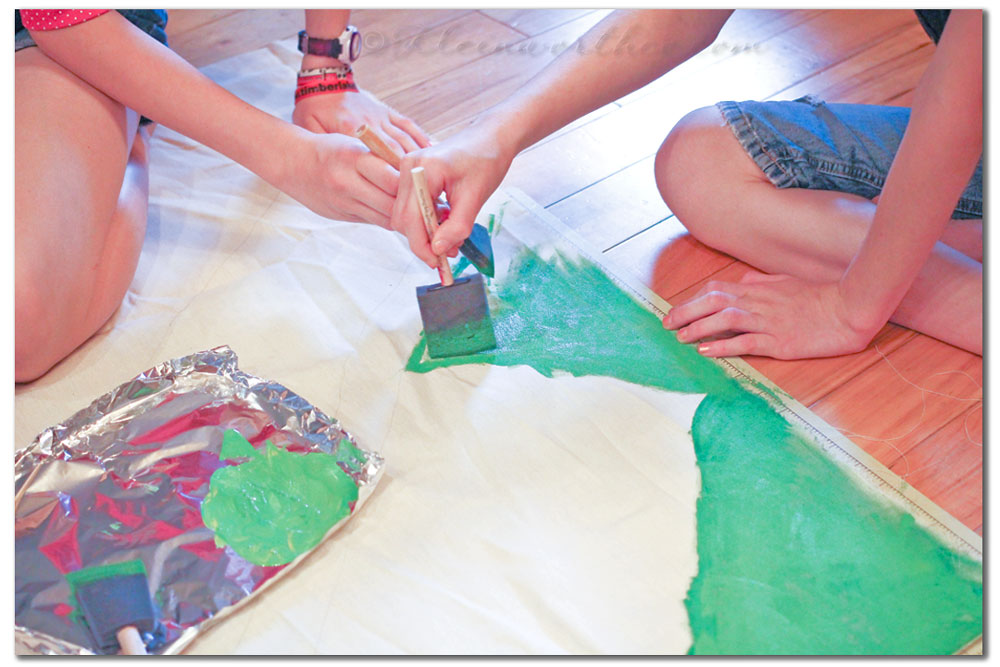
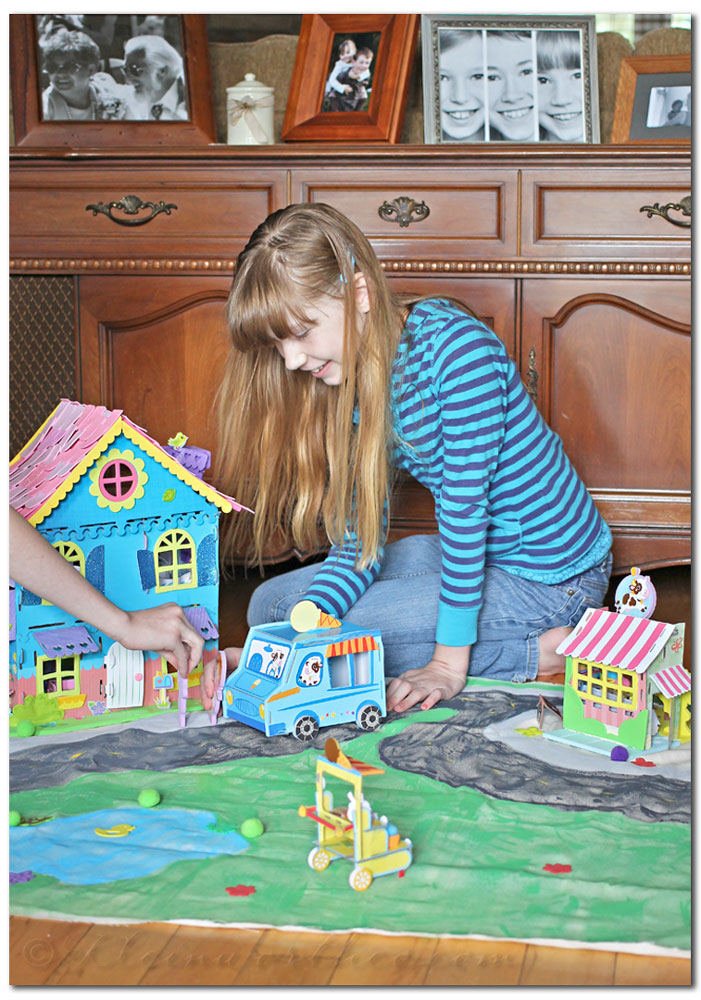
Don’t you just love it when you find things for the kids that not only push their creativity but keep them entertained for hours?? I absolutely love watching the kids think outside the box & work together to put ideas into motion. This past week I had the opportunity to play with the Pom Tree Kids craft kits with my kids. There are so many great kits- we wanted to use all of them in some way to really enjoy them as a whole.
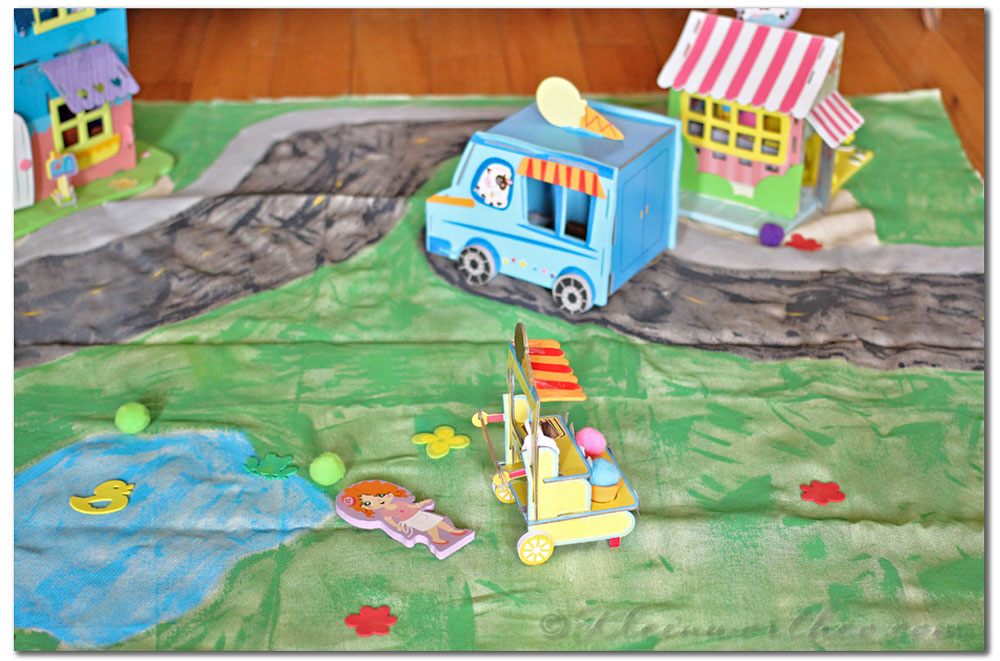
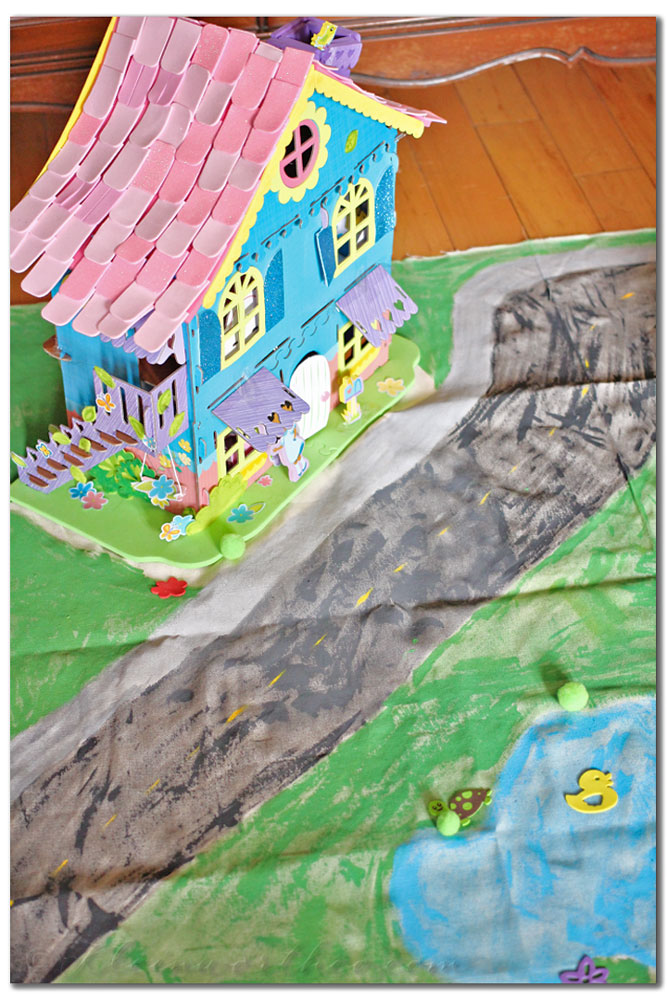
We decided to create this Painted Play Mat for the Pom Tree Kids Sparkle Fun Playhouse Kit, Over the Moon Creamery Play set Kit & Sweet Sundaes Treat Truck & then use the supplies in the Sticker Tubs & Mega Kits to accessorize the mat & make it perfect for setting the play area.
These are all the kits we were sent. It was a creative explosion here.
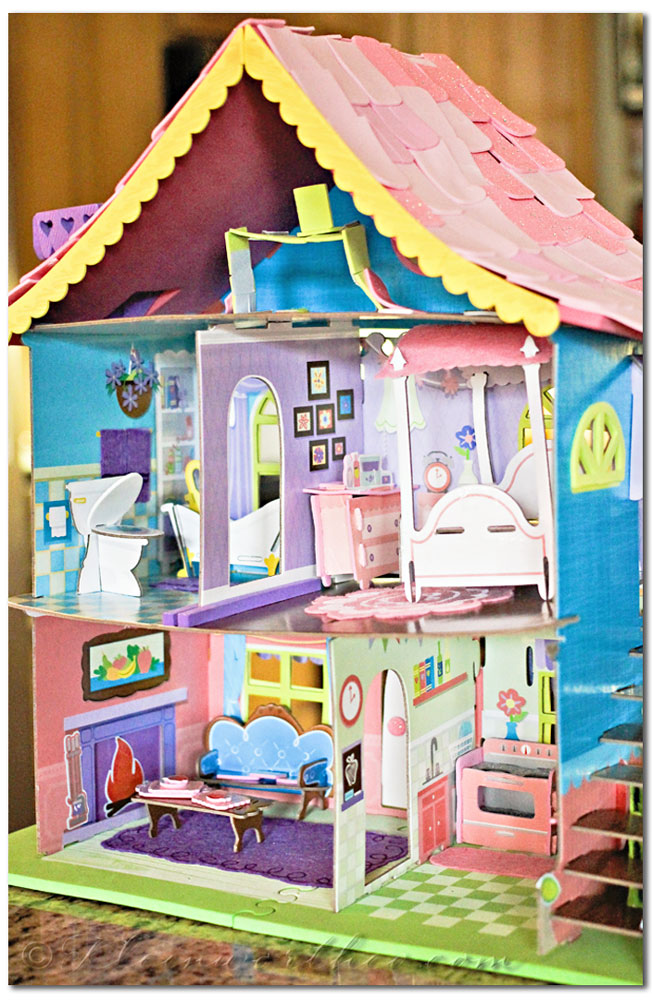
Step 1 – Build your play house & other structures to get the scale when deciding on the size of your mat.
This was great. I gave it to the girls & told them to follow the directions. They were able to do it all without much help from me. I LOVE that everything is peel & stick stickers so I didn’t have to worry about glue on the carpet. Gotta love no mess crafting- especially for the kids.
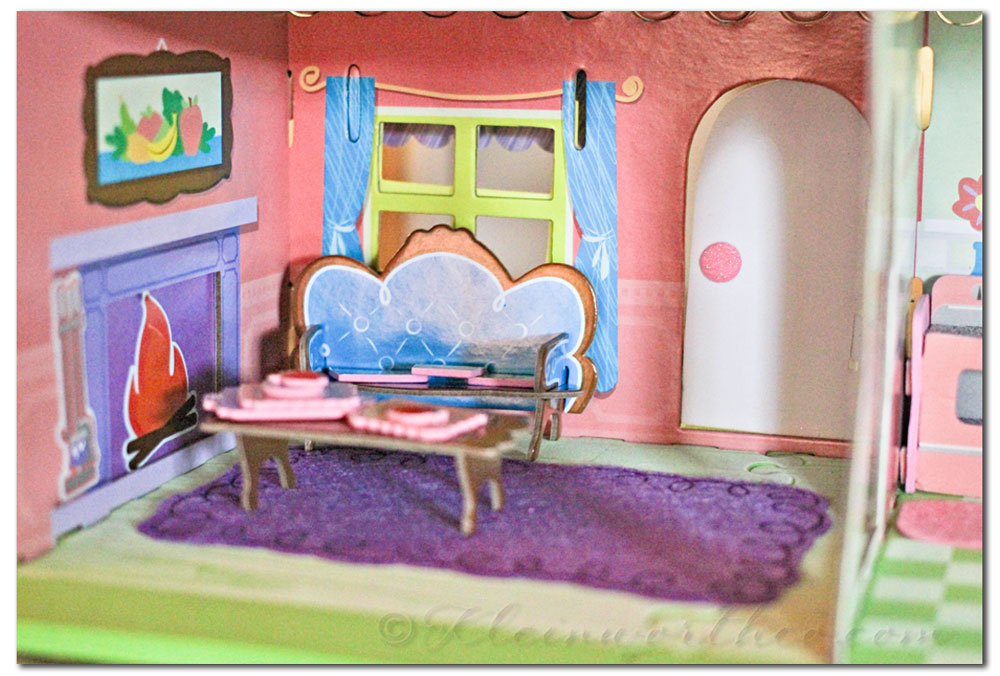
Step 2 – Assemble your furniture too.
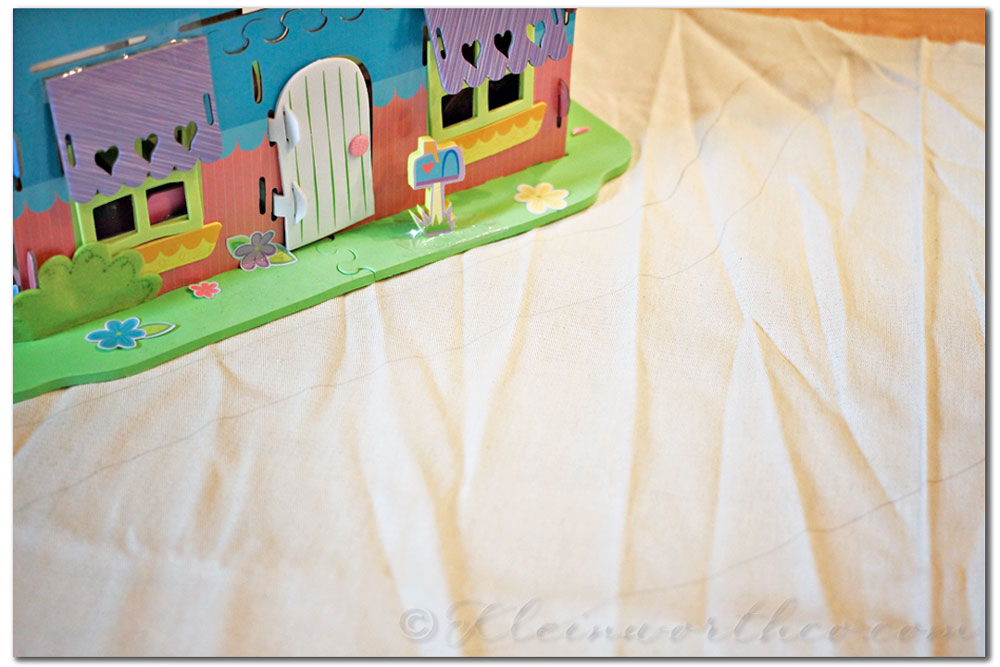
Step 3 – lay out your canvas & place your structures in the areas where you would want them. Cut canvas accordingly.
Step 4 – Draw out your town. I wanted a park like setting with a road for the ice cream truck so that was what I sketched out.
Step 5– place something underneath your canvas so the paint doesn’t bleed through. Start painting in your mat.
I used multi surface acrylic paint. It dried within a couple hours. I did a quick light coat of paint. I didn’t want it to saturate the fabric & I also liked the spotty darks & lights by not getting heavy handed with the paint. I felt it added to making the road look worn & grass some depth.
Step 6 – once your mat is dry- stick on the foam & felt sticker flowers & other shapes to fit your design.
I also used the pom pom balls & glued them on for bushes.
Now your mat is ready for you to place your structures on it & play.
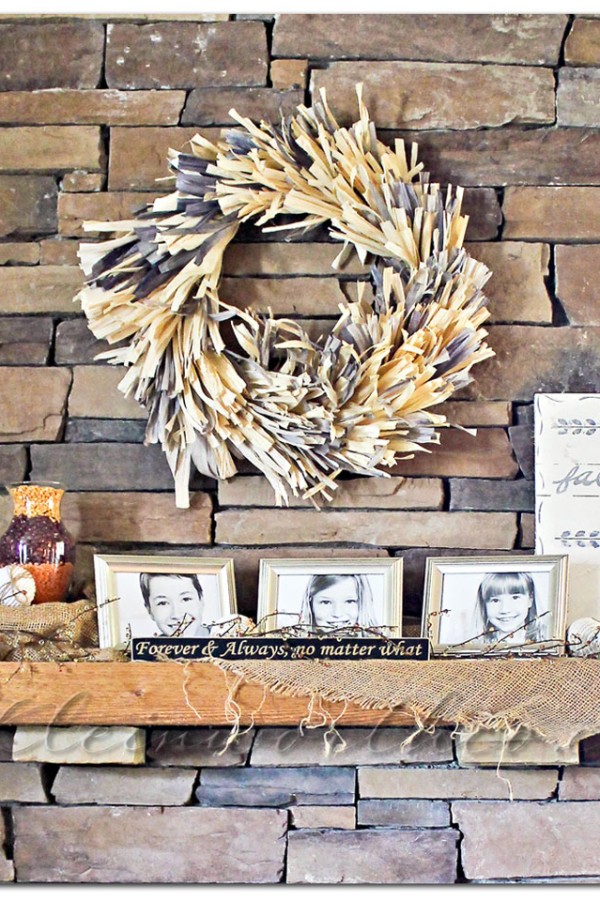
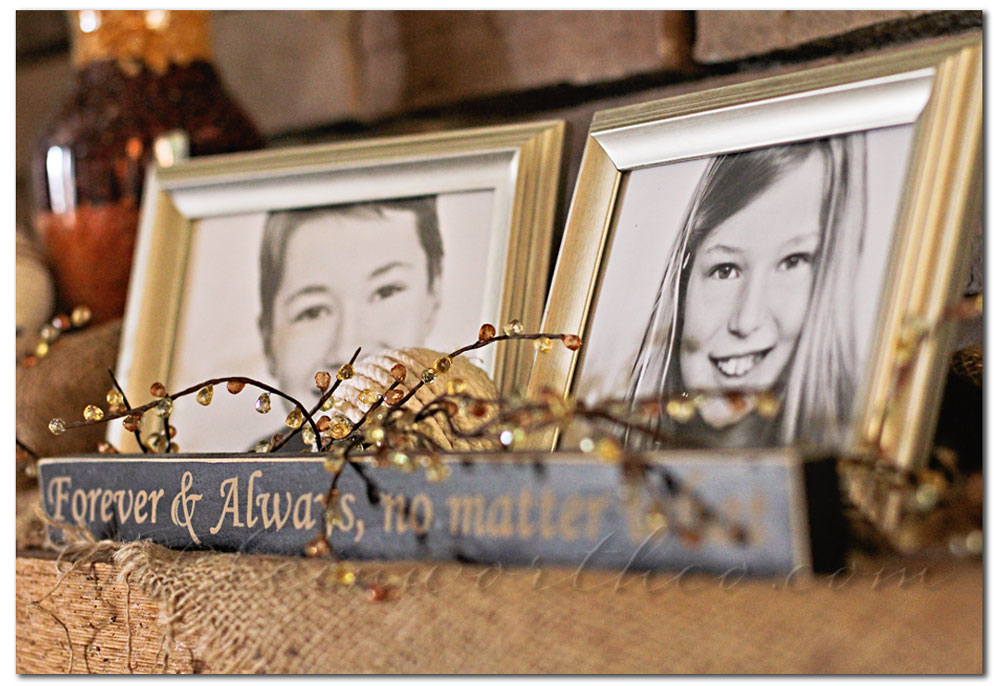
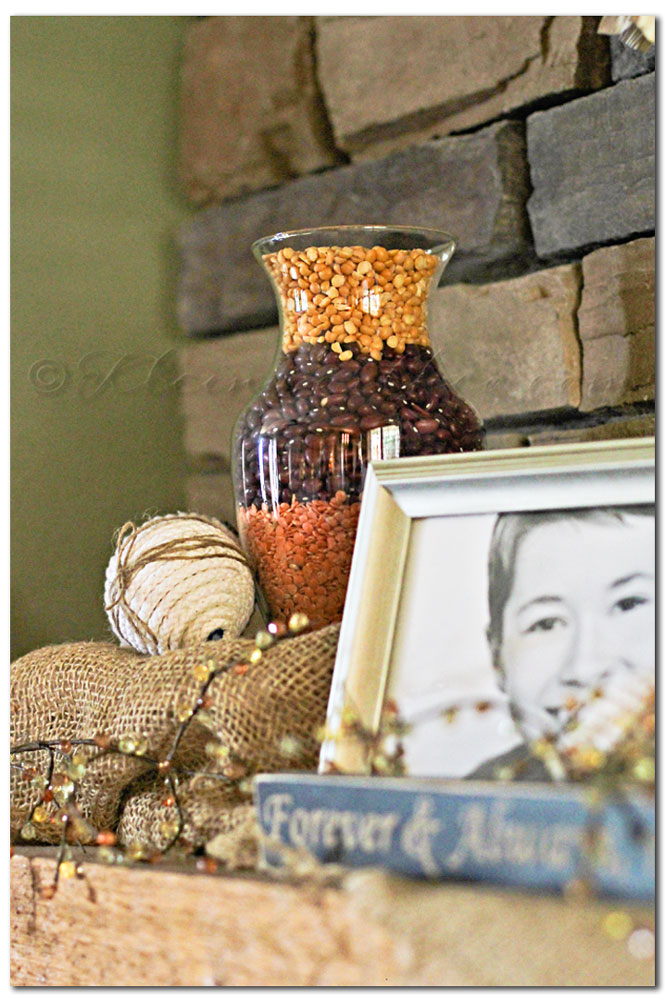
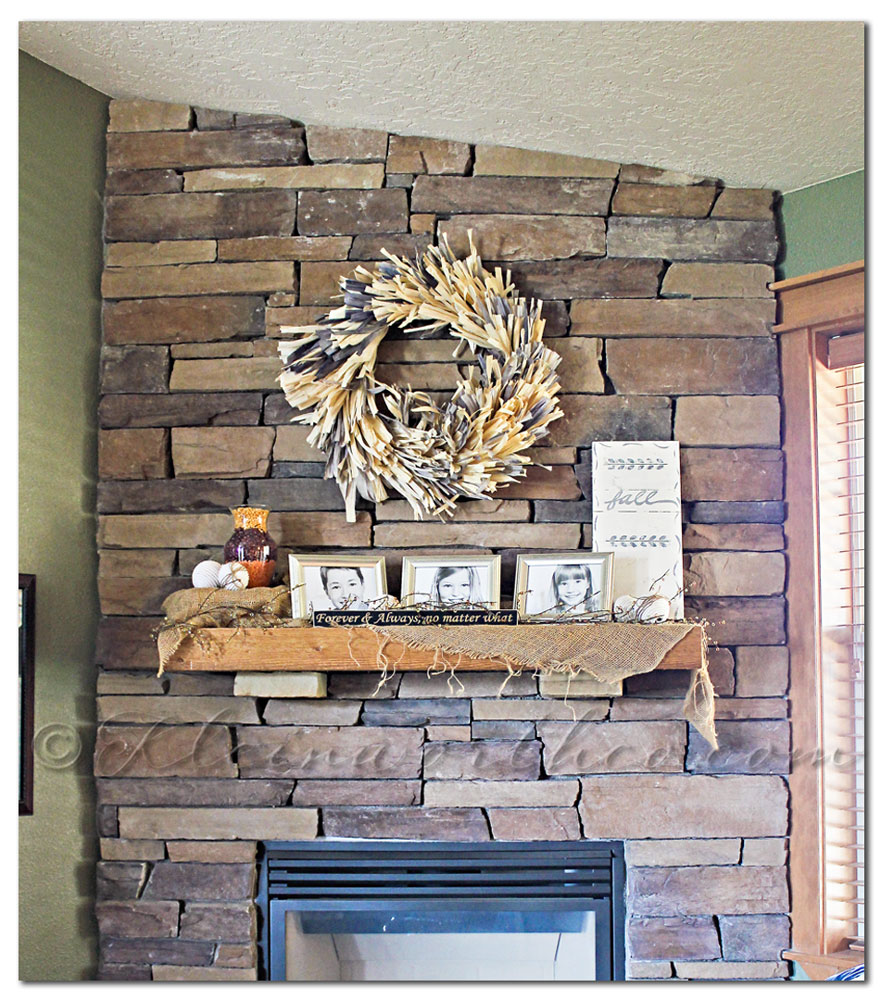
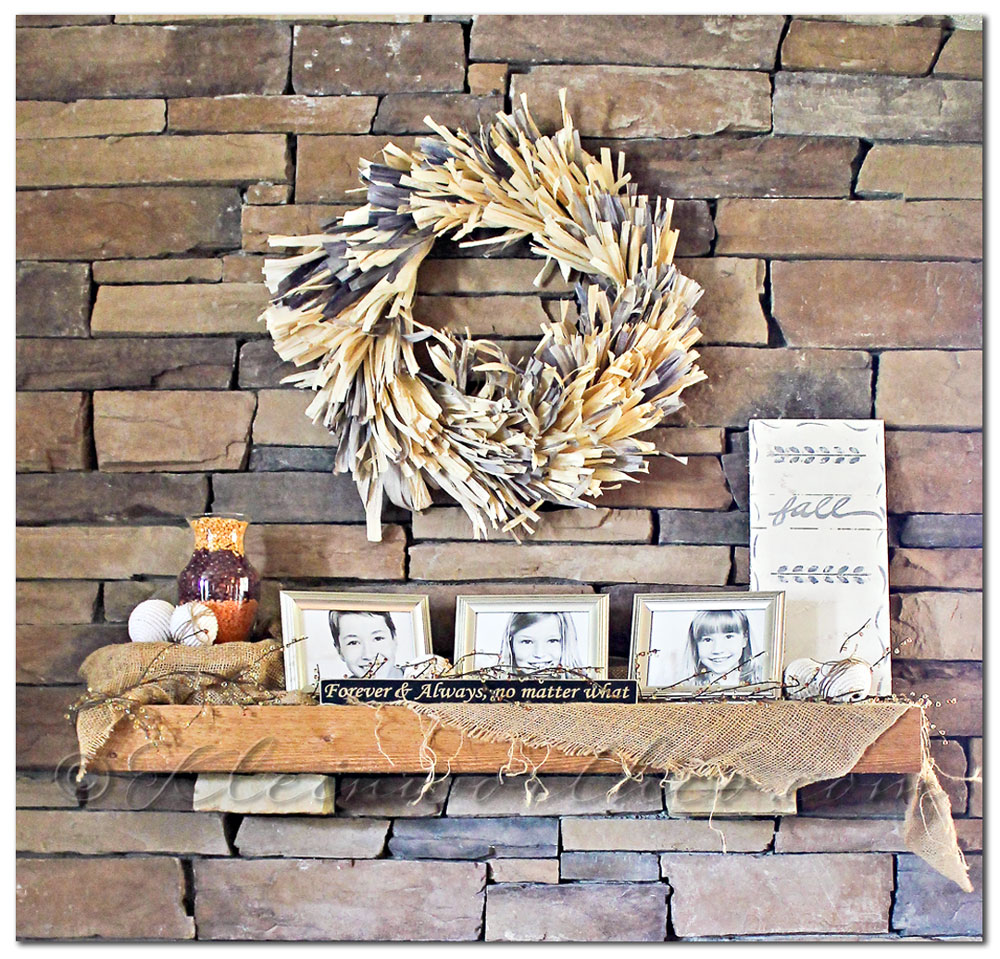
I finally wrapped up the finishing touches on the fall mantle. I love to decorate for each season & bring the changing of the seasons in. I especially love fall & all the decor it brings. The colors & tones just make me happy. I did a couple new projects to add to my already existing items I have had & used on other occations. I think the eclectic collection works well.
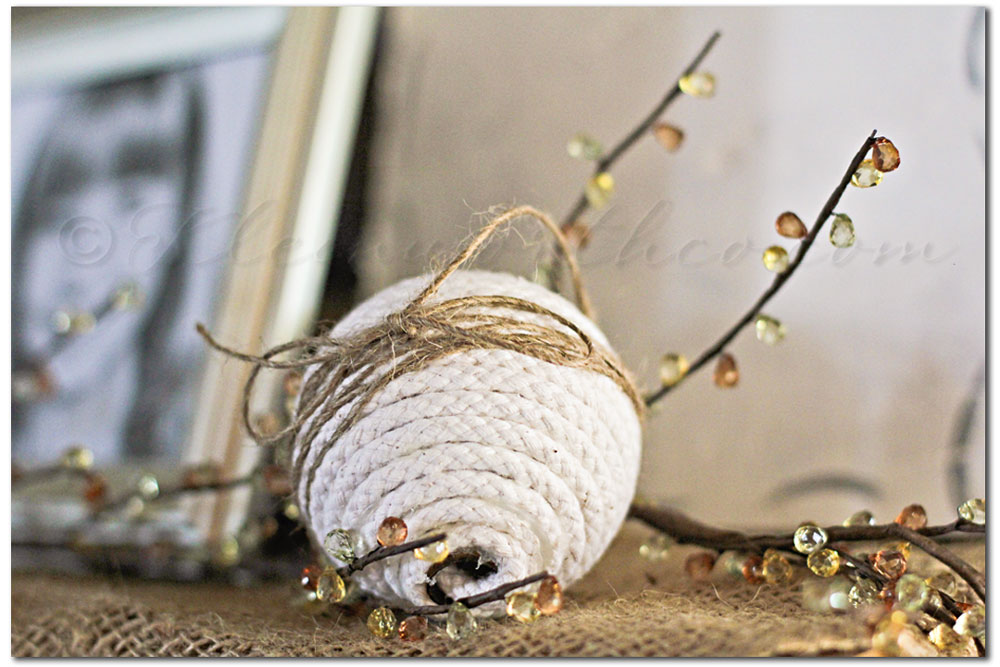
I made these rope balls this past January. I love the neutral tones they add.
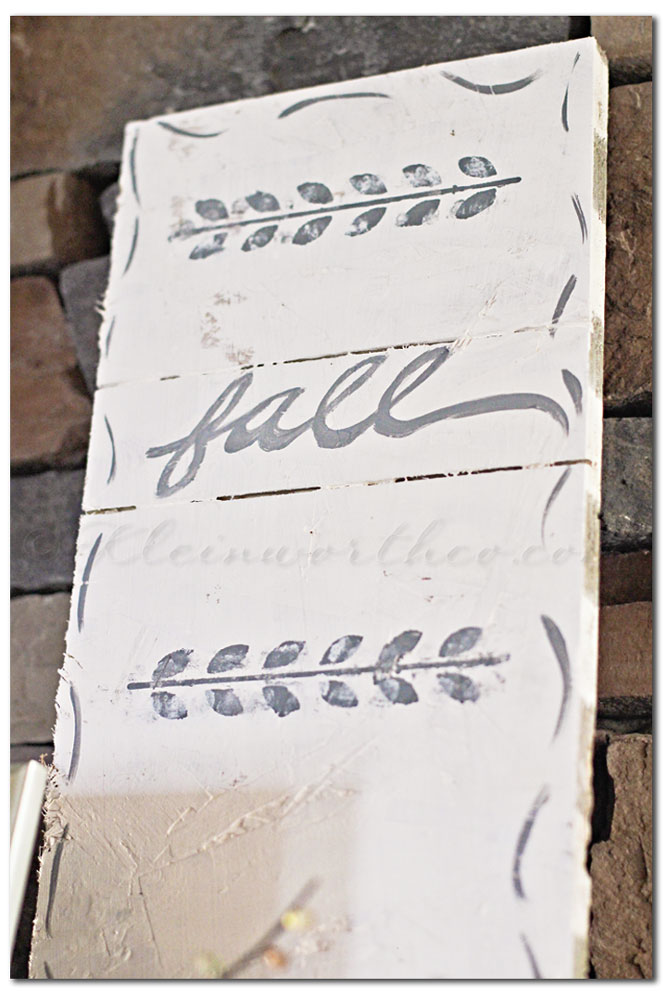
I painted this on a random board I had picked up in a salvage bin. The leaf pattern is a stencil & then I did the rest free hand.
Again- loving the neutrals. I also gave it a little rub while the paint was wet to distress it a little.
I picked up this garland with the beeds. I love the tones of amber it adds to the mantle.
I picked up some random dried beans & such for this vase.
I just grabbed some colors I liked- I didn’t even care to know what they were.
Here’s the view from the kitchen- I love how it flows with the first corn husk wreath I made.
Then a little closer so you can see the whole thing together.
I’m going to be a little sad when this has to come down for Christmas decor.
But I’m hoping I love what I do for Christmas just as much.
Don’t forget to come back & join me on Mondays for Project 52
Don’t miss my Fall Table Setting I’m sharing over at Design, Dining & Diapers today.
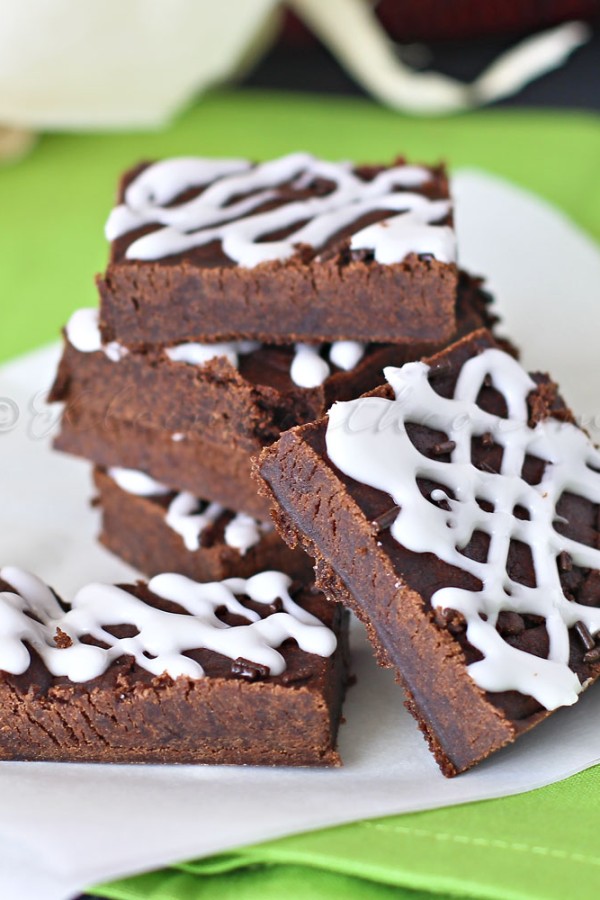
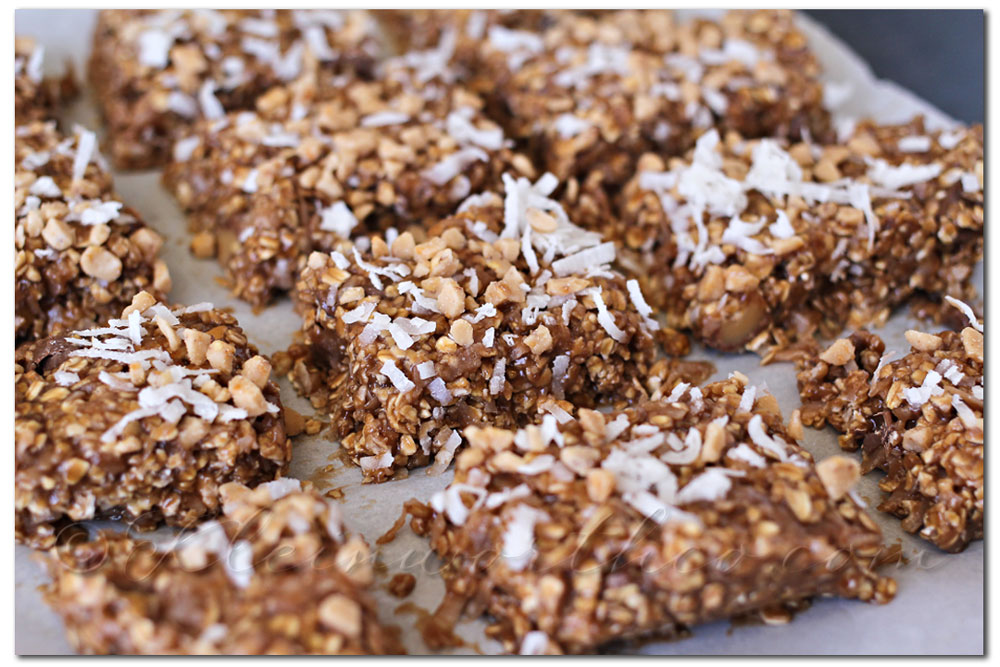
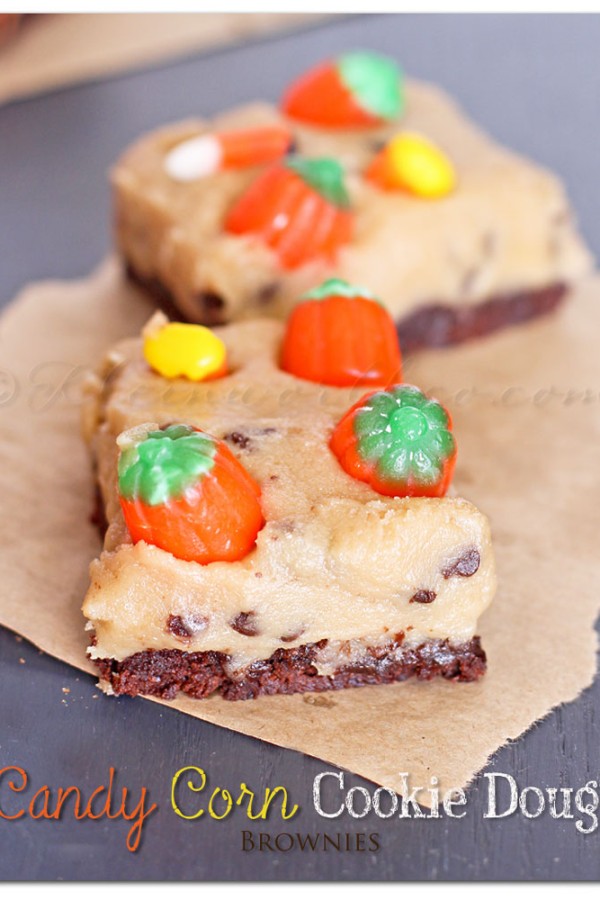
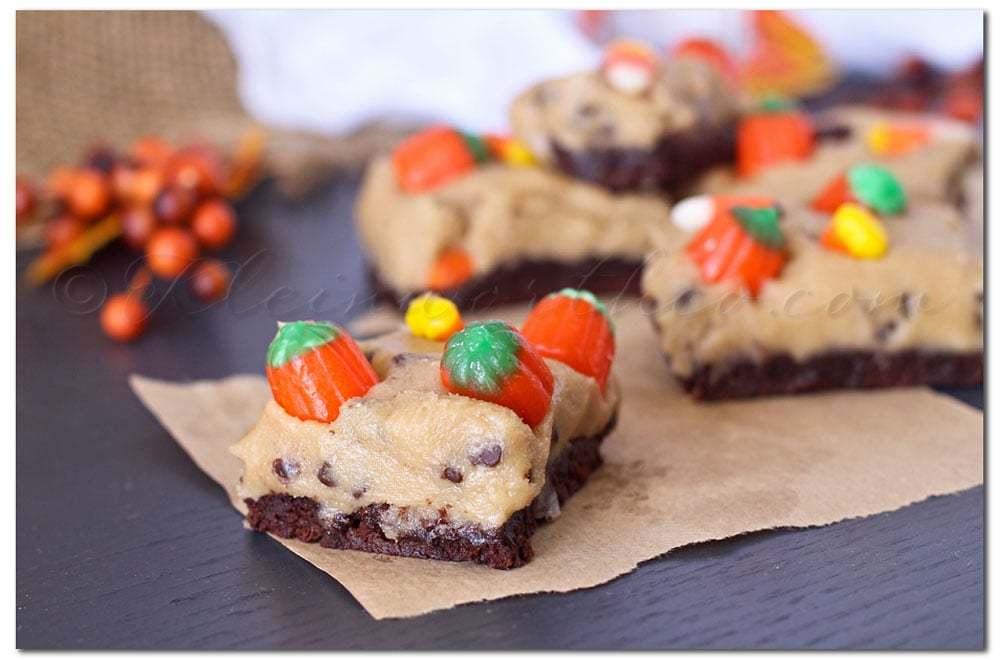
I don’t know about you- but one thing I really look forward to this time of year is candy corn. I LOVE IT! It usually doesn’t last long enough in this house to make it into recipes. But I was really good & used all self control this time because when I bought it- I had this recipe in mind. I knew that the mix of the brownies, the dough & the colors of the candy corn would make the perfect Fall/ Halloween treat.
Your favorite brownies - baked & cooledboxed or homemade
3/4cupbutter1-1/2 sticks
3/4cupsugar
3/4cupbrown sugar
1-1/2cupsall-purpose flour
2tspvanilla extract
3tbspmilk
1/4cupmini chocolate chips
1cupcandy corn
Instructions
Bake your brownies & allow to cool to room temperature.
For the dough- beat butter & your sugars in mixer bowl until well combined.
Add in your flour, milk & vanilla. Beat until combined- don't over beat.
Fold in mini chocolate chips
Spread out in even layer over the top of your brownies.
Scatter your candy corn over the top & press in
Cover & refrigerate several hours before cutting.
Cut while cold & remove from pan. (I recommend close to bite size- not large pieces)
Allow to come close to room temperature before serving.
Store in air tight container for several days.
Notes
**If you are concerned about killing bacteria in the flour, you can either pour the flour onto a baking sheet & bake in a 350-degree oven for 5 minutes or place on a microwave-safe plate & microwave for at least 1-2 minutes or until it reaches 160 degrees before adding to your dough mixture.
Take these to your next pot luck or gathering. They will be the first dish that runs out- I promise.
Don’t forget to come back & join me on Mondays for Project 52


 Oh my goodness- I could eat the whole batch in one sitting.


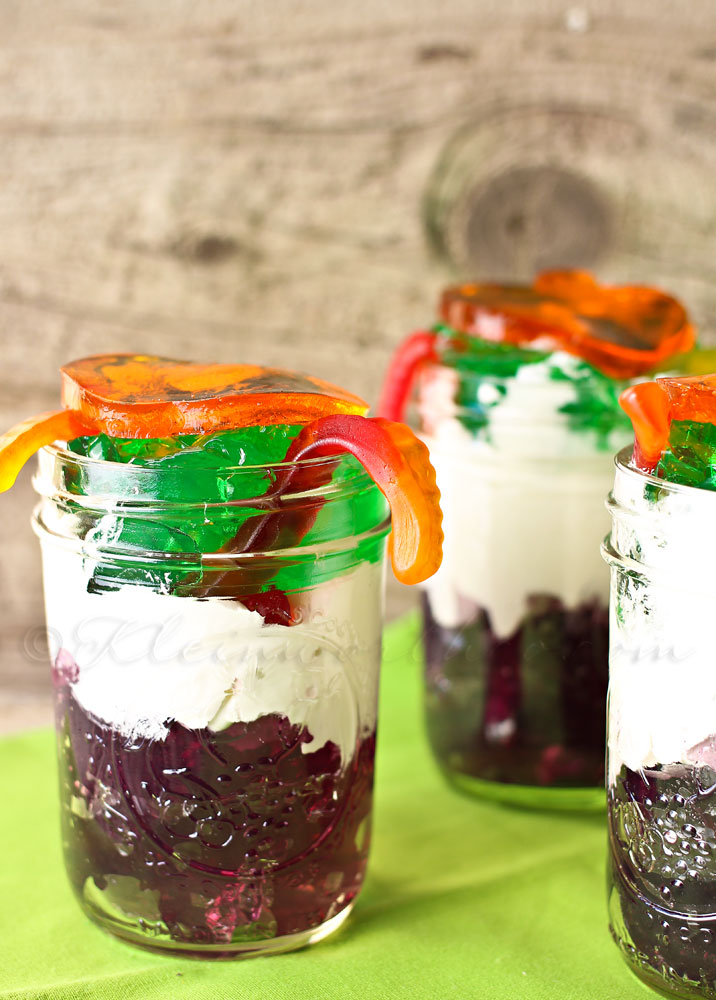
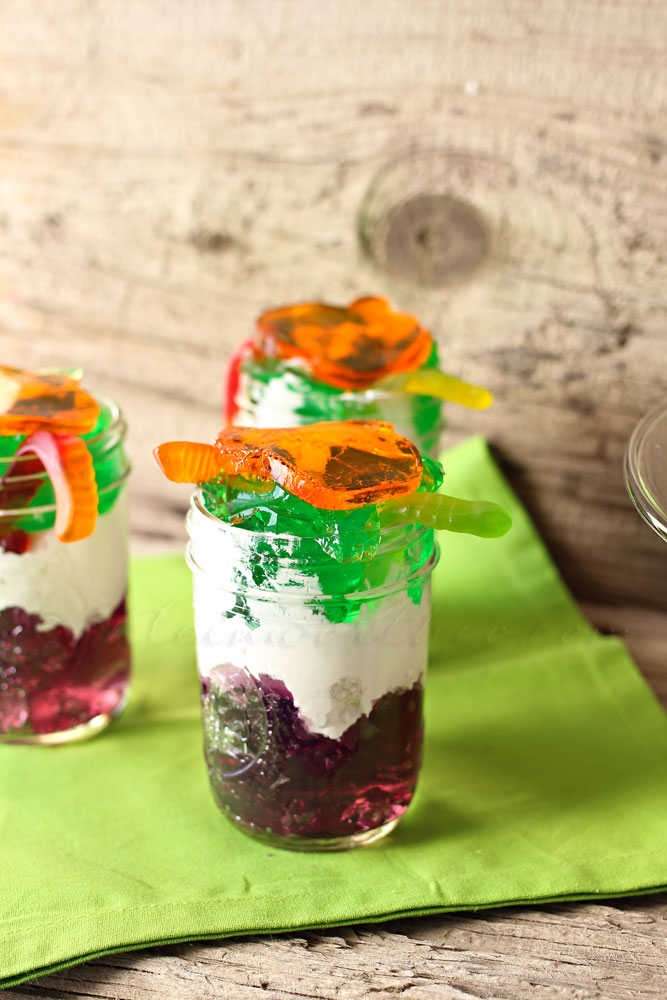 I also made some regular JELL-O® in Grape & Lime & layered it in these jars with some Whipped Cream & Gummy Worms.
 They had such a great time helping me with making them too.


 We shopped for it as a family – which was nice because we rarely do the market as a group.
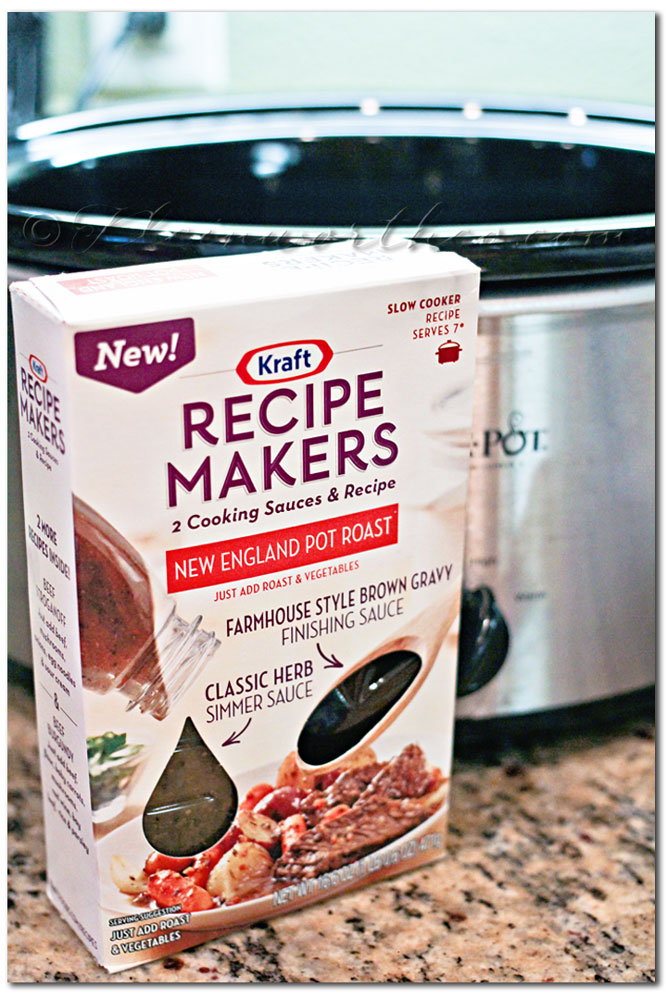 For the pot roast.
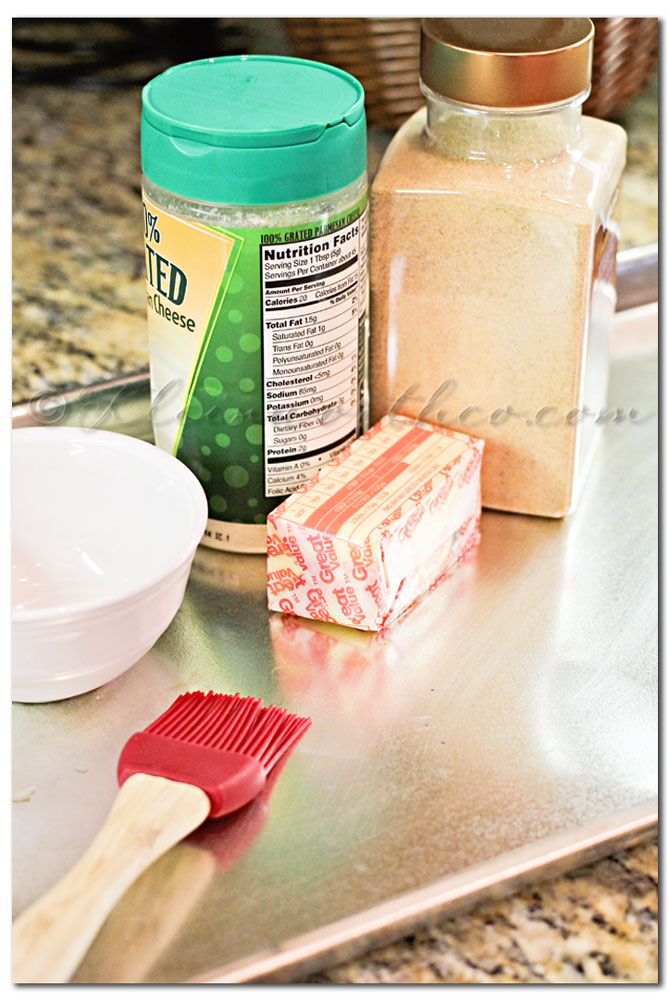


 Since I was using the dslr for the video so I could have it in HD I had to take pics with my phone during the process.


 Preheat your oven to 350 degrees & coat your 9×13 glass pan with cooking spray.
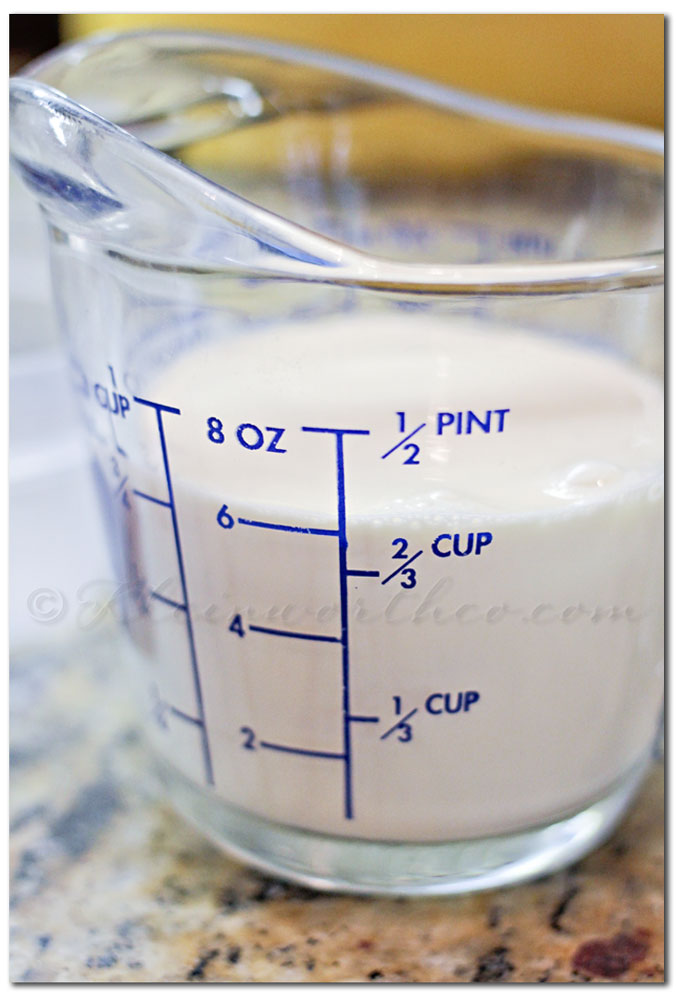 Put your cake mix, butter & evaporated milk in your mixer & beat well until it is thoroughly combined.Add in 1 cup of the Milky Ways bites & beat in on high.


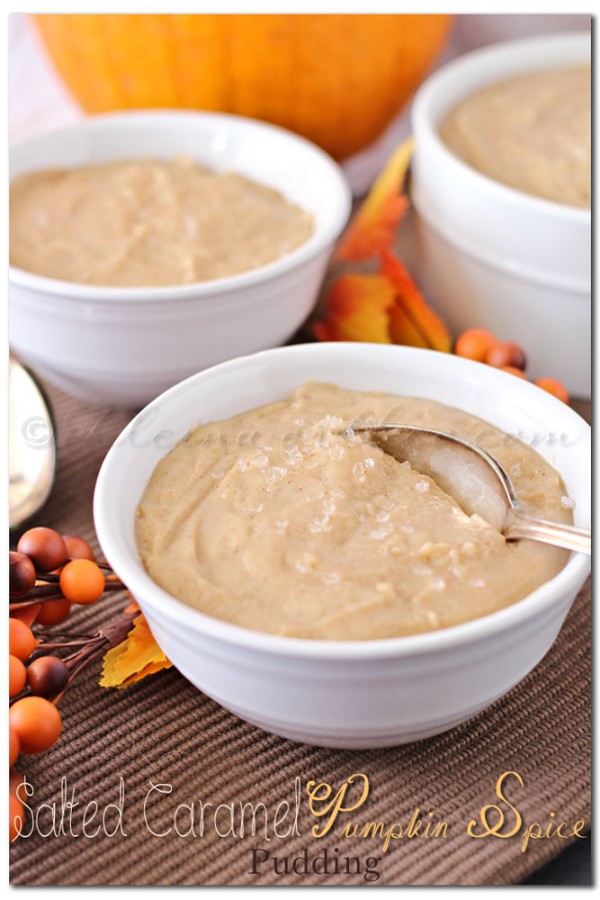
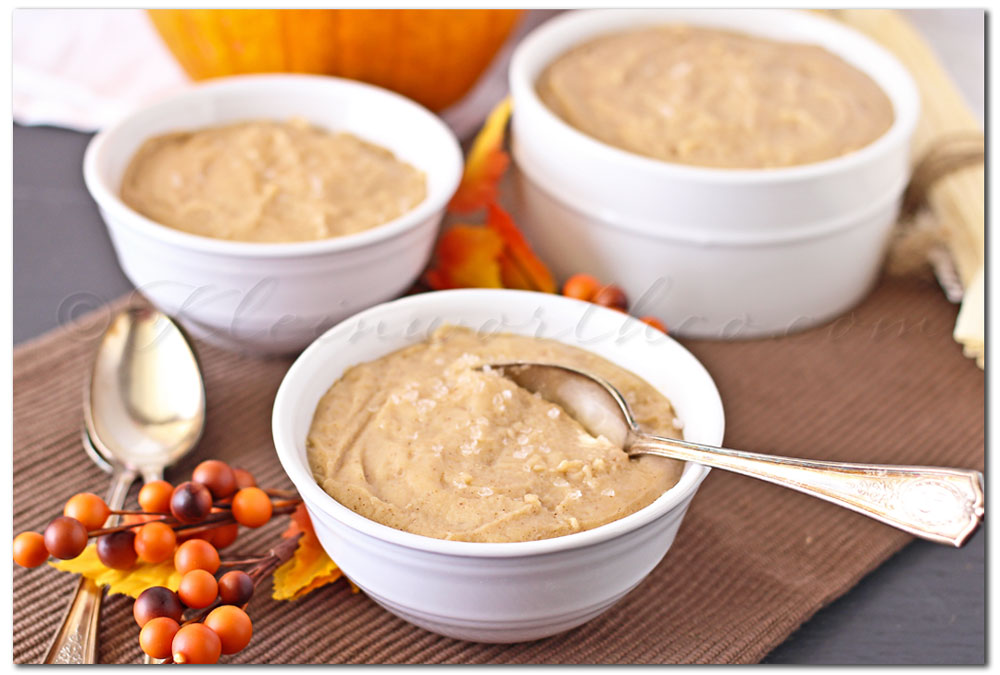 The salt mixed with the rich flavors of caramel & pumpkin spice is the perfect blend.


 I have this propped on the hearth- looks so cozy & brings in the feel of the season.

 The heat made a week long return after we had such fall like temps.
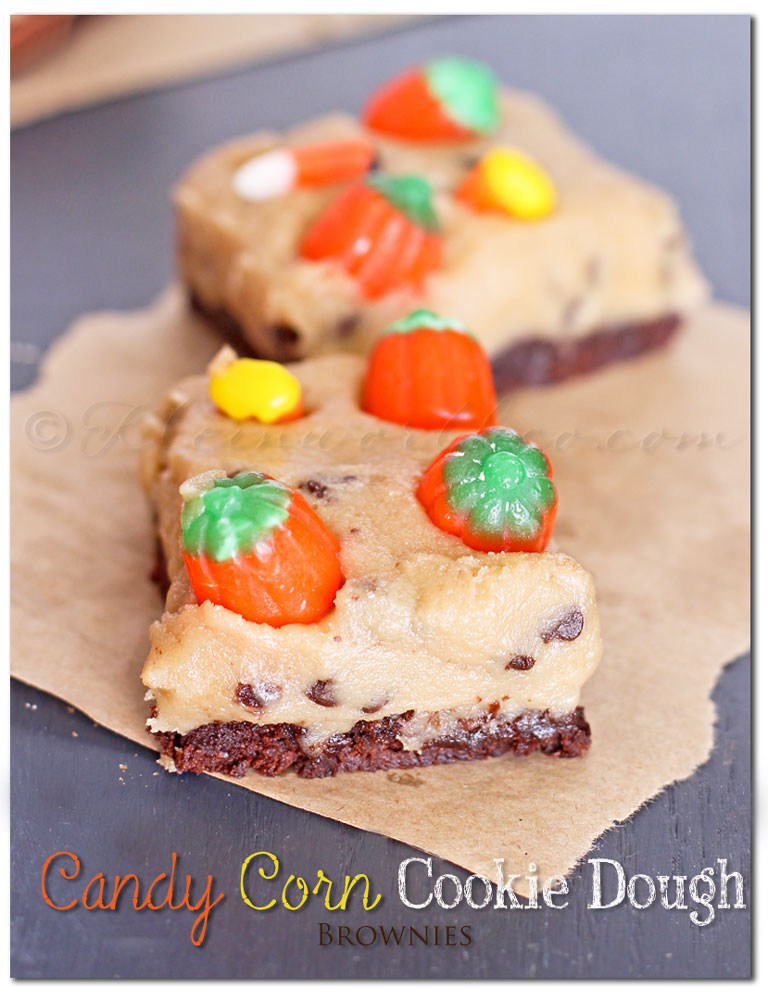


