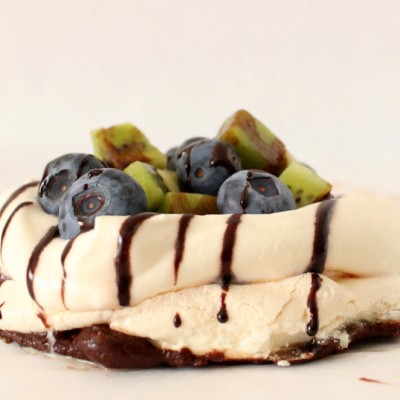
You all are going to love this GORGEOUS treat shared here today by the wonderful Clairellyn from The Simple, Sweet Life. I’m so very happy that she’s here with me on the team – helping me during these busy summer months. She created this AMAZING Chocolate Covered Pavlova for you all today. I can’t wait to try them myself. Thank you Clairellyn!
Hello everyone! My name’s Clairellyn from The Simple, Sweet Life, and I’m so excited to be posting here at Kleinworth & Co. this summer! Thank you to Gina for having me here!
Today I want to share a simple, yet elegant desert with you: chocolate covered pavlova! It’s a deliciously fresh dessert that can be made ahead (the pavlova can be made several days in advance and stored in airtight bags) or a few hours in advance.
Chocolate Covered Pavlova
Ingredients
- Makes 6 small 5" pavlovas
- 4 egg whites
- 1 cup granulated sugar + 1-2 tsp.
- 1 tsp. vanilla extract
- 2 bars 200 grams dark chocolate
- 1/2 tsp. corn starch
- 1 cup heavy whipping cream
- Fresh fruit cut and cubed
Instructions
- Start by preheating your oven to 250 degrees Fahrenheit (130 Celsius).
- I recommend creating some outlines for your pavlova by tracing some circles onto the underside of parchment paper (I used a small ramekin to do this). This will help keep all of you pavlova the same size so they'll look consistent and be less likely to burn.
- In a large glass bowl, whip your egg whites to a soft peak.
- Meringues can be a fickle beast, so make sure all of your equipment is completely grease free and dry before using it.
- Add the cup of sugar a little bit at a time, beating until you've added all of your sugar and the meringue is holding stiff peaks (you should also no longer be able to see bits of granulated sugar). Fold in your vanilla extract and corn starch, and pipe or spoon your meringue onto your parchment paper.
- Make sure your sides are slightly higher than the center of your palova so your whipped cream and fruit will have a place to sit.
- Bake your pavlova for 30-35 minutes, or until it's a light cream color.
- Turn off the oven and let the pavlova cool inside it with the door slightly ajar.
- Once your pavlova is completely cooled and firm enough to move, you can melt your chocolate in a shallow, microwave-safe bowl.
- Gently dip the bottom of each pavlova into the chocolate, and set it aside on parchment paper to harden.
- You can put it in the freezer or refrigerator for a few minutes if you're really in a hurry.
- Once the chocolate has hardened, you can whip up your whipped cream! In a medium-sized bowl, beat the heavy cream on high until soft peaks form.
- Add the 1-2 extra teaspoons of granulated sugar, and continue mixing until you begin to get stiff peaks.
- Spoon onto your pavlova, top with your fruit, and garnish with a little extra melted chocolate!
Nutritional information for the recipe is provided as a courtesy and is approximate. Please double-check with your own dietary calculator for the best accuracy. We at Yummi Haus cannot guarantee the accuracy of the nutritional information given for any recipe on this site.
Recipe adapted from Joy of Baking
Thank you SO MUCH Clairellyn for sharing this beautiful dessert today!!!
I can see these at my next holiday party!!
Want beautiful fruit treats?
To see where I am linking today- visit HERE
[include id=”1″ title=”Footer Ad”]


Whoa that looks amazing!! Totally pinning!
Oh wow! That is a gorgeous dessert! I could go for that now!