Easy Dinner Recipes Meal Plan – week 10 takes the guesswork out of meal time. This easy, budget friendly & delicious dinner recipe ideas to please your family.
Home
Tailgating Food Ideas Week 2 {of 8}
Tailgating Food Ideas Week 2 {of 8} is here to bring you delicious recipe ideas to make game day great! You will be the envy of all other tailgaters with these amazing ideas! They will be lining up to snag a bite!
Tailgating Food Ideas
Crock Pot Baked Apples
Need a perfect fall recipe? Crock Pot Baked Apples are simple, delicious & packed full of all that great fall flavor you love. Apples, cinnamon & caramel.
Fall is in the air and that means it’s time to enjoy all of the delicious fruits and vegetables that nature has to offer. Today, I’m going to show you how to make a simple recipe for Crock Pot Baked Apples.
This recipe is perfect for a quick snack or a light dessert. So, let’s get slow cooking!
PIN NOW TO SAVE FOR LATER
Are you excited about fall? Here in North Idaho, we had a week of ’90s like summer’s last whopper. Then a cold front came on in & we have been in the ’60s & ’70s. Fall blasted on in here & it’s been so lovely.
However, I hope these 70’s stick around for a while. I love the time when the weather is just perfect in the day where I can leave the windows open & let the breeze come on through without being too hot or cold.
But these chilly nights have me in full fall mode when it comes to food. The crock pot is making an appearance more times through the week & the smells drifting through here are wonderful.
Things like these baked apples in the crock pot just make me happy. All that cinnamon & caramel mixed with apples – wow! It’s no wonder this is my favorite season.
I can’t wait to show you all the glorious sights around here this time of year. That will come soon. But for now- I’m sharing my favorite flavors.
Here are some commonly asked questions
What kind of apples should I use for baked apples?
Well- we didn’t pick the types of trees that were planted on our property. That was decided by the first owners and we are the lucky recipients. So I have no idea what types we have here. I’m just using what I have and it’s working just fine.
However – since I’m sure most of you will be buying your apples at the store – here are some suggestions.
When you are making baked apples, there are different kinds of apples that work best. Some apples have a higher water content, so they aren’t the best for this recipe because they will fall apart faster than others.
When picking an apple to bake, you want to focus on ones that are sweeter since this will be a dessert. I like to use Fiji apples for this recipe. You can also use Honeycrisp, Golden Delicious, and Red Delicious.
How to store Crock Pot Baked Apples
Once you have made your delicious Crock Pot Baked Apples, you will want to know how to store them so they will be just as fresh when you are ready to eat them again.
The good news is that these apples can be stored in the fridge for up to a week or in the freezer for up to two months.
I used this Crock Pot Dulce de Leche to drizzle on these apples!
Ingredients for Crock Pot Baked Apples
- all-purpose flour
- brown sugar
- oats
- granulated sugar
- butter – chilled & cubed
- cinnamon
- salt
- apples
Apple Equivalents & Measures – rough estimates
- 1 bushel of apples is the dry equivalent to 2 gallons of produce
- 2 large apples = 1 pound
- 3-4 medium apples = 1 pound
- 3 cups cored, sliced or chopped apples = 1 pound
- 1-1/3 cups applesauce = 1 pound apples
- 1 pound dried apples = 8 cups cooked apples
- 1 pound dried apples = 4 1/3 cups
- 4 pounds fresh apples = 1 pound dried apples
- 4 pounds fresh apples = 4 cups applesauce
- 1/2 cup mashed apples = 1 medium apple
- 3/4 cup cored, chopped apples = 1 medium apple
- 1 cup cored, sliced apples = 1 medium apple
- 2 pounds fresh apples = filling for ONE 9″ pie
- Small apples are approx 2 1/4 inches in diameter.
- Medium apples are approx 2 3/4 inches in diameter.
- Large apples are approx 3 3/4 inches in diameter.
How to Make Crock Pot Baked Apples
- In a medium bowl combine the flour, brown sugar, oats, granulated sugar, butter, cinnamon, and salt.
- Using a pastry cutter (or with your hands) work the butter into the dry ingredients until the mixture is crumbly, then set aside.
- Wash the apples & cut off the tops.
- Spoon out some of the core & the inner flesh to make a “bowl”.
- Fill each hollow apple with the crumble mixture & then place them inside the cooker insert.
- Cover & cook for 2-2.5 hours – just enough that the apples soften but are not falling apart.
- Serve with a scoop of ice cream or whipped cream on top (I like to add some caramel drizzle too)
How long do Crock Pot Baked Apples last?
Crock Pot Baked Apples will last for up to a week in the fridge or up to two months in the freezer.
How to make Baked Apples in the air fryer
These (apples or peaches) can be made in the air fryer too! Just cook at 350 for 5 minutes. Then sprinkle on the toppings. Cook for another 5 minutes or until tender.
Can I use this recipe to make baked peaches instead?
Yep! This also works with peaches – sprinkle with a pinch of crushed graham cracker crumbs, cinnamon, butter, and brown sugar. Cook on low for the same amount of time.
It’s really all the sweet goodness of a rich caramel apple crisp – in a neat little apple bowl.
The perfect fall treat for sure.
What slow cooker do you use?
We actually have several slow cookers that we have acquired over the years from doing this job. I have a smaller one that is great for half recipes.
But the one I use the most is this standard, no-frills slow cooker that is perfect for this particular recipe.
If you love this easy-baked apple recipe, you’re going to love these other apple recipes too. Please click each link below to find the easy, printable recipe!
If you love this recipe for Slow Cooker Baked Apples as much as I do, please write a five-star review, and be sure to help me share on Facebook and Pinterest!
CONNECT WITH YUMMI HAUS!
Be sure to follow me on my social media, so you never miss a post!
Crock Pot Baked Apples
Equipment
- 1 slow cooker
Ingredients
- ½ cup all-purpose flour
- ⅓ cup brown sugar
- ¼ cup oats
- ¼ cup granulated sugar
- 4 tbsp butter – chilled & cubed
- 1 tbsp cinnamon
- ¼ tsp salt
- 6 apples fuji preferable
Instructions
- In a medium bowl combine the flour, brown sugar, oats, granulated sugar, butter, cinnamon, and salt.
- Using a pastry cutter (or with your hands) work the butter into the dry ingredients until the mixture is crumbly, then set aside.
- Wash the apples & cut off the tops.
- Spoon out some of the core & the inner flesh to make a "bowl".
- Fill each hollow apple with the crumble mixture & then place them inside the cooker insert.
- Cover & cook for 2-2.5 hours – just enough that the apples soften but are not falling apart.
- Serve with a scoop of ice cream or whipped cream on top (I like to add some caramel drizzle too)
Notes
Nutrition
Caramel Macchiato Cinnamon Rolls
Caramel Macchiato Cinnamon Rolls are perfect for fall mornings. Cinnamon, caramel & frosting- what could be better with your coffee? With this no-rise recipe, homemade cinnamon rolls just became easier than ever too.
You all know how much I cherish my morning coffee time. I actually go to bed looking forward to my morning cup, especially in the fall when I can get great creamer flavors like Pumpkin Spice & one of my favorites, Caramel Macchiato.
Something about caramel when it’s chilly outside just makes me feel all warm & cozy. So of course I like to add that great flavor to as many things as I can – like these homemade cinnamon rolls.
coffee cinnamon roll recipe
I love making little goodies to have with our coffee on the weekends. Most mornings it’s just coffee while we get straight to work- even on the weekends.
However there are some weekends where we have a few moments of peace where we can sip alongside a tasty little goodie. Those are the mornings I cherish most, which is why I made this super simple no-rise recipe for cinnamon rolls.
I don’t have a whole lot of time & I certainly have very little patience when it comes to making treats. I like it quick, simple & delicious whenever possible. So I’m so in love with this recipe – I don’t know why it was buried in my recipe cabinet. I tucked it away & completely forgot about it.
Once in a while I would remember & think “gee, I should make those” & then life & schedules took over & it never really happened. Until I was organizing & found it. I immediately got to making them. I didn’t want to forget again. The hubs was sure happy & we had a lovely coffee time this weekend.
Just a little bit of this Caramel Macchiato creamer & it takes these cinnamon rolls to whole new level of delicious.
You absolutely must give them a try!!! They will be your new favorite too.
Find out more about International Delight Delightful Moments & sign up for their newsletter.
Connect with them on Delightful Moments, Facebook, Twitter, Instagram & Pinterest.
More Great Cinnamon Roll Recipes
Super Easy Pumpkin Cinnamon Rolls
One-Hour Carrot Cake Cinnamon Rolls
Caramel Macchiato Cinnamon Rolls
Ingredients
Dough
- 2 cups all-purpose flour
- 2 tbsp granulated sugar
- 4 tsp baking powder
- 1 tsp salt
- 3 tbsp butter- room temperature
- 1/2 cup milk
- 1/4 cup Caramel Macchiato Creamer
Filling
- 5 tbsp butter
- 1 cup brown sugar
- 4 tsp cinnamon
Glaze
- 3/4 cup confectioners sugar
- 3-4 tbsp Caramel Macchiato creamer
Instructions
- Preheat oven to 400 degrees
- Line 9x9 baking pan with parchment & set aside
- In a small bowl combine filling ingredients & use a fork or pastry cutter to work together until mixture is crumbly.
- Sprinkle about 1/4 of the mixture in the bottom of your parchment lined pan
- In a large bowl, combine flour, sugar, baking powder & salt
- Cut in butter & mix until well combined
- Add in milk & creamer & mix well to form a soft dough
- Roll dough out on lightly floured surface forming a rectangle
- Sprinkle remaining filling mixture over rolled dough & spread out evenly to cover well
- Starting on one long end - roll dough into a tight log
- Use a sharp knife to cut into 12 even rolls - I like to cut in half & half again, repeating until I reach 12
- Place rolls into prepared pan
- Bake 20-25 minutes
- While baking prepare glaze by whisking creamer into confectioners sugar until smooth
- When rolls are done baking, remove & allow to cool about 5-10 minutes before adding glaze
- Pour glaze over rolls & enjoy while warm
Want more great breakfast recipes?
This conversation is sponsored by International Delight. The opinions and text are all mine.
Cannoli Sugar Cookie Cups
Simple & delicious go to a whole new level with these Cannoli Sugar Cookie Cups. Easy sugar cookie cups topped with cannoli filling & chocolate chips. YUM!
Do you love a good pastry? I sure do. Whenever we can stop in a little specialty pastry shop I always get a variety of goodies to take home & enjoy over a couple of days.
I especially love it when I can get there on a Friday so that I have treats to have along with my coffee over the weekend while we read the paper.
Those seem to be the best weekends when we have little on the calendar & we can just snack, sip & read until lunchtime. Sigh…… that doesn’t happen all that often. Guess that’s why I love & cherish it so much.
So since we don’t get to do that all that often, I decided to create a little cannoli-like treat to have one weekend.
mini cannoli cups
These are a sugar cookie cup, topped with cannoli filling & sprinkled with extra mini chocolate chips & confectioners sugar. Oh my word – so delicious.
So if you love a good cannoli & sugar cookies, you have to give this twist a try.
You will be so happy you did!
cannoli cups
Here are some commonly asked questions
What is the best way to store leftover cannoli sugar cookie cups?
The key here is that once they are assembled, you need to enjoy them right away. You can keep the filling separately in the refrigerator in an airtight container for several days. Just give it a good stir before using again.
For the cookies, place them in an airtight container and keep them at room temperature for up to 4 days
HOW DO YOU MAKE CANNOLI SUGAR COOKIE CUPS?
Cookies
- In a small bowl whisk together the flour and baking powder – set aside.
- In a large mixer bowl, beat the butter until soft.
- Add the sugar and mix well.
- Add the egg and vanilla – mix again just until incorporated.
- Slowly add the flour/baking powder mixture and stir until the dough begins to pull together.
- Roll the dough into a ball and wrap with plastic wrap- refrigerate for 1 hour.
- Once the dough has chilled, preheat the oven to 350 degrees.
- Pull off pieces of dough and roll it into balls. Then press into the wells of a greased muffin tin pan making the cup shape.
- Bake for 12-15 minutes and allow to cool in the pan before removing.
- To remove, slide a butter knife along the inside- they should pop right out.
Filling
- Whisk the ricotta in a large bowl until smooth.
- Stir in the confectioner’s sugar and vanilla and whisk until combined.
- Fold in the whipped topping and chocolate chips.
- Do not assemble until ready to serve as the filling will start to soften the cookie cup.
- Once ready to serve spoon about a tablespoon of your filling into the cookie cup.
- Dust with confectioner’s sugar and add a couple more mini chocolate chips to the top.
cannoli cookie
Can these cookies be made ahead of time?
You bet. This cookie dough can be made ahead of time and kept in the refrigerator for up to 4 days prior to baking. Make sure to cover tightly with plastic wrap so it doesn’t dry out. Let it sit out at room temperature for about 20-30 minutes before rolling and baking.
Ingredients for Cannoli Sugar Cookie Cups
Sugar Cookie Cups
- all-purpose flour -spooned and leveled- not scooped
- baking powder
- butter
- granulated sugar
- egg
- vanilla extract
Filling
- ricotta cheese
- whipped topping
- confectioners sugar
- vanilla extract
- mini chocolate chips
- confectioner’s sugar for dusting
Do I really need to chill the dough?
Yes, Yes, Yes! Chilling the dough is important for a couple of reasons. First – while the dough is chilling the ingredients are coming together. It gives a better overall flavor to the cookie.
The second and probably even more important than the first – is that chilling helps the dough hold together during the baking process.
Without chilling, the dough would not only be too sticky to really roll it into balls. But it would also spread way too much while baking – leaving flat and not very appealing cookies in the end. Please don’t skip the chilling process.
If you love this Easy Cannoli Cups recipe, you’re going to love these other treats too. Please click each link below to find the easy, printable recipe!
If you love this recipe for Cannoli Sugar Cookie Cups as much as I do, please write a five-star review, and be sure to help me share on Facebook and Pinterest!
CONNECT WITH YUMMI HAUS!
Be sure to follow me on my social media, so you never miss a post!
Cannoli Sugar Cookie Cups
Ingredients
Sugar Cookie Cups
- 3 cups all-purpose flour spooned and leveled- not scooped
- 1 tsp baking powder
- 1 cup butter
- 1 cup granulated sugar
- 1 large egg
- 1 tsp vanilla extract
Filling
- 2 cups ricotta cheese
- 3 tbsp whipped topping
- ½ cup confectioners sugar
- 1 tsp vanilla extract
- ¼ cup mini chocolate chips
- *additional confectioners sugar for dusting
Instructions
Cookies
- In a small bowl whisk together the flour and baking powder – set aside.
- In a large mixer bowl, beat the butter until soft.
- Add the sugar and mix well.
- Add the egg and vanilla – mix again just until incorporated.
- Slowly add the flour/baking powder mixture and stir until the dough begins to pull together.
- Roll the dough into a ball and wrap with plastic wrap- refrigerate for 1 hour.
- Once the dough has chilled, preheat the oven to 350 degrees.
- Pull off pieces of dough and roll it into balls. Then press into the wells of a greased muffin tin pan making the cup shape.
- Bake for 12-15 minutes and allow to cool in the pan before removing.
- To remove, slide a butter knife along the inside- they should pop right out.
Filling
- Whisk the ricotta in a large bowl until smooth.
- Stir in the confectioner's sugar and vanilla and whisk until combined.
- Fold in the whipped topping and chocolate chips.
- Do not assemble until ready to serve as the filling will start to soften the cookie cup.
- Once ready to serve spoon about a tablespoon of your filling into the cookie cup.
- Dust with confectioner's sugar and add a couple more mini chocolate chips to the top.
Strawberry & Banana Dessert Dip
This Strawberry & Banana Dessert Dip is a quick & easy no bake dessert idea that everyone loves. If your crowd loves strawberries & bananas this is for you.
It’s tailgate, party, game time season. We really look forward to this time of year because it’s when we come together as a family, make a great spread of food & enjoy the games together. We have everything from wings, to chips & salsa & all sorts of goodies like this easy to make dessert dip. I love no bake desserts to add to the mix. My family loves strawberries & bananas – so even though we are getting into fall flavors, they always beg for this flavor combo. I may transition into a fall flavored dip next month- stay tuned, I’ll be sure to share it if I do.
I just love it because I can hand one of the kids the recipe & they can literally do it by themselves. It’s super easy & I can have them set up on the table & out from where I’m working in the kitchen on all the other dishes for the day. They don’t need to be at the stove or getting in & out of the oven to help me make something delicious for us to enjoy later. HUGE bonus because I’m sure a lot of you have heard me talk about how difficult it can be to get things done when everyone is in the kitchen all at once.
If you love a good strawberry & banana combo- you will love this! It’s sooooo good. I just pull up a chair & snack all through the game. (probably not the best thing for my waistline- but I’m just keepin’ it real here)
Strawberry & Banana Dessert Dip
Ingredients
- 2 3.4oz boxes of banana instant pudding
- 32 oz vanilla yogurt
- 8 oz whip topping
- 3 cups washed hulled & chopped strawberries
Instructions
- Combine pudding mix & yogurt in a medium mixing bowl
- Whisk together until fully combined
- Fold in whip topping
- Fold in strawberries
- Cover & refrigerate until ready to enjoy
- **Serve with regular or chocolate graham crackers for dipping
Looking for more great no bake dessert ideas?
No Bake Chocolate Caramel Oat Bars
Cake Batter Oreo Cheesecake Dessert
Check out these great dip ideas…
Key Lime Pie Dip from Life with the Crust Cut Off
Lemon Cream Pie Cheesecake Dip from Food, Folks & Fun
To see where I am linking today- visit HERE
Turkey Rub
This flavorful Turkey Rub is the perfect seasoning blend for all your turkey recipes, regardless of how you cook your bird. So tasty!
Today, I’m sharing something that will elevate your turkey game—my homemade Turkey Rub! Imagine your turkey with a crispy, golden-brown skin infused with a blend of savory spices.
I’m talking paprika, thyme, rosemary, and more, all coming together to create the most flavorful turkey you’ve ever had. A good turkey rub is the secret to the most flavorful turkeys out there.
View postEasy Dinner Recipes Meal Plan- Week 9
Take the guesswork out of dinner. This Easy Dinner Recipes Meal Plan- Week 9 is created to help make meal time quick & easy! Meal planning made simple.
Are you all ready for another great week of recipe ideas? I know I sure am. These weekly meal plans this group puts together is taking the stress out of our evenings & giving us the most delicious meals. The whole family just loves them all & I know you will too. So let’s get on with all the great ideas for the week. Click on through- print your recipes & have a week packed full of YUMMIES!! We are doing the same.
Turkey Lettuce Wraps from Eazy Peazy Mealz
Black Bean & Sweet Potato Baked Flautas from Domestic Superhero
Nail-Biter Chicken Fingers from Living Better Together
White Bean Chicken Chili from Play. Party. Pin.
Balsamic Braised Beef from Just Us Four
Crunchy Onion Burger from Kleinworth & Co
Slow Cooker Drunken BBQ Chicken Wings from This Silly Girl’s Kitchen
Fried Apple Crumble from This Silly Girl’s Kitchen
The Easy Dinner Recipes Meal Plan brought to you by:
Domestic Superhero – Just Us Four – Living Better Together
Kleinworth & Co. – This Silly Girl’s Kitchen – Eazy Peazy Mealz – Play.Party.Pin
Looking for more great meal planning dinner ideas?
15 Casserole & Skillet Dinners
THE EASY DINNER RECIPES MEAL PLAN – WEEK 2
To see where I am linking today- visit HERE
Tailgating Food Ideas Week 1 {of 8}
Do you love game day? It’s practically a holiday in this house. We look forward to homegating, making FABULOUS food & sharing quality family time with each other & our favorite teams as much as we can each weekend. So that means great recipe ideas are a must. Which is why I am SO EXCITED to share that I have teamed up with some of my bestie bloggers that I love so much to bring you this weekly tailgating series. That’s right- AMAZING appetizers & desserts to keep your spread fun & delicious week after week. So make sure you catch us each week- because every weekend, for the next 8 weeks – you get 9 scrumptious tailgating recipes from 9 food-loving bloggers!
Before we get to this week’s of tailgating food ideas, let me introduce our hosts:
‘Or so she says…‘
Made from Pinterest
Taste and Tell
The Girl Who Ate Everything
Cravings of a Lunatic
Bakerette
Kleinworth & Co. (that’s me!)
Lady Behind the Curtain
The Pinning Mama
Now let’s get to the grub… Be sure to PIN THIS IMAGE for your future tailgating parties and find all the individual recipes linked below!
Bacon Wrapped Tator Tot Bombs from Made from Pinterest
Broccoli Bites with Ranch Dip from ‘Or so she says…’
Cowboy Caviar from The Girl Who Ate Everything
Jalapeno Bacon Poppers from Craving of a Lunatic
Chipotle Honey Biscuit Chicken Sliders from Lady Behind the Curtain
Best Ever Spinach Artichoke Dip from The Pinning Mama
Hawaiian Chicken Sliders from Kleinworth & Co.
Dark Chocolate Football Cake from Bakerette
Jalapeno Stuffed Taco Soft Pretzel Sticks from Taste and Tell
And, there you have it! Have a delicious party and see you back here next week with even MORE tailgating food ideas!
Want more great tailgating ideas?
To see where I am linking today- visit HERE
Reese’s Caramel Popcorn
Homemade caramel popcorn & Reese’s mini cups combined together to make this Reese’s Caramel Popcorn is a peanut butter & caramel lovers dream. Delicious!
My friends, I have a treat for you today. It’s time for our monthly Peanut Butter Bash! That means a group of us creative food bloggers have come together to bring you all the wonderful recipes we could dream up combining peanut butter with another key ingredient. This month- Caramel!!! So since I am already obsessing over homemade caramel popcorn this time of year, it’s no wonder I decided to whip up some more & add in some Reese’s mini peanut butter cups for this month’s challenge.
The key here is to add half the peanut butter cups while the popcorn & caramel is still hot- so they melt on though the popcorn. Then add in the remainder once it’s cooled down so you still have some whole peanut butter cups. WOW! I have to say, this was beyond delicious. Right after I took this photo I walked the bowl down to the hub’s office so he could give it a try. He took one bite & snagged this whole bowl from me. Before I knew it, the whole thing was gone. Good thing I had a separate, super large bowl full waiting in the kitchen. Otherwise the rest of us would have missed out. It’s AMAZING! That’s for sure!
Reese's Caramel Popcorn
Ingredients
- 2 packs Caramel flavored microwave popcorn
- 1/4 cup butter
- 1/2 cup corn syrup
- 1 cup packed brown sugar
- 7 oz sweetened condensed milk
- 1/8 tsp salt
- 1 - 8 oz bag Reese's minis
Instructions
- Pop both bags of popcorn in microwave to package directions & combine in a large bowl - set aside
- Combine butter, corn syrup, brown sugar, sweetened condensed milk & salt in a saucepan
- Attach a candy thermometer to the side- don't let the tip touch the bottom of the pan- but make sure it's well within the liquid.
- Heat over medium-high -stirring constantly until mixture boils
- Once it boils reduce heat to medium & continue stirring until thermometer reaches 220 degrees
- Remove from heat, carefully remove your thermometer & drizzle mixture over the popcorn
- Fold with a spatula to coat the popcorn with caramel
- Add in 1/2 the bag of peanut butter cups & continue to fold in - allowing them to melt a bit
- Once the popcorn has cooled enough that it won't melt the peanut butter cups anymore- add in the remainder of your bag & mix until incorporated
- Enjoy immediately
Don’t miss all these other fabulous peanut butter & caramel combos being shared today!
Reese’s Caramel Popcorn from Gina of Kleinworth & Co
Peanut Butter Caramel Stuffed Chocolate Chip Cookies from Rebecca of Living Better Together
Peanut Butter Twix Bars from Carisa of Messes to Memories
Dark Chocolate Peanut Butter Carmelitas from Maggie of The Love Nerds
Peanut Butter Caramel Oreo Ice Box Cake from Miranda of Cookie Dough and Oven Mitt
Caramel Peanut Butter Cookie Ice Cream from Ellie of Peanut Butter and Ellie
Peanut Butter Cheesecake Brownie Cups from Stephanie of The TipToe Fairy
Looking for more great caramel recipes?
Dulce de Leche Pumpkin Muffins
To see where I am linking today- visit HERE
Crock Pot Apple Butter
This Crock Pot Apple Butter is the perfect apple recipe to use all those fall apples. Loaded with all that great apple cinnamon flavor, it’s fall in a jar.
What’s your favorite thing about fall? Mine has to be the colors, followed by the flavors. Being a photographer and a person that grew up in a place with little change in seasons – I absolutely love the fall colors.
But second to that is all the wonderful fall smells and flavors. Things like this apple butter added to so many things just make the season so special.
Try our Instant Pot Apple Butter!
Almond Butter & Jam Wrap {Creative Lunchbox Idea}
This Almond Butter & Jam Wrap is a great alternative to the classic peanut butter & jelly sandwich. It’s an easy school lunch recipe that kids will love.
It’s that time of year – the kids are going back to school. That means it’s time to get creative & think outside the standard sandwich & make lunch fun. My kids love a good sandwich. But when we run out of bread or I’m just looking to mix things up it’s great to grab some of the leftovers from other things in the fridge & come up with something new & fresh, like this Almond Butter & Jam Wrap. My kids would spread either almond or peanut butter on these. Add a little homemade jam & you have a super lunch idea that’s quick & easy. For those of you who have a peanut free school – almond butter is a great alternative. If your school is completely nut free – sunflower seed spread tastes great too.
Even better, these work great for making the night before, put them in the fridge overnight. Then in the morning toss in your Wet Ones® Singles and Pepperidge Farm® Goldfish Crackers, maybe some dried fruit & a water & you have a great little lunch.
You can prepare the Goldfish Crackers in easy “to-go” cups to make lunch prep a snap. I like to have a small basket for each item in the pantry. On the weekends I fill all the little containers with snacks & lunch add-ins like Wet Ones® Singles and Pepperidge Farm® Goldfish Crackers. Then in the mornings it’s as easy as picking a couple & tossing them in the lunch box along with your wrap you made the night before & a cooler pack.
The Wet Ones® Singles are DEFINITELY a must for little fingers. I like to put 2 in the box. One for cleaning their hands before they eat- because who knows where they have been up until lunch time. Did you know that Wet Ones® kill 99.9% of germs – so you know that their hands are clean before enjoying their lunch. Then the second is great for getting all those gooey jam dribbles off their fingers before they wipe them on their clothes. Definitely a lunchbox necessity.
I picked up my Wet Ones® Singles and Pepperidge Farm® Goldfish Crackers at Walmart during our weekly shopping trip.
Don’t miss your chance- ENTER to WIN a years supply of Wet Ones® for your home & your child’s classroom- PLUS $1000 CASH!
So what’s your child’s favorite back to school lunch recipe?
Almond Butter & Jam Wrap {Creative Lunchbox Idea}
Ingredients
- *per wrap
- 1 small flour or mix flour/corn tortilla
- 1 tbsp almond butter
- 1 tbsp homemade jam
Instructions
- Spread almond butter in a thin, even layer over most of the tortilla
- add jam
- roll, cut in half & add to travel lunch container
- If preparing ahead, refrigerate overnight
Looking for more back to school lunch ideas?
This is a sponsored conversation written by me on behalf of Wet Ones® + Pepperidge Farm® . The opinions and text are all mine.
Easy Dinner Recipes Meal Plan- Week 8
Easy Dinner Recipes Meal Plan- Week 8 is here to take the guess work out of meal planning. Easy dinner recipes, tried, tested & perfected by these awesome bloggers that inspire me every day!
Are you ready for another week’s worth a AWESOME dinner ideas? I know I am. I can’t get enough of all these dinner ideas! My family is always excited about what’s for dinner because they know we are making these same recipes & following the plan I share with you all here. I hope you are enjoying them all as much as we are!
So let’s get on to the recipes!!
Skinny Bruschetta Chicken by Domestic Superhero
Cheesy Bacon Kale Quiche by This Silly Girl’s Kitchen
Asian Chicken Salad with Grape Nut Chicken by Play Party Pin
Caprese Panini by Domestic Superhero
Fiesta Lime Shrimp Salad by Eazy Peazy Mealz
Crock Pot Turkey & Rice Soup by Kleinworth & Co.
Ham and Cheese Lasagna by Just Us Four
Cap N’ Crunch Treats by Living Better Together
The Easy Dinner Recipes Meal Plan brought to you by: Domestic Superhero – Just Us Four – Living Better Together – Kleinworth & Co. – This Silly Girl’s Kitchen – Eazy Peazy Mealz – Play.Party.Pin
Aren’t these great??!! I hope this gave you some great inspiration & you can plan for your week ahead. Be sure to check out all the weekly meal plans & come by next week for more.
Looking for more great dinner ideas?
To see where I am linking today- visit HERE
Bacon Caramel Apple Wedges
The great taste of caramel apples is easy with wedges. Add bacon to make Bacon Caramel Apple Wedges & you have the best caramel apple recipe ever
One thing I love about this wonderful season of fall is caramel apples. I used to not be such a caramel lover as I am now. However a good caramel apple is where my weakness was. When we lived near Virginia City we would go up on the weekends & walk the boardwalk & stop in the shops. One shop we always made a point to stop in was the fudge shop because they had these huge, over the top caramel apples. I always bought one & it took a fork, knife & 2 sittings to get through one. These days I’m looking to scale back on that a bit – as much as I would love to enjoy that every single day, I really can’t anymore. So I came up with a slightly lighter version of that with these Bacon Caramel Apple Wedges for our last post of bacon month.
You see – by cutting the apples into wedges it’s so much easier to share. Using a thin caramel sauce instead of coating a whole apple with thick & chewy caramel & all the other additions gives the flavor of a caramel apple with far less heaviness. Then I added bacon. Instead of chocolate or nuts or anything else – adding bacon gave the perfect amount of chewy & salty perfection to these. Oh my – simple & absolutely delicious. I love this snack.
Bacon Caramel Apple Wedges
Ingredients
- 2-3 large apples -I like granny smith for this
- 3-4 tbsp Caramel Sauce
- 3-5 pieces cooked bacon- crumbled
Instructions
- Core & cut apples into wedges & arrange on platter
- Sprinkle with bacon crumbles
- Liberally drizzle with caramel sauce so there is enough for each piece
- Enjoy!
Don’t miss all these other great bacon recipes by my bacon loving blogging friends!
Loaded Potato and Chicken Casserole
BBQ Pulled Chicken BLT Sandwich
Wedge Salad with Bacon & Bleu Cheese
Looking for more great bacon recipes from our bacon month celebration?
To see where I am linking today- visit HERE
Fiesta Dog
This is a sponsored conversation written by me of behalf of Ball Park® brand. The opinions and text are all mine.
This Fiesta Dog is loaded with 2 hot dogs, salsa & cheese on a cheesy hoagie roll. It’s delicious & one of the best hot dog recipes you will ever eat!
Are you still grilling? We sure are – however, we have been known to grill in the snow. We are die hard grillers no matter the season. But we are definitely taking advantage of the wonderful weather we are having right now by making some dogs. You know I’m all about combining things outside the norm to come up with new & exciting ways to please the family. A while ago when we were hosting our own Grillathon in our backyard it sparked my creativity when it comes to hot dogs. You see – they are one of the foods that the hubs loves above all else. So creating delicious ways to enjoy them outside of ketchup & mustard is key for us. Like this Fiesta Dog loaded with 2 hot dogs, salsa & cheese on a cheesy hoagie roll.
Remember back when I shared my BLT Dog with you all & I told you about the Finest Grillathon & Ball Park Park’s Finest hot dogs? Well it happened & it was EXTRAORDINARY!!!
On August 13th, Ball Park brand, set the Guinness World Record for the Longest Team Barbecue Marathon after grilling for 34 hours and 35 minutes in New York City!
Finest Grillathon winners, Andrew Battistelli and Susan Bulloch, along with Food Network chef Tyler Florence, grilled more than 3,000 Ball Park Park’s Finest Hot Dogs which were donated to City Harvest, a food rescue organization.
Check out the recap video featuring highlights from the event and tell us how you would have kept going for 34 hours! Video
Aside from what you put ON your dog – it’s what you wrap it with too. The bun is just as important as the dog because if you are buying top quality dogs – they deserve something special to be paired with. We like to do a good quality hoagie roll like these cheesy ones. We also use stadium buns. They are soft & large enough to really handle the out of normal add-ons we load in there.
Fiesta Dog
Ingredients
- Any flavor Ball Park Park’s Finest hot dogs
- 2 tbsp of your favorite salsa
- shredded cheddar cheese
- cheesy hoagie roll
Instructions
- Grill hot dogs on a 350 degree grill for approx 10 minutes
- Add 2 dogs to roll with salsa & cheese
- Enjoy!
So what are you waiting for? Go get your grill on while the weather is still fabulous!!
You can visit Ball Park Park’s Finest hot dogs for more info!
Looking for more hot dog ideas?
To see where I am linking today- visit HERE
This is a sponsored conversation written by me on behalf of Ball Park. The opinions and text are all mine.
Caramel Apple Pie Filling
Apple pie, is America’s favorite. Packed full of cinnamon-coated apples in a thick caramel glaze makes it positively delicious. This homemade Caramel Apple Pie Filling makes it so easy to make your own.
If you love apple pie – this caramel apple pie filling will be your new favorite fall recipe. It’s simple, easy and so delicious. Definitely the perfect way to use up all those apples from the orchard.
View postApple Fritter Cupcakes
These Apple Fritter Cupcakes are the perfect way to kick off the fall season. Bursting with apples & cinnamon in a moist little cupcake. Everything you love about fall.
It’s FALL!!! (or nearly there) Can you tell I’m excited? I love baking for fall. All the apple & cinnamon recipes just make me happy. My family loves it too This is a sponsored conversation written by me on behalf of KitchenAid. All opinions and text are mine.apple cupcakes
So I thought I would break out the ol’ KitchenAid Stand Mixer & whip up some Apple Fritter Cupcakes. They are really simple to make, line your tins, whip up your batter, fill your wrappers & add a little dollop of pie filling & bake. That simple!
Fall baking doesn’t have to be complicated. But it’s always delicious & makes the house smell amazing. Which is why you should jump in & start baking!!! While you’re at it you should enter this AWESOME GIVEAWAY….
Food Network and Food.com invites passionate connectors to show how to take simple to extraordinary!cupcakes with apple filling
Fall baking doesn’t have to be complicated. But it’s always delicious & makes the house smell amazing. Which is why you should jump in & start baking!!! While you’re at it you should enter this AWESOME GIVEAWAY….
Food Network and Food.com invites passionate connectors to show how to take simple to extraordinary! Enter the “apple” recipe cooking challenge – submit a photo and description of your best dish incorporating the use of an apple! Submissions can be uploaded through Twitter or Instagram, FoodNetwork.com/applechallenge or food.com/applechallenge Food Network Kitchens will select the top 4 recipe submissions and the 4 finalist will win a trip for 2 to NYC to push their limits in a live cook-off to cook their dish to be judged by FN chef Geoffrey Zakarian 1 winner will receive the grand prize of a suite of KitchenAid Black Stainless Steel Appliances and a private cooking lesson with Geoffrey Zakarian. Contest Dates: 8/17 – 9/14Best Apple Cupcakes for Fall
That’s a pretty fabulous prize! Have you seen those new KitchenAid black & stainless steel appliances? I’m swooning.
They are so sleek & luxurious. Plus they would go nicely with my red mixer – even though it’s knocking on 15 years old now. Someday I can upgrade that to a new professional line KitchenAid Stand Mixer.
Just thinking of new applicances gives me motivation to make some more apple recipes. I know the family is already begging me to make more of these cupcakes. They are so delicious.
Other Creative Cupcakes
Funfetti Cupcakes Coconut Cupcakes S’mores Cupcakes Blueberry CupcakesApple Fritter Cupcakes
Ingredients
- 1/3 cup butter - room temperature
- 3/4 cup granulated sugar
- 1/2 cup cinnamon applesauce
- 1 tsp vanilla extract
- 2 eggs
- 2-1/4 cup all-purpose flour
- 1 tsp baking powder
- 1 tsp baking soda
- 1/2 tsp salt
- 1-1/2 tsp cinnamon
- 1 cup sour cream
- 10 ounces apple pie filling
Topping
- caramel drizzle
- confectioners sugar
Instructions
- Preheat oven to 350 degrees
- Line 24 muffin tin wells with wrappers
- In mixer bowl combine butter & sugar - beat until fluffy
- Add applesauce, eggs, vanilla - mix until just combined
- Add flour, baking powder, baking soda, salt & cinnamon
- Stir in slowly & add in your sour cream to keep moist
- Mix until just combined
- Scoop out into your cupcake wrappers filling about 2/3 full
- Top each with 1-2 tsp of apple pie filling
- Bake 30-35 minutes or until the center springs back when touched
- Remove & cool on wire rack before adding caramel drizzle & confectioners sugar
Looking for more great apple recipes?
Crock Pot Cinnamon & Brown Sugar Apple Sauce
Check out these other apple recipes from fellow bloggers. Salted Caramel Apple Pie Bars from Sally’s Baking Addiction Salted Caramel Apple Hand Pies from Just a Taste From the first-ever black stainless steel to the first-ever five-door refrigerator, KitchenAid pushes the limits with our appliances, so our home cooks can do the same with their cooking. See the revolutionary new line of KitchenAid appliances or visit the Kitchenthusiast™ blog for recipes, tips and more. This is a sponsored conversation written by me on behalf of KitchenAid. The opinions and text are all mine.To see where I am linking today- visit HERE
Bacon Meatball Sandwich
Kick up your classic meatball sandwich & add some crispy bacon like this Bacon Meatball Sandwich that is positively the best bacon for dinner recipe ever.
Do you love comfort food? I’m talking some down home – smothered in yummy goodness comfort food. Yep – me too. Which is why when we were working on more recipes for bacon month I just had to make some of our favorite meatball sandwiches with a whole lot of bacon added in there. Holy smokes – what a great combo that you wouldn’t normally think of – but man it was so delicious. Fortunately we made a double bacth of these colossal meatballs so just one or two filled us up & we had plenty left over for the next night too. Gotta love leftovers – especially when they are as good as this. YUM!
Just look at all that delicious marinara all over that giant meatball & bacon. WOW it was good. Be sure to toast your bread – just slightly. It’s easy to do by just rubbing the inside part in a hot skillet. It keeps the marinara from soaking in so quickly & makes it easier to eat. Now the amount of marinara & cheese you add to your final sandwich is entirely up to you. But when it comes to this deliciousness – I couldn’t help but load it up.
Bacon Meatball Sandwich
Ingredients
- 1-1/2 lbs grass fed beef - 90% lean or more
- 1/2 cup Italian bread crumbs
- 2 tbsp finely chopped parsley
- 1 egg
- 2 tbsp milk
- 2 tbsp tomato paste
- 1/2 cup grated Parmesan cheese + more for topping
- 2 tsp granulated garlic
- 1 tbsp minced onions
- salt & pepper to taste
- 3/4 cup olive oil -to saute
- 1 jar Marinara sauce of choice
- 1 batch - perfect oven cooked bacon
- Toasted buns
Instructions
- Prepare your oven cooked bacon while you work on preparing your meatballs
Meatballs
- Combine meat, bread crumbs, parsley, egg, milk, tomato paste, Parmesan cheese, granulated garlic, minced onions, salt & pepper in large bowl.
- Work with your hands mixing ingredients until combined
- Roll meatballs by hand & place on a plate
- In a large skillet heat oil over medium heat
- Once oil is hot, gently place meatballs in skillet & cook about 2 minutes before rolling to continue cooking another side.
- Cook until most of the meatball surface has been cooked -if you are working in batches transfer cooked meatballs to a plate lined with paper towels.
- Once all the meatballs are browned - place back in skillet & add your marinara sauce
- Cover & simmer on low for about 1 hour - stiring occasionally
- Serve with bacon & additional Parmesan cheese on your rolls
Don’t miss these from my fellow bacon loving bloggers joining in on bacon month!!
Heirloom Tomato BLT Salad with Warm Bacon Dressing
Copycat Gordon Biersch House Chips
Giant Peanut Butter Bacon Cookies
Sweet & Salty Chocolate Bacon Bars
Don’t forget to enter to win our AWESOME bacon giveaway!!!
Looking for even more great bacon recipes?
To see where I am linking today- visit HERE
Hawaiian Chicken Sliders : Easy Back to School Dinner
Easy family dinner ideas are in full swing. These Hawaiian Chicken Sliders make a simple & easy back to school dinner. Quick & delicious, you can’t go wrong.
Remember last weekend when I shared with you my simple Buttermilk Ranch Dip that I love to pair with Crispy Chicken Strips? Well, we have created another easy recipe for back to school that I’m sure you & your kids will love. It certainly takes the chaos out of dinner time.
We like to bake some with the teriyaki glaze & then leave some that we add it to later on. It’s delicious either way! Add a little provolone cheese when the chicken is hot to let it melt on in there. We used fresh pineapple slices, but you could also use the canned rounds if you like.
I love the ease of this recipe & how the family just LOVES it.
Hawaiian Chicken Sliders : Easy Back to School Dinner
Ingredients
- 1 bag Tyson® Crispy Chicken Strips
- 1 dozen slider buns
- 12 slices provolone cheese
- 3-4 tbsp teriyaki glaze
- 12 slices or rounds pineapple
Instructions
- Lay chicken out on baking sheet & add teriyaki glaze over the top of each piece
- Bake the Tyson® Crispy Chicken Strips to package directions
- Once cooked, assemble the sliders by adding chicken, cheese & pineapple to bun
- Serve- enjoy!
This was originally a sponsored conversation written by me on behalf of Tyson. The opinions and text are all mine.
Looking for more easy family dinner ideas for back to school?
135 Back to School Recipes
This is a sponsored conversation written by me on behalf of Tyson. The opinions and text are all mine.
To see where I am linking today- visit HERE
Easy Dinner Recipes Meal Plan – Week 7
The Easy Dinner Recipes Meal Plan – Week 7 is designed to take away the stress of meal time & making weekly dinners delicious. All from your favorite top food bloggers!
Are you all as excited as I am about this week’s recipe plan? I absolutely can’t wait to share this with you each week. I love these dinner ideas!!!
So let’s get on with the plan for the week – SEVEN meals along with a dessert this week! Take a look!
Orange Chicken from Eazy Peazy Mealz
Pineapple Pork Tacos from Just Us Four
Pizza Loaf from Play. Party. Pin.
Creamy White Bean Pork Stew from This Silly Girl’s Life
Crock Pot Honey Sesame Chicken Lettuce Wraps from Domestic Superhero
Garlic Sausage & Asparagus from Kleinworth & Co
Blackberry Lemon Salmon from Living Better Together
Chocolate Cake Shakes from Play. Party. Pin.
The Easy Dinner Recipes Meal Plan brought to you by:
Domestic Superhero – Just Us Four – Living Better Together
Kleinworth & Co. – This Silly Girl’s Life – Eazy Peazy Mealz – Play.Party.Pin
There you go. I hope this has you excited for the meals ahead this week!
Looking for more great dinner ideas?
To see where I am linking today- visit HERE
Bacon Cheddar Beer Bread
Beer bread is reaching new heights during bacon recipes month with this Bacon Cheddar Beer Bread. Simple, easy & the perfect side to every meal. Delicious.
Bacon month continues – have you found your perfect bacon recipe yet? I know I am in bacon heaven with all these scrumptious bacon recipes being shared. With all of us sharing a couple times a week you are bound to find something you love! I know I am & it’s been great. So today I’m sharing one of my favorite recipes – beer bread. I love beer bread because it’s so incredibly easy to make. The original recipe came from my mother-in-law. I didn’t receive many recipes from her (I somehow need to get more of her recipe book from my sister-in-law) but this one that I did get from her is a favorite. It’s as easy as mix & bake – nothing fancy. You don’t even have to wait for it to rise. I think that’s why I make it all the time. Only now – I have added bacon & cheddar cheese to really pack a punch.
This is a fabulous recipe for serving on the side of maybe a steak dinner or even an alfredo recipe. We enjoyed it for both recently. With the 5 of us – there is rarely any left over. Positively delicious – you have to make it!
Bacon Cheddar Beer Bread
Ingredients
- 3 cups self rising flour
- 3 tbsp granulated sugar
- 1 bottle kraft beer
- 2 cups shredded sharp cheddar cheese
- 1 cup crisp bacon pieces
- 1/2 stick butter
Instructions
- Preheat oven to 350 degrees
- Spray large glass loaf pan with cooking spray
- Mix flour, sugar & beer in mixer bowl with dough hook attachment until combined & dough like
- Slowly mix in cheese & 1/2 the bacon
- Transfer to prepared pan.
- Top with remaining bacon
- Bake 40 minutes
- Melt butter in microwave.
- After bread has baked 40 minutes- remove from oven & pour the melted butter over the top
- Return to oven & bake another 20 minutes.
- Remove & cool until it is able to be handled.
- Slice gently & serve warm.
Check out these AWESOME bacon recipes from my fabulous bacon loving blogger friends!
Cheesy Bacon Stuffed Pretzel Rolls
Looking for more great bacon recipes?
Be sure to check out these other bacon recipes from these great bloggers too!
Buffet Pancake Dippers from Lady Behind the Curtain
Bacon Wrapped Tater Tot Bombs from Damn Delicious
To see where I am linking today- visit HERE
Cherry Pie Pops
Need a quick & easy dessert recipe that everyone will love? These Cherry Pie Pops are perfect. Vanilla pudding pops packed with cherry pie filling, delicious!
Oh my friends, this is the last of the frozen desserts for the season. I still have so much to share with you but it will have to wait for next year. I just have SO MANY fall recipes that I need to start sharing them with you before the seasons change again. It’s already going to be so hard to narrow them down to the few weeks we have for that. But I just had to share these Cherry Pie Pops with you to send off summer with a smile.
I spend a good portion of the summer making homemade pie fillings & packing my freezer full. This way when I decide to make some sort of dessert that calls for pie filling, I’m ahead of the game. It just makes dessert prep that much faster. So at the moment I have an overload of homemade cherry pie filling & so I just couldn’t resist packing a little into these pudding pops. It’s was absolutely delicious. The whole family was begging for more. You really can’t go wrong with a simple & easy dessert like this.
These are SOOOOO GOOD!
Cherry Pie Pops
Ingredients
- 1 box vanilla pudding mix
- 3 cups cold milk
- 1/2 of an 8oz tub whipped topping
- 1/2 cup cherry pie filling
- Popsicle sticks
Instructions
- In a large bowl combine pudding mix & milk- whisk until fully combined
- Fold in whip topping & stir until smooth
- Add about 1 tbsp pie filling into each pop mold
- Fill each mold with pudding mixture & swirl around to mix a little
- Add sticks
- Freeze 8-10 hours, preferably overnight
Looking for more easy cherry recipes?
To see where I am linking today- visit HERE
Caramel Macchiato Frosting
Caramel Macchiato Frosting made with International Delight coffee creamer is the perfect frosting recipe for fall. Simple, easy & delicious dessert recipe
My morning coffee is something I go to bed looking forward to. The first thing I do in the morning is head downstairs to fill my mug. It’s not only how I wake up & get going for the day but I often find my inspiration during that first cup of jo. Something about those hot sips of strong coffee long before the sun comes up really gets my creativity flowing & I feel ready to tackle my day head on.
While I was sipping my coffee with Caramel Macchiato creamer from International Delight the other morning I was brainstorming on ideas for yet another birthday celebration in this house. You see – the oldest in the house & the youngest have birthdays exactly a week apart from each other. So the first part of August is a busy time for us. Fortunately my morning coffee gave me more than a pick-me-up that day. I was inspired to use that wonderful caramel macchiato flavor to create a delicious frosting that I would use for the birthday cake I was ready to make.
Let me tell you – it was a HUGE HIT! The delicious hints of caramel macchiato flavor in this frosting were the perfect compliment to the cake. It definitely was a great way to get more creative in the birthday cake making – all starting with my morning cup of coffee. We ended up having a wonderful birthday celebration full of food, laughter & family time. I love it when something as dear to me as my morning coffee can continue on through my day & be a part of something as special as a birthday celebration.
So when do you find your inspiration?
Caramel Macchiato Frosting
Ingredients
- 8 tbsp 1 stick butter - room temperature
- 4 cups confectioners sugar
- 1/3 cup International Delight Caramel Macchiato Creamer
Instructions
- In a mixer with a paddle attachment cream butter until light & fluffy
- Add in confectioners sugar & beat slowly
- Once mixture looks moist but crumbly add in creamer & beat until fluffy again - if you want it a little softer add additional creamer 1-2 tsp at a time
- Store in refrigerator for up to 1 week
Find out more about International Delight Delightful Moments & sign up for their newsletter.
Connect with them on Facebook, Twitter, Instagram & Pinterest.
This conversation is sponsored by International Delight. The opinions and text are all mine.
Looking for more great recipes using International Delight?
To see where I am linking today- visit HERE
Bacon Egg Salad Sandwich
Great bacon recipes continue with this delicious twist on a the classic egg salad. This Bacon Egg Salad Sandwich is perfect for any meal of the day.
We sure love egg salad! How about you? It’s such an easy recipe that the whole family absolutely loves. Which is why we decided to kick it up with some heavenly oven cooked bacon for bacon month. Honestly, I can’t believe we never did this before. It’s so simple & really the perfect thing to add to a great egg salad recipe. All that crispy, salty bacon mixed in with the eggs – oh my. Seriously, I was so excited to eat this that I was rushing though taking these pictures just so I could get back to the kitchen & have a bite. I was really sad when I was so full after one sandwich that I couldn’t have just a little more.
You see, we typically make our egg salad as a slider – on some Parmesan toasted baguettes. It’s pretty darn good that way. I love every bite. But changing it up & adding it to this big fat croissant was a great choice. Oh my – it was SO GOOD. We really have to make this more often. I certainly didn’t get enough the first time.
Bacon Egg Salad Sandwich
Ingredients
- 18 hard boiled eggs
- 2 tbsp drained pickle relish we use dill but you can also use sweet
- 1 tbsp minced garlic
- 1/3 cup mustard
- 1 cup mayo
- Minced onions salt, pepper & powdered garlic - Sprinkle to liking
- 2 cups oven cooked bacon - crisp & crumbled
- Croissants
Instructions
- Put the eggs & all the egg mix ingredients in a large bowl & mix with fork.
- Mash & break up the eggs as you go.
- When all combined & there are no large chunks- refrigerate until ready to serve
- Add to croissants (toasted or untoasted) when serving
Don’t miss these from my fellow bacon loving bloggers joining in on bacon month!!
Bacon and Egg Breakfast Fried Rice
Don’t forget to enter to win our AWESOME bacon giveaway!!!
Looking for more great bacon recipes?
To see where I am linking today- visit HERE
Buttermilk Ranch Dip & Easy Back to School Dinner
This is a sponsored conversation written by me on behalf of Tyson. The opinions and text are all mine.
This Buttermilk Ranch Dip is the perfect compliment to your crispy fried chicken or tasty summer salad. It’s so easy to make your own homemade dressing.
As much as love to be in the kitchen, there are times when life takes over & I need to make something quick – but delicious. I certainly don’t want to resort to costly fast food. So I have a handful of “go-to” easy family dinner ideas that come in handy for those crazy schedule evenings.
When making a quick stop into Walmart, I pick up some Tyson® Crispy Chicken Strips.
The family loves them & they make dinner so quick & easy.
I love it for its convenience, 100% all-white meat, 100% natural ingredients & ease of preparation. But I also love it because it is part of the Tyson Project A+™ program along with other Tyson products like Tyson® Fun Nuggets, Tyson® Chicken Nuggets & Tyson® Crispy Chicken Strips. Have you heard about it before? It’s a program where you can nominate your school of choice. It’s one of the simplest ways to support your school. Just clip and collect Tyson Project A+™ labels from Tyson® participating packages. For every label submitted, Tyson will give the school cash and the school can use the money for whatever it needs. Visit Tyson Project A+™ for a chance to win a packet of labels worth $1000 to help the school get a head start on collecting.
Our favorite thing to do with the chicken is whip up a batch of our homemade buttermilk ranch dip. It’s the perfect compliment that the whole family enjoys. Plus it’s so incredibly simple to make. You probably already keep these ingredients in your kitchen.
So what’s your favorite pairing with Tyson® Crispy Chicken Strips?
Be sure to visit walmart.com/TysonProjectAPlus for more info on how you can nominate your school!
Buttermilk Ranch Dip
Ingredients
- 2 tbsp chives - fresh or dried
- 1 tsp garlic powder
- 2 tbsp parsley - dried
- 1 tbsp lemon juice
- 1/2 tsp smoked paprika
- 1/4 tsp black pepper
- 1/2 tsp salt
- 3/4 cup mayonnaise
- 1/4 cup buttermilk
- 3/4 cup sour cream
Instructions
- Combine all ingredients in blender & blend on high for approx 60-90 seconds
- Transfer to airtight container & refrigerate for at least 1 hour to thicken
- *note- to make a thicker dip- increase sour cream & mayonnaise to 1 cup each
Looking for more great dips for your chicken?
Comments submitted may be displayed on other websites owned by the sponsoring brand.
This is a sponsored conversation written by me on behalf of Tyson. The opinions and text are all mine.
To see where I am linking today- visit HERE
Bacon Caramel Kettle Corn
If you love kettle corn & unique popcorn recipes then this Bacon Caramel Kettle Corn is perfect for you. This makes a caramel popcorn recipe AMAZING.
Popcorn recipes
Do you love caramel popcorn? How about kettle corn? Me too – so much so that I had a hard time deciding which I would use for my latest popcorn recipe when planning our family movie time. So I decided to mix the two & add a little extra special too.
You see – I love to pick up a variety of flavors of Pop Secret when I’m at Walmart doing my weekly shopping. We try to have some sort of family time during the week & if it’s a movie, then it always involves popcorn.
Before my son got a job we would have family movie night on the weekends. Now he works until quite late on the weekend & so we have had to shift our movie time to week day afternoons. Which is fine with me – I just have to break away from the studio earlier. I usually grumble about having way too much to do but I’m always so happy once I’m finally sitting with my family & finding a little breather in my week.
RIGHT NOW: Buy any 3 Pop-Secret items between 7/31 – 8/31 and get a Free ticket to the Fantastic Four movie (up to $5) while supplies last!
Seems that the older my kids get the harder it is to get time with all 5 of us together. So I really cherish these times when we can make some goodies, gather around & enjoy each other’s company for a little while.
What’s your favorite thing to make for movie night?
Bacon Caramel Kettle Corn
Ingredients
- 1 pack Pop Secret Sweet 'n Crunchy Caramel
- 1 pack Pop Secret Sweet 'n Crunchy Kettlecorn
- 1/4 cup butter
- 1/2 cup corn syrup
- 1 cup packed brown sugar
- 7 oz sweetened condensed milk
- 1/8 tsp salt
- 1 cup bacon crumbles
Instructions
- Pop both bags of popcorn in microwave to package directions & combine in a large bowl with your bacon crumbles - set aside
- Combine butter, corn syrup, brown sugar, sweetened condensed milk & salt in a saucepan
- Attach a candy thermometer to the side- don't let the tip touch the bottom of the pan- but make sure it's well within the liquid.
- Heat over medium-high -stirring constantly until mixture boils
- Once it boils reduce heat to medium & continue stirring until thermometer reaches 220 degrees
- Remove from heat, carefully remove your thermometer & drizzle mixture over the popcorn
- Fold with a spatula to coat the popcorn & bacon with caramel
- Enjoy immediately - the bacon should not be left out at room temperature for very long. This is best enjoyed at the time of preparation.
This post is part of a social shopper marketing insight campaign with Pollinate Media Group® and Pop Secret, but all my opinions are my own. #pmedia #pop4Fantastic4
Want more great popcorn recipes?
Here are a couple other great popcorn recipes from some great bloggers!
25 Popcorn Recipes – from Reasons to Skip the Housework
100 of the Best Popcorn Recipes from Yellow Bliss Road
To see where I am linking today- visit HERE
Easy Dinner Recipes Meal Plan- Week 6
The Easy Dinner Recipes Meal Plan is brought to you by the best recipe bloggers to make meal time quick, easy & delicious. Follow along each week!
Do you all do meal planning? I sort of did but not to the extent I am now that I have teamed up with these AMAZING food bloggers to bring you these weekly meal plans. I love that I have all these recipes planned & ready to go each week – all I have to do is shop & follow each recipe to bring my family some delicious meals. They are sure loving it too because we never have the same thing & we are finding some truly incredible recipes. We are already making our list of which ones we will share with our next guests.
So let’s get on with the plan for the week – SEVEN meals along with a dessert this week! Take a look!
Slow Cooker Chinese Pork from Just Us Four
Asian Marinated Grilled Shrimp Skewers from This Silly Girl’s Life
Crockpot Chicken Florentine from Kleinworth & Co.
Quick Homemade Chicken Noodle Soup from Play.Party.Pin
Slow Cooker Buffalo Chicken Lettuce Wraps from Domestic Superhero
Blueberry Chipotle BBQ Glazed Pork Tenderloin from Eazy Peazy Mealz
Mustard Balsamic Chicken Kabobs from Just Us Four
Rocky Road Cupcakes from Living Better Together
The Easy Dinner Recipes Meal Plan brought to you by:
Domestic Superhero – Just Us Four – Living Better Together
Kleinworth & Co. – This Silly Girl’s Life – Eazy Peazy Mealz – Play.Party.Pin
There you go. I hope this gave you some great inspiration for this week ahead. I hope you stop by next week for some more meal plan ideas and inspiration!
Looking for more great dinner ideas?
To see where I am linking today- visit HERE
Bacon Banana Split
This Bacon Banana Split is the most over the top banana split dessert ever! One of my favorite bacon recipes because of it’s salty sweet combo, it’s delicious
Bacon month continues & this has got to be my all time favorite way to take my bacon in the oven & turn it into something so delicious that I can’t get enough! I wanted this to really be an over the top banana split for adults. So I chose to pass on things like rainbow sprinkles & traditional banana split flavors. Instead, I chose to use butter pecan & salted caramel ice cream along with a rich vanilla bean. Then I topped it with homemade dulce de leche – whipped cream & of course I still had to have my cherry with all those bacon crumbles.
All that salty & sweet come together like nothing ever before. Even my hubs (who claims to be anti “sweet with meat”) was LOVING this creation. I’m not sure why he doesn’t like things like syrup touching his bacon or sausage during breakfast. But this is somehow quite different for him because he was having a hard time sharing with me. I however happen to love mixing bacon with sweet & savory dishes – so stay tuned for more fabulous bacon recipes to come this month. I have a few that I CAN’T WAIT to share with you!!!
But for now- check out this crazy, over the top banana split that I know you will LOVE!
Bacon Banana Split
Ingredients
- 2-3 bananas per boat depending on the size of each boat
- 1 scoop each ice cream flavor - butter pecan vanilla bean & salted caramel
- 2 tbsp salted peanuts
- 2 tbsp dulce de leche
- Whipped cream
- 3 tbsp bacon crumbles
- 1 cherry
Instructions
- Peel bananas & slice them lengthwise - place in boat
- Top with ice cream, followed by dulce de leche, then peanuts, whipped cream, bacon & cherry
- ENJOY!!
Don’t forget to grab all these other FABULOUS bacon recipes by my fellow bacon month bloggers!!
Chocolate Peanut Butter Bacon Cake
Roasted Brussels Sprouts with Bacon and Almonds
Looking for more bacon recipes?
Check out some great bacon recipes from my friends:
50 Maple Bacon Dessert Recipes
Slow Cooker Cheesy Bacon Ranch Potatoes
To see where I am linking today- visit HERE
Mint Chocolate Chip Ice Cream
Need an easy no-bake dessert to wow your crowd? This homemade Mint Chocolate Chip Ice Cream is so easy & beyond delicious! Perfect for mint chocolate lovers everywhere!
I know we are nearing the end of frozen treat season. At least here in North Idaho anyway. By the end of the month, our highs typically don’t even reach 80 degrees anymore.
It’s sort of sad because I have to stop sharing all these delicious frozen desserts with you all. But at the same time, I’m excited because I have SO MANY fall recipes headed your way. But before we get to that- you have to make this Mint Chocolate Chip Ice Cream.
Scroll to the bottom for the Printable Recipe
Peanut Butter & Jelly Arepas
I participated in an Ambassador Program on behalf of Influence Central for P.A.N. Cornmeal. I received product samples as well as a promotional item to thank me for my participation.
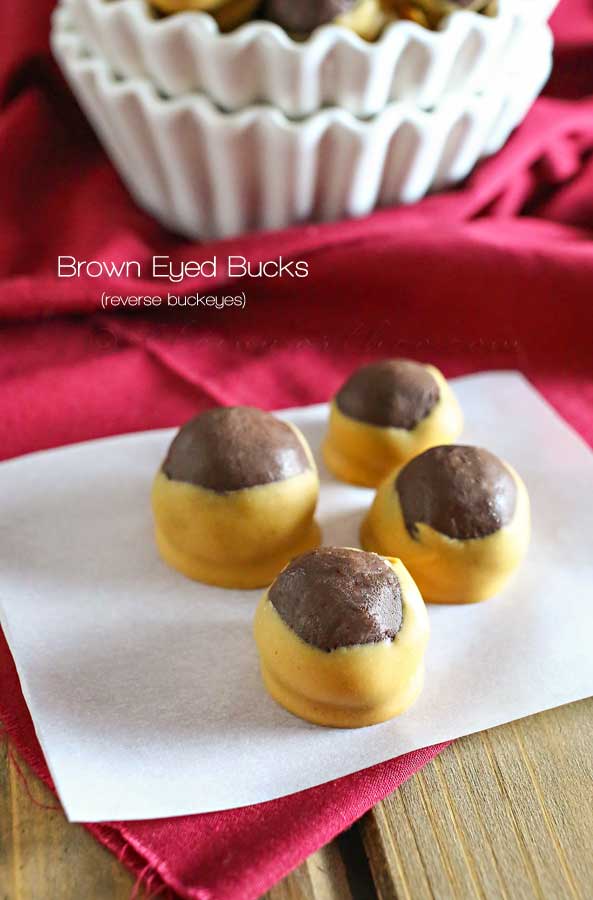
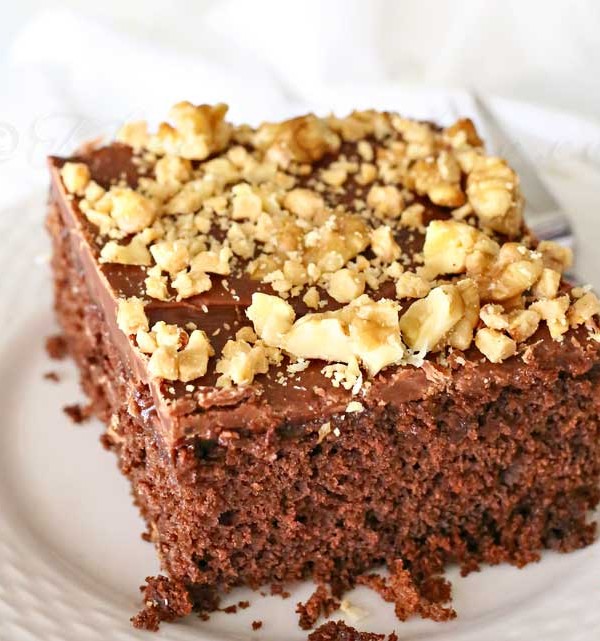
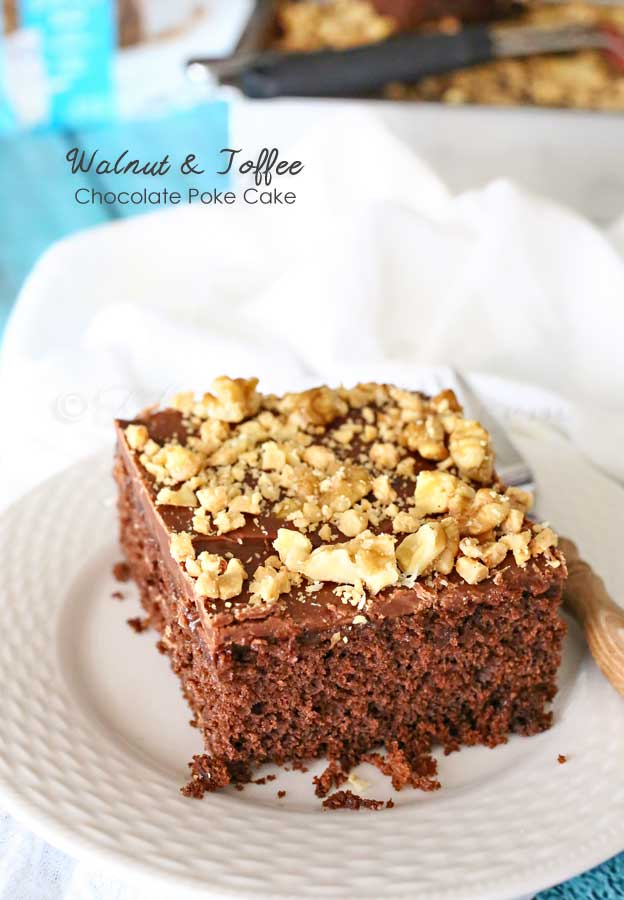
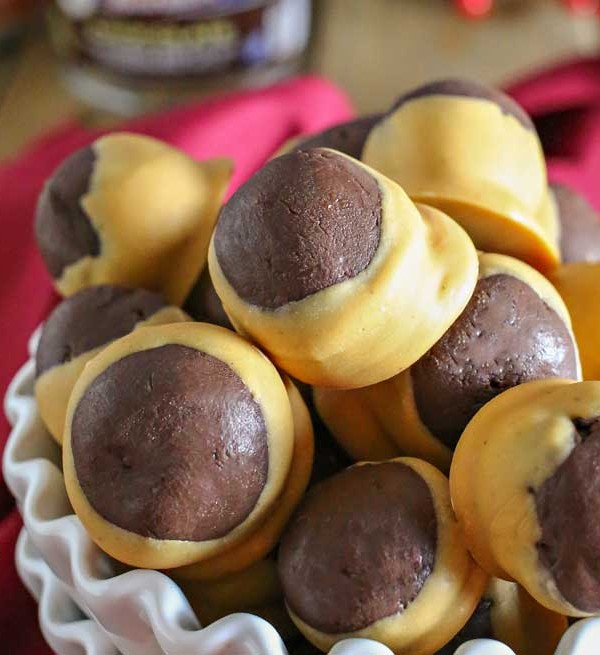
An American twist on the classic Venezuelan dish, these Peanut Butter & Jelly Arepas are absolutely divine. Great easy recipe sandwich alternative.
Have you ever had arepas? They are a classic Venezuelan recipe made with white cornmeal like you see above, that is so versatile. Typically prepared like a grilled cheese or even stuffed full of meat & other great sandwich add-ins that are delicious.
Instead of preparing one of those, I decided to put an all-American twist on it. You see, in my research of them I saw that someone mentioned how great these were in place on English muffins for breakfast. I just couldn’t shake that urge to add some jam to a couple, so I just had to make a good ol’ PB&J. It’s was absolutely delicious!!!
As I mentioned, I used my favorite, P.A.N. Cornmeal, which was founded & is based in Venezuela. Great versatility & excellent flavor, this cornmeal is fabulous! It’s definitely a pantry staple. It’s existed for many years but just recently made it’s way to the U.S. — For more great recipes using P.A.N Cornmeal -visit P.A.N. on Tumblr
What would you stuff into your arepas?
Peanut Butter & Jelly Arepas
Ingredients
- 2 cups white cornmeal
- 2 cups warm water
- 1 tsp vegetable oil
- 1 tsp salt
- 3-4 tbsp peanut butter
- 3-4 tbsp homemade jam/jelly
Instructions
- In a medium bowl, combine white corn meal, oil & salt
- Add the water slowly until it absorbs
- Mix with your hands until dough forms, kneading until smooth & manageable
- Form a large ball & then section into about 6 equal parts
- For those 6 equal parts into smooth patties
- Place on preheated griddle & cook on medium to low heat until golden brown (7-10 minutes each side)
- Remove & cool on wire rack
- Once they are cool enough to handle but still slightly warm, split the open & add in your peanut butter & jelly
- Enjoy
Looking for more great cornmeal recipes?
White Cornmeal Shortbread Bars
To see where I am linking today- visit HERE
Pineapple Cooler
This Pineapple Cooler is the perfect beverage for those tropical drink cravings. Creamy pineapple whip up into this slushy goodness- it’s divine!
It’s no secret, I love all things tropical. Pineapple & coconut are my “go-to” flavors. I literally can’t get enough. So it’s no surprise that I have been making a pitcher of these pineapple coolers all summer long. The great taste of pineapple whipped with some creamy goodness & ice makes for a delicious cool down.
I was in tropical heaven with each & every sip. I did make sure to share with the kids. They LOVE it. In fact, it’s time to whip up some more for the week & they have not forgotten to remind me.
It’s so incredibly good. A few times I added coconut milk instead of half & half – made for a great virgin pina colada twist every once in a while. DELICIOUS! Definitely my all time favorite drink.
Pineapple Cooler
Ingredients
- 2 cups chunked pineapple
- 2-½ cups ice
- ½ cup half & half
- ¼ cup confectioners sugar
- Additional pineapple chunks for garnish opt
Instructions
- Place all ingredients in blender & blend on high speed for at least 90-120 seconds or until all ice is crushed & mixture is like a slushie.
- Garnish with additional pineapple chunk if desired
- Enjoy immediately.
Looking for more great drink recipes?
To see where I am linking today- visit HERE
DIY Notebook Organizer
This shop has been compensated by Collective Bias, Inc. and its advertiser. All opinions are mine alone. #SchoolYearReady #CollectiveBias
This easy to make DIY Notebook Organizer is the perfect craft to keep all those back to school papers in order. Simple & quick project to make with the kids.
Keeping paper organized in our homeschooling home is the largest task each year. I have most everything dialed out but the paper the kids use & create with is overwhelming. I’m all about using what I have on hand whenever possible. So in taking an inventory of my supplies, I decided that I would make them some notebook organizers with some simple supplies to help wrangle in the volume of projects they have in their work spaces.
I started out with a handful of file folder, some thick bakers twine, Scotch® Magic™ tape, Scotch® Transparent Tape, Scotch® Tape Dispenser, Post-it® Notes. I then also added some thin cardboard (2 pieces), a little wrapping paper & some thick brown paper.
I started with taping the sides of the folders closed using Scotch® Transparent Tape.
Then I covered the cardboard pieces with the wrapping paper also utilizing my Scotch® Transparent Tape.
In order to give room for additional folders or larger items to be added to the folder I decided to add a “spacer” of thick brown paper to work as the book binder portion of the organizer. I just cut a piece in a rectangle the length to fit the folders & to my desired width & just taped it to my cardboard pieces.
Then I taped a couple of the file folder pockets I created earlier to each of the inside cardboard folder covers. Then I taped additional folder pockets to those folders shifting them down just a little so they were offset.
I used Post-it® Notes on the file tabs so that my daughter can easily change out what she wants the tabs to say. Sticks securely, yet removes cleanly.
I wanted her to be able to keep it closed so I measured off a long piece of bakers twine.
I poked two holes in the binding paper & threaded the twine through. Then I placed a piece of Scotch® Transparent Tape over it on the inside to make sure it stayed in place.
You can see how the files are attached together here. She has plenty of compartments to store & organize all her drawings.
She had this filled so quickly. Good thing I made this with plenty of room to expand & add more folders.
I picked up my Scotch® Magic™ tape, Scotch® Transparent Tape, Scotch® Tape Dispenser, Post-it® Notes at Walmart in the packing supplies/stationary aisle. You can also find them in the seasonal area.
I’ve shared how we’re using Scotch® Tape products to get ready for Back To School!
What project would you use them for?
Looking for more Back to School ideas to make with the kids?
To see where I am linking today- visit HERE